

Wenn Sie sich einen Syntax-Markierer für Ihre Website oder Ihre Lieblings-IDE zulegen möchten, werden Sie schnell feststellen, dass viele Optionen zur Verfügung stehen. Die Auswahl, welche verwendet werden soll, kann eine entmutigende Aufgabe sein.
Heute erleichtern wir Ihnen den Prozess der Auswahl mit einer Zusammenfassung der wichtigsten Angebote in den Bereichen JavaScript-basierte Syntax-Highlighter, WordPress-Plugins sowie IDE-Erweiterungen und Pakete für Sublime Text, Brackets und Atom.
JavaScript-basierte Textmarker
Ein großer Teil der Auswahl eines JavaScript-unterstützten Syntax-Highlighter besteht darin, zu sehen, wie er die Sprachen färbt und formatiert, mit denen Sie arbeiten möchten. Um diesen Teil der Gleichung zu unterstützen, haben wir eine Live-Demo für jeden der in diesem Artikel beschriebenen Textmarker erstellt. Für jeden Textmarker gibt es drei Beispielthemen. Sie können sich die gesamte Demo auf Github ansehen.
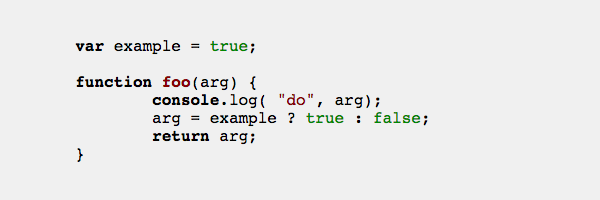
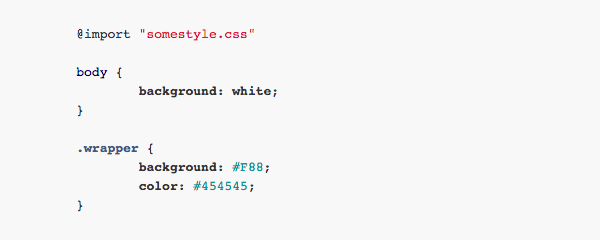
Die Sammlung von Textmarkern, die wir betrachten werden, unterstützt eine breite Palette von Sprachen zwischen ihnen. Da wir jedoch eine Webdesign-Community sind, zeigen unsere Demos, wie die Textmarker mit den von Web-Designern verwendeten Sprachen umgehen:
- HTML
- JavaScript
- CSS
- PHP
- Markdown
- CoffeeScript
- Handlebars
- Jade
- LESS
- Sass
- Stylus
Alle Demos zeigen, wie jede dieser Sprachen unter dem betreffenden Textmarker aussieht, unabhängig davon, ob sie eine für diese Sprache spezifische Unterstützung hat. Wenn kein sprachspezifischer Textmarker verfügbar ist, greift die Demo auf das nächstmögliche Äquivalent oder auf Klartext zurück.
Neben den Demos erhalten Sie auf einen Blick einen Screenshot jedes Textmarkers, eine knappe Version der Bereitstellung, eine Zusammenfassung der wichtigsten Punkte, gegebenenfalls zusätzliche Informationen und Links zu der Liste der unterstützten Sprachen , Website und GitHub-Repository.
1. SyntaxHighlighter
SyntaxHighlighter gibt es seit 2004 und ist sehr vertraut. Seine 23 unterstützten Sprachen sind mehr Programmiersprachen als Webdesign-orientiert, so dass dies für eine Website zum Programmieren gut geeignet ist, weniger jedoch für eine Website zum Webdesign. Es stehen sieben Themen zur Auswahl.


Bereitstellungsmethode
- Laden Sie eine JavaScript-Kerndatei und anschließend eine zusätzliche JavaScript-Datei für jede Sprache, die Sie hervorheben möchten.
- Laden Sie eine zentrale CSS-Datei und dann eine zusätzliche CSS-Datei für das Design, das Sie verwenden möchten.
- Führen Sie am Ende Ihrer Seite die JavaScript-Funktion
SyntaxHighlighter.all()aus. - Schließen Sie Codeblöcke in ein
pre-Element ein und verwenden Sie den Klassennamen, um die Sprache anzugeben:
1 |
<pre class="brush: js"> |
2 |
// code here |
3 |
</pre>
|
Links
2. Prism
Ein großer Vorteil der Verwendung von Prism ist, dass Sie einen benutzerdefinierten Build herunterladen können, der nur das enthält, was Sie benötigen. Es bietet auch eine starke Unterstützung für die in unseren Demos verwendeten Webdesign-Sprachen sowie für viele andere Sprachen. Für eine Website, die mit Webdesign zu tun hat, ist dies ein starker Konkurrent, jedoch bedeutet die große Anzahl unterstützter Sprachen, dass sie auch auf anderen Websites in Bezug auf andere Codierungsarten gleich gut funktioniert. Es stehen sechs Themen zur Auswahl.


Kundenspezifisches Download-System
Prism unterstützt 61 Sprachen, einschließlich aller Webdesign-Sprachen, die wir in unseren Demos verwenden. Wenn Sie Prism herunterladen, müssen Sie jedoch nicht alle diese Sprachen einführen. Sie können nur die auswählen, die Sie benötigen. Sie können auch das Design auswählen, das Sie verwenden möchten. Anschließend werden das erforderliche JavaScript und CSS für Sie generiert.
Nachdem Sie das gewünschte Design und die gewünschten Sprachen ausgewählt haben, laden Sie Ihre JS- und CSS-Dateien unten auf der Download-Seite herunter.
Wenn Sie ein anderes Design verwenden möchten, nehmen Sie einfach eine neue Designauswahl oben auf der Seite vor und laden Sie das neu generierte Stylesheet herunter.
Bereitstellungsmethode
- Laden Sie die JavaScript-Datei und die CSS-Datei aus Ihrem benutzerdefinierten Build.
- Umhüllen Sie jeden Codeblock in ein
pre-Element und anschließend in eincode-Element, indem Sie die Klasse descode-Elements verwenden, um die Sprache anzugeben:
1 |
<pre>
|
2 |
<code class="language-javascript"> |
3 |
// code here |
4 |
</code>
|
5 |
</pre>
|
Links
3. Highlight.js
Highlight.js verfügt über die größte Anzahl unterstützter Sprachen und Designs, mit einem ziemlich erheblichen Vorsprung und einen großartigen Prozess zum Herunterladen eines benutzerdefinierten Builds mit den gewünschten Sprachen. Die automatische Spracherkennung ist eine weitere sehr wichtige Funktion. Bei einer derart großen Auswahl an Sprachen und Themen scheint dieser Markierer für fast jeden Anwendungsfall geeignet zu sein.


Highlight.js - Railscasts-Stil (js)Highlight.js enthält eine große Anzahl von Stilen (Designs), von denen alle 54 im Download enthalten sind, und einige davon entsprechen gängigen IDE-Designs wie Monokai und Railscasts. Angesichts der Anzahl der enthaltenen CSS-Dateien möchten Sie möglicherweise nur die Designs, die Sie verwenden, in Ihr Projekt kopieren.
Die Liste der unterstützten Sprachen ist ebenfalls umfangreich. Ich zählte derzeit 118, einschließlich aller unserer Demo-Webdesign-Sprachen.
Wenn Sie Highlight.js herunterladen, können Sie auswählen, welche dieser Sprachen Sie verwenden möchten, und diese werden in einer einzigen JavaScript-Datei für Sie gepackt.
Bereitstellungsmethode
- Laden Sie die heruntergeladene Javascript-Datei und die CSS-Datei für Ihr ausgewähltes Thema.
- Führen Sie am Ende Ihrer Seite die JavaScript-Funktion
hljs.initHighlightingOnLoad();aus. - Wickeln Sie jeden Codeblock in ein
pre-Element und dann in eincode-Element ein. Die Spracherkennung erfolgt automatisch, jedoch können Sie bei Bedarf die Klasse descode-Elements verwenden, um die Sprache anzugeben:
1 |
<pre>
|
2 |
<code>
|
3 |
// code here |
4 |
</code>
|
5 |
</pre>
|
6 |
|
7 |
OR... |
8 |
|
9 |
<pre>
|
10 |
<code class="language-javascript"> |
11 |
// code here |
12 |
</code>
|
13 |
</pre>
|
Links
4. Rainbow
Rainbow ist ein kleiner Syntax-Highlighter, der erweiterbar und themenfähig ist. Er ist daher eine gute Wahl für alle, die Anpassungen vornehmen möchten. Unter bestimmten Umständen kann die Verwendung von data-language zum Angeben der Sprache anstelle einer Klasse bevorzugt werden. Es stehen 14 Themen zur Verfügung, wobei einige beliebte IDE-Themen wie Monokai, Solarized und Tomorrow Night übereinstimmen.


Rainbow bietet eine solide Auswahl an Hauptsprachen. Sie können entscheiden, welche Sie beim Download verwenden möchten.
Bereitstellungsmethode
- Laden Sie die Rainbow-Hauptdatei von Rainbow und die CSS-Datei für Ihr ausgewähltes Thema.
- Laden Sie eine zusätzliche JavaScript-Datei für jede Sprache, die Sie hervorheben möchten
- Wickeln Sie jeden Codeblock in ein
pre-Element und dann in eincode-Element ein. Verwenden Sie das Attributdata-languagefür das Codeelement, um die Sprache anzugeben:
1 |
<pre>
|
2 |
<code data-language="javascript"> |
3 |
// code here |
4 |
</code>
|
5 |
</pre>
|
Links
5. SHJS
SHJS ist wie SyntaxHighlighter ein Paket, das sich mehr auf Programmiersprachen als auf Webdesignsprachen konzentriert. Es unterstützt 39 Sprachen und verfügt über 39 verfügbare Themen.


Bereitstellungsmethode
- Laden Sie die SHJS-JavaScript-Hauptdatei und die CSS-Datei für Ihr ausgewähltes Design.
- Laden Sie eine zusätzliche JavaScript-Datei für jede Sprache, die Sie hervorheben möchten
- Führen Sie die Funktion
sh_highlightDocument();aus. Verwenden Sie entwederonloadfür das öffnendebody-Tag oder jQuery, um herauszufinden, wann das Dokument fertig ist. - Wickeln Sie jeden Codeblock in ein
pre-Element ein. Verwenden Sie die Klasse despre-Elements, um die Sprache anzugeben:
1 |
<pre class="sh_javascript"> |
2 |
// code here |
3 |
</pre>
|
Links
6. Google Code Prettify
Code Prettify unterstützt 29 Sprachen, wiederum mit starker Neigung zu Programmiersprachen und weniger Unterstützung für Webdesign-Sprachen. Mit dem Autoloader mit einer einzigen URL können Sie das Herunterladen von JS- oder CSS-Dateien vermeiden und alles über CDN laden. Das ist sicherlich ein schneller und einfacher Weg. In der Lage zu sein, die Angabe von Sprachen zu überspringen, anstatt nur die Klasse prettyprint auf pre-Elemente anzuwenden, kann ebenfalls Zeit sparen.


Bereitstellungsmethode
- Laden Sie eine einzelne URL
https://cdn.rawgit.com/google/code-prettify/master/loader/run_prettify.jsüber ein Skript-Tag, das die Syntax-Highlighter und das Standarddesign automatisch lädt. - Wenn Sie ein nicht standardmäßiges Design verwenden möchten, hängen Sie den Namen wie folgt an die Autoloader-URL an:
run_prettify.js?skin=sunburst - Die Spracherkennung erfolgt automatisch. Um einen Codeblock als hervorzuheben zu kennzeichnen, wickeln Sie ihn in ein
pre-Element mit der Klasseprettyprintein:
1 |
<pre class="prettyprint"> |
2 |
// code here |
3 |
</pre>
|
Links
WordPress-Plugins
Bitte beachten Sie, dass es im WP-Repository einige Syntax-Highlighter-Plugins gibt, die zwar recht beliebt sind, jedoch in diesem Artikel nicht behandelt werden. Der Grund dafür ist ein aktuelles WP-Problem, bei dem viele Plugins aktualisiert werden mussten, um die Sicherheit zu gewährleisten. Zum Zeitpunkt der Erstellung dieses Dokuments werden alle unten aufgeführten Plugins aktiv verwaltet und sind mit der neuesten Version von WordPress kompatibel.
TIPP: Bei der Hervorhebung von WordPress-Syntaxhervorhebungen kann das aktive Design das beabsichtigte Erscheinungsbild des Codes beeinträchtigen. Wenn ein Block hervorgehobenen Codes nicht ganz richtig aussieht, versuchen Sie es mit einem kurzen Themenwechsel, um zu sehen, ob dies möglicherweise das Problem ist. Möglicherweise müssen Sie Ihrem Design ein wenig benutzerdefiniertes CSS hinzufügen, um auftretende Konflikte zu überwinden.
7. SyntaxHighlighter entwickelt
SyntaxHighlighter Evolved ist eine Implementierung von SyntaxHighlighter, dem JavaScript-basierten Highlighter, den wir oben betrachtet haben.
Sobald das Plugin installiert und aktiviert ist, wird es in einem Beitrag bereitgestellt, indem Wrapper-Shortcodes für den Code verwendet werden, den Sie hervorgehoben haben möchten. Zum Beispiel:
1 |
[code language="html"] |
2 |
<header>
|
3 |
<h1>Example HTML</h1> |
4 |
</header>
|
5 |
<main class="style"> |
6 |
<p>Some text</p> |
7 |
</main>
|
8 |
[/code] |
Verwendungs-Tipps
Wenn Sie mit dem Erstellen eines neuen Beitrags beginnen, entscheiden Sie im Voraus, ob Sie den Modus "Visual" verwenden oder nicht. Wenn Sie den "Visual"-Modus verwenden, müssen Sie den Code, den Sie hervorheben möchten, im "Visual"-Modus einfügen und nicht in den "Text"-Modus. Wenn Sie Ihren Code im "Visual"-Modus eingeben, wird der Code nicht verwendet,< und >-Zeichen werden in HTML-Entitäten wie < und >
Wenn Sie im "Visual"-Modus arbeiten, ist es eine gute Idee, zuerst die Eröffnungs- und Schließungskürzel und dann den Code dazwischen hinzuzufügen. Das hilft sicherzustellen, dass Ihr Code während des Speicherns nicht beschädigt wird.
Links
8. Crayon-Syntax-Highlighter
Crayon Syntax Highlighter ist eine PHP-basierte Lösung. Obwohl es hauptsächlich für die Verwendung als WordPress-Plugin konzipiert ist, bezeichnet es sich selbst als für jede PHP-basierte Plattform geeignet.
Die Verwendung von Crayon in Ihren Posts ist sehr intuitiv, da Sie Ihrer Post-Editing-Symbolleiste eine Schaltfläche hinzufügen, die ein Fenster zum Erstellen von hervorgehobenem Code öffnet. Ihnen steht ein Bereich zum Einfügen Ihres Codes, eine Dropdown-Liste zur Auswahl der verwendeten Sprache und mehrere andere Optionen zur Verfügung, die viele verschiedene Aspekte der Codeanzeige steuern.


Eine der verfügbaren Optionen ist eine Auswahl verschiedener Designs, die pro Codeblock verwendet werden können. Das bedeutet, dass Sie mehrere Designs pro Seite verwenden können.


Es hat eine sehr lange Liste von unterstützten Sprachen, insgesamt sind es derzeit 63, darunter viele, die häufig im Webdesign verwendet werden. Um die Liste der Sprachen anzuzeigen, müssen Sie das Plugin auf einer WordPress-Site installieren und sich die Einstellungsseite im Admin-Bereich ansehen.
Links
9. Prism Syntax Highlighter für WordPress
Prism Syntax Highlighter für WordPress ist eine Implementierung des JavaScript-Highlighter von Prism, den wir zuvor behandelt haben.
Dieses Plugin verwendet weder Wrapper-Shortcodes noch ein Fenster zum Code hinzufügen. Stattdessen erstellen Sie für jeden Codeblock, den Sie anzeigen möchten, ein neues entsprechend benanntes benutzerdefiniertes Feld, z.B. js_code_example, und fügen Sie Ihren Code hinzu. Der Zweck dieses Ansatzes ist sicherzustellen, dass Ihr Code nicht durch den WP-Post-Editor beeinträchtigt wird.
Um den Code aus Ihrem benutzerdefinierten Feld anzuzeigen, verwenden Sie einen Kurzcode, der den Namen des benutzerdefinierten Felds und die Sprache enthält, die hervorgehoben werden soll, z.B.
1 |
[prism field=js_code_example language=javascript] |
Links
IDE-Erweiterungen und -Pakete
In diesem Abschnitt werden drei beliebte IDEs betrachtet: Sublime Text, Brackets und Atom. Wir werden nicht die eingebaute Syntax-Highlighter von einer dieser drei Möglichkeiten behandeln, die in vielen Fällen standardmäßig ausreichend ist.
Stattdessen werden wir die verfügbaren Erweiterungen und Pakete durchgehen, um die Syntax-Highlighting mit jeder zu erweitern. Wenn Sie feststellen, dass die Standardhervorhebung in einem dieser IDEs nicht Ihren Anforderungen entspricht, können Sie direkt in diese Liste springen und die richtige Erweiterung oder das richtige Paket für Sie finden.
Hinweis: Überall, wo es mehrere feste Optionen gibt, um eine bestimmte Sprache hervorzuheben, haben wir einige kurze Informationen bereitgestellt, mit denen Sie entscheiden können, welche am besten zu Ihnen passt. Wenn Sie jedoch keine zusätzlichen Informationen zu einem Paket sehen, können Sie davon ausgehen, dass wir die verfügbare Auswahl bereits geprüft und die herausragende Auswahl nominiert haben.
Erhabene Textpakete
Es ist an der Zeit, einige Sublime Text-Pakete zu behandeln, die das Syntax-Highlighting für Ihre bevorzugten Sprachen verbessern. Wir werden eine Reihe von Beispielen behandeln, beginnend mit Markdown-Highlighter.
Hinweis: Alle folgenden Screenshots verwenden das Spacegrey-Design.
10. Markdown erweitert
Dieses Paket ist das Paket, das ich persönlich in Sublime Text verwende, da es im Erscheinungsbild mit der übrigen Codierungsumgebung konsistent bleibt.


Links
11. MarkdownLight
MarkdownLight ändert die Farbe Ihres Dokuments in Weiß, ändert jedoch nicht die Anzeige Ihres Markdown-Codes über das Einfärben und Kursivieren hinaus.


Links
12. MarkdownEditing
MarkdownEditing unterscheidet sich stark von den beiden anderen Paketen. Es zentriert den Code auf der Seite und konvertiert > Blockmarkierungen in einen dicken linken Seitenrand. Mit diesem Paket sieht Ihre IDE aus wie ein Post-Editor. Sie eignet sich daher gut, wenn Sie Sublime Text als Werkzeug zum Schreiben von Inhalten verwenden.


Links
13. Lenker
Nun ist es Zeit für ein paar Lenker. Dieses Paket funktioniert auch in Atom Editor. Wenn Sie also sowohl Atom als auch Sublime Text verwenden, können Sie mit beiden vertraut sein.


Links:
14. Jade
Jade ist an der Reihe, einige Verbesserungen zu erzielen (wie Sie wissen, Ich bin ein bisschen Jade-Fan).


Links
15. CSS3
Dieses Paket verbessert die Syntax-Highlighter für einige der neueren CSS-Ergänzungen. Es ersetzt das frühere CSS3_Syntax-Paket für Sublime Text 2.


Links
16. Stylus


Links
17. Sass
Dieses Paket enthält Highlighting für Sass und SCSS sowie Kurzbefehle für die Zen-Codierung.


Links
18. Syntax-Highlighting für Sass
Der Unterschied zwischen dem oben genannten "Sass" -Paket und diesem Paket ist aus einem Screenshot nicht ersichtlich, da die signifikantere Abweichung darin besteht, wie jedes einzelne Paket die Autovervollständigung behandelt. Wenn Sie viel Zeit mit dem Schreiben von Sass verbringen, empfiehlt es sich, jedes dieser Pakete gründlich zu testen, um herauszufinden, welches für Ihren Arbeitsablauf am besten geeignet ist.


Links
19. LESS


Links
20. Better CoffeeScript


Links
Klammern-Erweiterungen
Brackets hat viele, viele Syntax-Hervorhebungserweiterungen, zum gegenwärtigen Zeitpunkt sind sie jedoch eher für Programmiersprachen als für Webdesignsprachen gedacht.
Das ist im Wesentlichen darauf zurückzuführen, dass die IDE bereits eine integrierte Unterstützung für das Hervorheben vieler Sprachen bietet, einschließlich derjenigen, die Sie wahrscheinlich als Teil des Webdesigns verwenden. Einige Ausnahmen sind Lenker, Jade, CoffeeScript und Stylus. Die ersten drei Erweiterungen zur Syntaxhervorhebung sind unten aufgeführt. Leider konnte zu diesem Zeitpunkt keine starke Syntax-Highlighting-Erweiterung für Stylus gefunden werden.
Die folgenden Screenshots verwenden alle das Standard-Brackets-Design - und wir beginnen wieder mit Handlebars.
21. brackets-handlebars-templates
Der Unterschied bei der Hervorhebung von Handlebars vor und nach der Installation dieser Erweiterung stört Sie nicht, da sie bei den HTML-Tags etwas untergeht. Wenn Sie jedoch den spezifischen Code der Lenkstange direkt vergleichen, werden die Farbänderungen darin angezeigt.


Links
22. jade-brackets
Das ist das offizielle Jade-Highlighting-Plugin für Brackets, das von der Person gepflegt wird, die Jade verwaltet. So können Sie sicher sein, dass es auf dem neuesten Stand ist!


Links
23. Brackets CoffeeScript


Links
Atom-Pakete
Atom hat wahrscheinlich die stärkste Standard-Syntax-Hervorhebung aller drei IDEs, die wir hier heute behandelt haben. Für die meisten Sprachen, die Sie für das Webdesign verwenden, benötigen Sie nur die integrierte Hervorhebung. Für Jade und Stylus gibt es jedoch ein paar Empfehlungen.
24. language-jade


Links
25. Stylus


Links
Einpacken
Für JavaScript-Textmarker und WordPress-Plugins ist der beste Ansatz, indem Sie zunächst die Liste der unterstützten Sprachen auschecken. Vergleichen Sie nach der Auswahl der Markierungen, die die anzuzeigenden Sprachen unterstützen, die anderen Funktionen, um Ihre Entscheidung zu treffen.
Bei IDE-Erweiterungen und -Paketen sind alle oben aufgeführten Optionen solide und werden häufig verwendet, sodass Sie nicht zu viel falsch machen können.
Wenn Sie nicht sicher waren, welchen Weg die Syntax-Highlighting für Ihre Website oder IDE vorgehen sollte, ist der Weg nach vorne hoffentlich jetzt viel klarer für Sie!
 By
By


