


In a previous tutorial you learned how to create a responsive handmade SVG form. Today, we’ll go a step further and make it dynamic.


I’ll explain how to integrate this form with WordPress using Contact Form 7 (CF7), arguably the most popular WordPress form plugin.
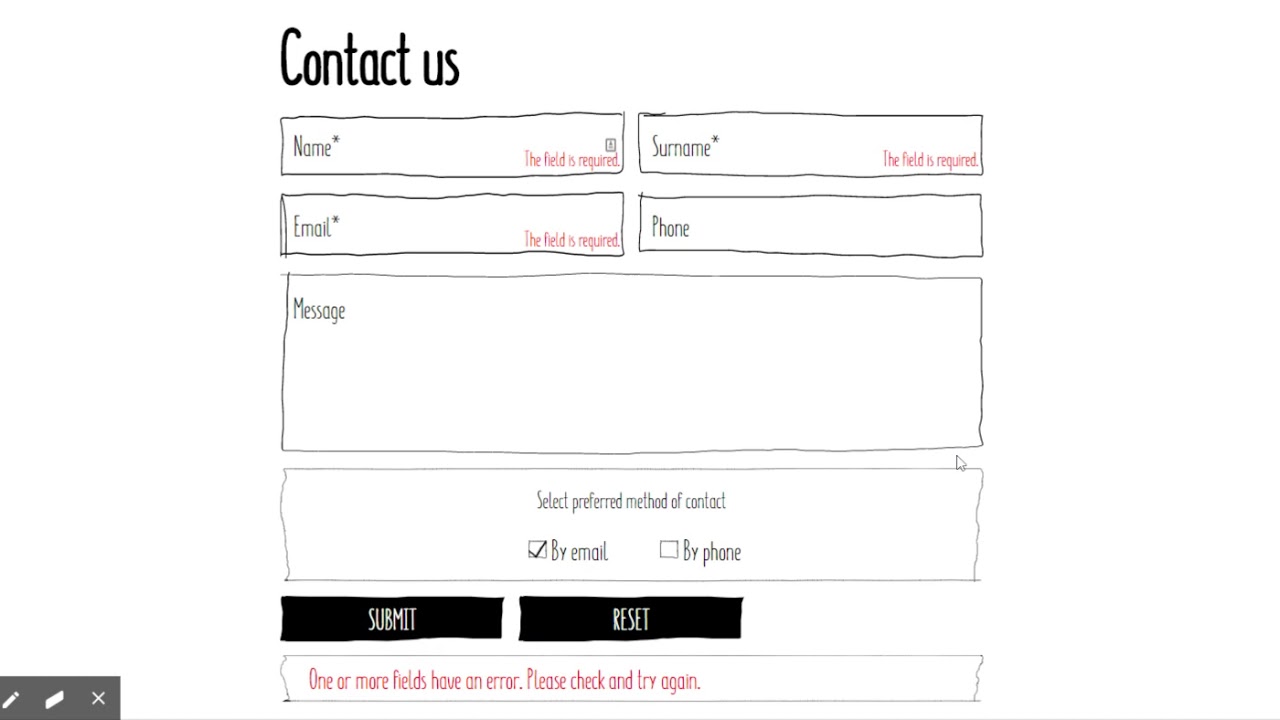
What We’ll be Building
Here’s a quick video demo of the WordPress form in action:
Note: This tutorial assumes that you are somewhat familiar with WordPress and Contact Form 7.
Assuming that you’ve installed CF7 to a WordPress project, let’s discuss the steps needed for making the form compatible with this plugin.
1. Include SVG Sprites
To begin with we have to include the SVG sprites in our project.
In the previous tutorial we used a single <svg> element containing all the various elements we needed as <symbol>s, each with a unique id. Whenever we needed one of the elements in our form we’d do so with a <use> element, referencing the id like so:
1 |
<svg>
|
2 |
<use xlink:href="#checkbox_empty"></use> |
3 |
</svg>
|
Now, within our WordPress theme, we’ll create a new PHP file to hold the SVG sprite markup:


We’ll then incorporate this SVG content just after the opening body tag in our theme’s header.php:


2. Create the Contact Form
The second step is to create the form from within WordPress.


We’ll use a combination of CF7 shortcodes along with some custom HTML.
Two things are important here:
- Firstly, if you look at the previous tutorial, all form child elements are wrapped within the
.handmade-formand.containerwrapper elements. Later, when we call the form, we’ll attach these wrapper classes directly to theformelement. - Secondly, we cannot 100% recreate the markup for the custom checkboxes with the available CF7 shortcodes. To overcome this limitation we’ll write some custom JavaScript. Plus, for easier manipulation, the
.checkbox-listwon’t remain aul, but we’ll convert it into adiv.
Here’s the code that we have to add to the CF7 editor:
1 |
<h1>Contact us</h1> |
2 |
<ul>
|
3 |
<li class="grid grid-2"> |
4 |
<div class="form-wrapper"> |
5 |
[text* your-name placeholder "Name*"] |
6 |
<svg>
|
7 |
<use xlink:href="#input1"></use> |
8 |
</svg>
|
9 |
</div>
|
10 |
<div class="form-wrapper"> |
11 |
[text* your-surname placeholder "Surname*"] |
12 |
<svg>
|
13 |
<use xlink:href="#input2"></use> |
14 |
</svg>
|
15 |
</div>
|
16 |
</li>
|
17 |
<li class="grid grid-2"> |
18 |
<div class="form-wrapper"> |
19 |
[email* your-email placeholder "Email*"] |
20 |
<svg>
|
21 |
<use xlink:href="#input3"></use> |
22 |
</svg>
|
23 |
</div>
|
24 |
<div class="form-wrapper"> |
25 |
[tel your-phone placeholder "Phone"] |
26 |
<svg>
|
27 |
<use xlink:href="#input4"></use> |
28 |
</svg>
|
29 |
</div>
|
30 |
</li>
|
31 |
<li class="form-wrapper"> |
32 |
[textarea your-message placeholder "Message"] |
33 |
<svg>
|
34 |
<use xlink:href="#textarea"></use> |
35 |
</svg>
|
36 |
</li>
|
37 |
<li class="form-wrapper"> |
38 |
<fieldset>
|
39 |
<legend>Select preferred method of contact</legend> |
40 |
<div class="checkbox-list"> |
41 |
[radio contact-method default:1 "email" "phone"] |
42 |
</div>
|
43 |
<svg>
|
44 |
<use xlink:href="#fieldset"></use> |
45 |
</svg>
|
46 |
</fieldset>
|
47 |
</li>
|
48 |
<li class="grid grid-3"> |
49 |
<div class="form-wrapper"> |
50 |
<button type="submit" class="wpcf7-form-control wpcf7-submit">SUBMIT</button> |
51 |
<svg>
|
52 |
<use xlink:href="#button"></use> |
53 |
</svg>
|
54 |
</div>
|
55 |
<div class="form-wrapper"> |
56 |
<button type="reset">RESET</button> |
57 |
<svg>
|
58 |
<use xlink:href="#button"></use> |
59 |
</svg>
|
60 |
</div>
|
61 |
</li>
|
62 |
</ul>
|
3. Add the CSS Form Styles
Moving on, we’ll enqueue a new CSS file in the functions.php file of our project, like this (your destination folder may differ though):
1 |
wp_enqueue_style( 'custom', get_template_directory_uri() . '/assets/css/custom.css' ); |
Here we’ll put most of the styles from the static demo with some new additions for the editing messages that come with CF7.
Here are all the required styles:
1 |
/* RESET RULES & INITIAL SET UP
|
2 |
–––––––––––––––––––––––––––––––––––––––––––––––––– */
|
3 |
@font-face { |
4 |
font-family: "Summer"; |
5 |
src: url(https://s3-us-west-2.amazonaws.com/s.cdpn.io/162656/Summer%20Font%20Regular.woff); |
6 |
}
|
7 |
|
8 |
@font-face { |
9 |
font-family: "Summer Bold"; |
10 |
src: url(https://s3-us-west-2.amazonaws.com/s.cdpn.io/162656/Summer%20Font%20Bold.woff); |
11 |
}
|
12 |
|
13 |
:root { |
14 |
--white: #fff; |
15 |
--red: #e31b23; |
16 |
}
|
17 |
|
18 |
* { |
19 |
padding: 0; |
20 |
margin: 0; |
21 |
border: none; |
22 |
box-sizing: border-box; |
23 |
}
|
24 |
|
25 |
a { |
26 |
color: inherit; |
27 |
text-decoration: none; |
28 |
}
|
29 |
|
30 |
input, |
31 |
textarea, |
32 |
button { |
33 |
font-family: inherit; |
34 |
font-size: 100%; |
35 |
background: none; |
36 |
outline: none; |
37 |
}
|
38 |
|
39 |
[type="radio"] { |
40 |
position: absolute; |
41 |
left: -9999px; |
42 |
}
|
43 |
|
44 |
button, |
45 |
label { |
46 |
cursor: pointer; |
47 |
}
|
48 |
|
49 |
textarea { |
50 |
resize: none; |
51 |
}
|
52 |
|
53 |
ul { |
54 |
list-style: none; |
55 |
}
|
56 |
|
57 |
body { |
58 |
font: 32px/1.2 "Summer"; |
59 |
margin: 1.5rem 0; |
60 |
}
|
61 |
|
62 |
.container { |
63 |
max-width: 800px; |
64 |
margin: 0 auto; |
65 |
padding: 0 1.5rem; |
66 |
}
|
67 |
|
68 |
|
69 |
/* FORM ELEMENTS
|
70 |
–––––––––––––––––––––––––––––––––––––––––––––––––– */
|
71 |
.handmade-form h1, |
72 |
.handmade-form li, |
73 |
.handmade-form .grid > *:not(:last-child) { |
74 |
margin-bottom: 1.5rem; |
75 |
}
|
76 |
|
77 |
.handmade-form .form-wrapper, |
78 |
.handmade-form input:not([type="radio"]), |
79 |
.handmade-form textarea, |
80 |
.handmade-form button, |
81 |
.handmade-form .checkbox-list label { |
82 |
position: relative; |
83 |
}
|
84 |
|
85 |
.handmade-form input:not([type="radio"]), |
86 |
.handmade-form textarea, |
87 |
.handmade-form button, |
88 |
.handmade-form .checkbox-list label { |
89 |
z-index: 1; |
90 |
}
|
91 |
|
92 |
.handmade-form input:not([type="radio"]), |
93 |
.handmade-form textarea, |
94 |
.handmade-form button { |
95 |
width: 100%; |
96 |
}
|
97 |
|
98 |
.handmade-form input:not([type="radio"]), |
99 |
.handmade-form textarea, |
100 |
.handmade-form fieldset { |
101 |
padding: 15px; |
102 |
}
|
103 |
|
104 |
.handmade-form textarea { |
105 |
height: 200px; |
106 |
vertical-align: top; |
107 |
}
|
108 |
|
109 |
.handmade-form legend { |
110 |
padding-top: 15px; |
111 |
margin: 0 auto; |
112 |
}
|
113 |
|
114 |
.handmade-form ::placeholder { |
115 |
color: inherit; |
116 |
/*Fix opacity issue on Firefox*/
|
117 |
opacity: 1; |
118 |
}
|
119 |
|
120 |
.handmade-form .form-wrapper svg { |
121 |
position: absolute; |
122 |
top: 0; |
123 |
left: 0; |
124 |
width: 100%; |
125 |
height: 100%; |
126 |
}
|
127 |
|
128 |
.handmade-form button { |
129 |
font-family: "Summer Bold"; |
130 |
color: var(--white); |
131 |
padding: 5px 10px; |
132 |
}
|
133 |
|
134 |
|
135 |
/* RADIO BUTTONS
|
136 |
–––––––––––––––––––––––––––––––––––––––––––––––––– */
|
137 |
.handmade-form .checkbox-list { |
138 |
display: flex; |
139 |
justify-content: center; |
140 |
}
|
141 |
|
142 |
.handmade-form .checkbox-list .first { |
143 |
margin-right: 50px; |
144 |
}
|
145 |
|
146 |
.handmade-form .checkbox-list label svg { |
147 |
top: 50%; |
148 |
left: -25px; |
149 |
width: 20px; |
150 |
height: 20px; |
151 |
transform: translateY(-50%); |
152 |
}
|
153 |
|
154 |
.handmade-form .checkbox-list label .checkmark { |
155 |
/*the value of the stroke-* properties comes from the getTotalLength() method*/
|
156 |
stroke-dasharray: 233.69552612304688; |
157 |
stroke-dashoffset: 233.69552612304688; |
158 |
transition: stroke-dashoffset 0.5s linear; |
159 |
}
|
160 |
|
161 |
.handmade-form [type="radio"]:checked + label .checkmark { |
162 |
stroke-dashoffset: 0; |
163 |
}
|
164 |
|
165 |
|
166 |
/* MQ
|
167 |
–––––––––––––––––––––––––––––––––––––––––––––––––– */
|
168 |
@media screen and (min-width: 600px) { |
169 |
.handmade-form .grid { |
170 |
display: grid; |
171 |
grid-gap: 1.5rem; |
172 |
}
|
173 |
|
174 |
.handmade-form .grid-2 { |
175 |
grid-template-columns: repeat(2, 1fr); |
176 |
}
|
177 |
|
178 |
.handmade-form .grid-3 { |
179 |
grid-template-columns: repeat(3, 1fr); |
180 |
}
|
181 |
|
182 |
.handmade-form .grid > *:not(:last-child) { |
183 |
margin-bottom: 0; |
184 |
}
|
185 |
}
|
186 |
|
187 |
|
188 |
/* OUTPUT MESSAGES CF7
|
189 |
–––––––––––––––––––––––––––––––––––––––––––––––––– */
|
190 |
span.wpcf7-form-control-wrap { |
191 |
display: block; |
192 |
}
|
193 |
|
194 |
span.wpcf7-not-valid-tip { |
195 |
position: absolute; |
196 |
bottom: 5px; |
197 |
right: 5px; |
198 |
font-size: 24px; |
199 |
}
|
200 |
|
201 |
div.wpcf7-validation-errors, |
202 |
div.wpcf7-acceptance-missing, |
203 |
div.wpcf7-mail-sent-ng, |
204 |
div.wpcf7-aborted, |
205 |
div.wpcf7-mail-sent-ok { |
206 |
border: none; |
207 |
color: var(--red); |
208 |
margin: 0; |
209 |
}
|
210 |
|
211 |
div.wpcf7-mail-sent-ok { |
212 |
color: green; |
213 |
}
|
Note: For this example, I’m using a vanilla theme. Depending on your theme though, some of these styles may be overridden. Given that fact, if the form doesn’t appear as expected in your project, be sure to check your theme styles and make the necessary changes.
4. Add the JavaScript
Coming up next, we’ll enqueue a new JavaScript file in the functions.php file of our project, like this (your destination folder may differ though):
1 |
wp_enqueue_script( 'custom', get_template_directory_uri() . '/assets/js/custom.js', array(), '', true ); |
2 |
Then, within it, we’ll write the code needed for the checkbox functionality:
1 |
const radios = document.querySelectorAll(".checkbox-list .wpcf7-list-item"); |
2 |
const wpcf7Elm = document.querySelector(".wpcf7"); |
3 |
|
4 |
radios.forEach((radio) => { |
5 |
const input = radio.querySelector("input"); |
6 |
input.nextElementSibling.remove(); |
7 |
const inputValue = input.value; |
8 |
input.id = inputValue; |
9 |
const label = document.createElement("label"); |
10 |
label.setAttribute("for", inputValue); |
11 |
label.innerHTML = ` |
12 |
<svg>
|
13 |
<use xlink:href="#checkbox_empty"></use>
|
14 |
</svg>
|
15 |
<svg class="checkmark">
|
16 |
<use xlink:href="#checkmark"></use>
|
17 |
</svg>
|
18 |
By ${inputValue} |
19 |
`; |
20 |
radio.appendChild(label); |
21 |
});
|
Bonus: Customize the Output Messages
Just for fun, let's add one of our custom SVGs to the AJAX output messages.


To do this we won’t use any CSS; instead we’ll take advantage of Contact Form 7’s AJAX events:
1 |
const wpcf7Elm = document.querySelector(".wpcf7"); |
2 |
const output = document.querySelector(".wpcf7-response-output"); |
3 |
const html = ` |
4 |
<svg>
|
5 |
<use xlink:href="#fieldset"></use>
|
6 |
</svg>
|
7 |
`; |
8 |
|
9 |
wpcf7Elm.addEventListener("wpcf7submit", () => { |
10 |
setTimeout(() => { |
11 |
output.classList.add("form-wrapper"); |
12 |
output.insertAdjacentHTML("beforeend", html); |
13 |
}, 100); |
14 |
});
|
5. Call the Contact Form
Last but not least, we’ll include the generated CF7 shortcode in the desired part of our project:
1 |
[contact-form-7 id="5" title="Handmade SVG Form" html_class="handmade-form container"] |
Notice the classes added via the html_class attribute.
Premium Contact Form Plugins
Free plugins are great when you’re getting started with WordPress, but if you want to go to the next level with your sites and save yourself time while you’re doing it, consider a premium contact form plugin from CodeCanyon.

 Best WordPress Contact Form Plugins


 Choose a Form Builder: The 7 Best WordPress Form Builders Compared

 Create a Drag-and-Drop Contact Form With the FormCraft 3 WordPress Plugin

You’ve Customized a Contact Form 7 with SVG!
And we’re done folks! In this tutorial we walked through the process of converting a static SVG form into something dynamic by incorporating it into a popular WordPress form plugin. Hopefully the steps were clear to you and you’ll give it a try.
Have you ever done any customization for Contact Form 7?
If you have any questions or problems, do let me know in the comments below!


