

German (Deutsch) translation by Władysław Łucyszyn (you can also view the original English article)


Im Mai 2009 führte Google Rich Snippets ein, einen kleinen Informationsblock, der in den Suchmaschinenergebnissen von Google angezeigt wird, um Nutzern die Entscheidung zu erleichtern, welche Seiten für ihre Suche relevant sind. Im Juni 2011 gab Google die Gründung von Schema.org bekannt, einer neuen Initiative von Google, Bing und Yahoo! das darauf abzielt, das Web zu verbessern, indem ein strukturiertes Daten-Markup-Schema erstellt wird.
Dieses Tutorial zeigt, wie Sie einen Online-Lebenslauf erstellen, der Schema.org-Mikrodaten enthält. Das Tutorial enthält auch Anweisungen zur Verwendung von Authorship Markup!
Bonusartikel inklusive!


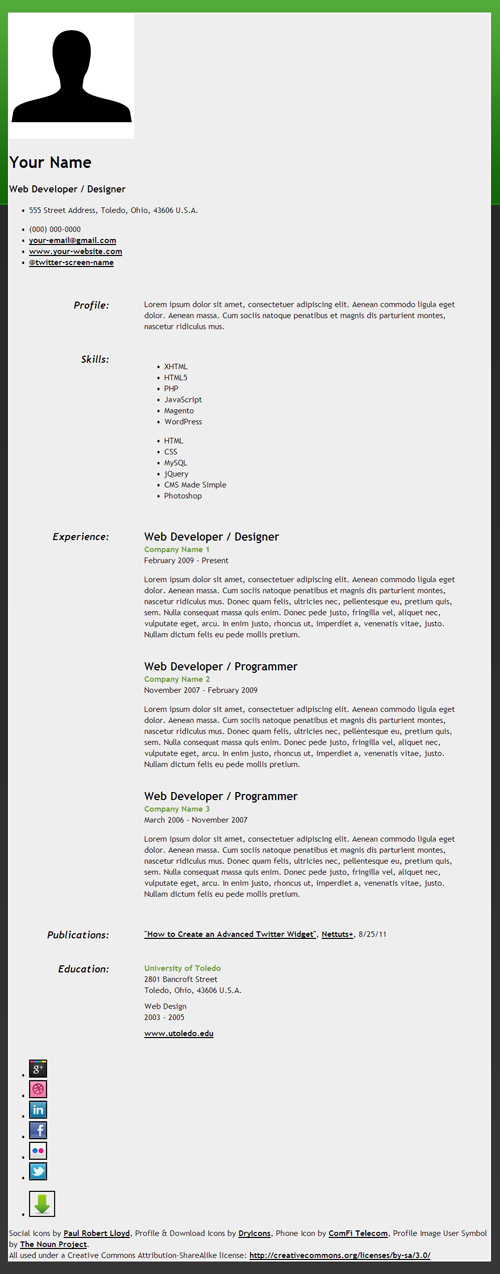
Die Tutorial-Demo ist eine einseitige Website-Vorlage, die Sie für Ihren Online-Lebenslauf verwenden können. Als Bonus sind mehrere Farbversionen in der Quelldatei zip enthalten; dunkelgrün, hellgrün, dunkelblau und hellblau.
Bitte beachten Sie, dass dies kein Webdesign- oder CSS-Tutorial ist, daher wird nur das HTML5- und Schema.org-Mikrodaten-Markup behandelt.
Jetzt fangen wir an!
Schritt 1: Das CSS
Erstellen Sie ein CSS-Stylesheet namens "style.css" und fügen Sie den folgenden Code ein. Mach dir keine Sorgen; Es ist ziemlich einfach und für dieses Tutorial ist es nicht erforderlich, es zu verstehen.
1 |
/* Default Styles
|
2 |
--------------------------------------------------- */
|
3 |
|
4 |
body { |
5 |
margin: 0px; |
6 |
padding: 0px; |
7 |
background: url("../images/bg_dark_green.png"); |
8 |
background-color: inherit; |
9 |
font-size: 16px; |
10 |
font-family: "Trebuchet MS", Helvetica, sans-serif; |
11 |
color: #000; |
12 |
}
|
13 |
|
14 |
a:link { |
15 |
text-decoration: underline; |
16 |
color: #000; |
17 |
font-weight: bold; |
18 |
}
|
19 |
|
20 |
a:visited { |
21 |
text-decoration: underline; |
22 |
color: #000; |
23 |
font-weight: bold; |
24 |
}
|
25 |
|
26 |
a:hover { |
27 |
text-decoration: underline; |
28 |
color: #669933; |
29 |
font-weight: bold; |
30 |
}
|
31 |
|
32 |
a:active { |
33 |
text-decoration: underline; |
34 |
color: #000; |
35 |
font-weight: bold; |
36 |
}
|
37 |
|
38 |
#wrapper { |
39 |
width: 965px; |
40 |
margin: 0 auto; |
41 |
}
|
42 |
|
43 |
#content { |
44 |
background-color: #eee; |
45 |
width: 960px; |
46 |
text-align: left; |
47 |
overflow: auto; |
48 |
position: relative; |
49 |
margin: 25px 0px 25px 0px; |
50 |
border: #fff solid 2px; |
51 |
}
|
52 |
|
53 |
.clear { |
54 |
float: none; |
55 |
clear: both; |
56 |
margin: 20px 0px 20px 0px; |
57 |
}
|
58 |
|
59 |
|
60 |
/* Header
|
61 |
--------------------------------------------------- */
|
62 |
|
63 |
|
64 |
#contact-details .header_1 { |
65 |
float: left; |
66 |
width: 350px; |
67 |
text-align: center; |
68 |
margin: 40px 0px 0px 20px; |
69 |
}
|
70 |
|
71 |
#contact-details .header_1 img { |
72 |
border: #fff solid 4px; |
73 |
background: url("../images/bg_img_dark_green.png"); |
74 |
padding: 16px; |
75 |
margin: 10px 0px 0px 0px; |
76 |
}
|
77 |
|
78 |
#contact-details .header_2 { |
79 |
float: left; |
80 |
width: 570px; |
81 |
margin: 40px 0px 0px 10px; |
82 |
}
|
83 |
|
84 |
#contact-details .header_2 a { |
85 |
font-weight: normal; |
86 |
}
|
87 |
|
88 |
#contact-details h1 { |
89 |
margin: 0px 0px 0px 20px; |
90 |
font-size: 52px; |
91 |
font-weight: bold; |
92 |
}
|
93 |
|
94 |
#contact-details h3 { |
95 |
margin: 0px 0px 32px 20px; |
96 |
font-size: 30px; |
97 |
font-weight: bold; |
98 |
font-style: italic; |
99 |
}
|
100 |
|
101 |
#contact-details ul.info_1 { |
102 |
list-style: none; |
103 |
margin: 0px 0px 0px -12px; |
104 |
font-size: 18px; |
105 |
}
|
106 |
|
107 |
#contact-details ul.info_2 { |
108 |
list-style: none; |
109 |
margin: 0px 0px 15px -12px; |
110 |
font-size: 18px; |
111 |
}
|
112 |
|
113 |
#contact-details li.address { |
114 |
background: url("../images/home.png") no-repeat; |
115 |
background-position: 0px 0px; |
116 |
padding: 0px 0px 12px 40px; |
117 |
}
|
118 |
|
119 |
#contact-details li.phone { |
120 |
background: url("../images/phone.png") no-repeat; |
121 |
background-position: 0px 0px; |
122 |
padding: 0px 0px 12px 40px; |
123 |
}
|
124 |
|
125 |
#contact-details li.email { |
126 |
background: url("../images/mail.png") no-repeat; |
127 |
background-position: 0px 0px; |
128 |
padding: 0px 0px 12px 40px; |
129 |
}
|
130 |
|
131 |
#contact-details li.site_url { |
132 |
background: url("../images/computer.png") no-repeat; |
133 |
background-position: 0px 2px; |
134 |
padding: 0px 0px 12px 40px; |
135 |
}
|
136 |
|
137 |
#contact-details li.twitter { |
138 |
background: url("../images/twitter_sm.png") no-repeat; |
139 |
background-position: 0px 0px; |
140 |
padding: 0px 0px 12px 40px; |
141 |
}
|
142 |
|
143 |
|
144 |
|
145 |
/* Main Content
|
146 |
--------------------------------------------------- */
|
147 |
|
148 |
h2.top { |
149 |
margin: 0px; |
150 |
font-size: 22px; |
151 |
font-weight: bold; |
152 |
}
|
153 |
|
154 |
h2 { |
155 |
margin: 40px 0px 0px 0px; |
156 |
font-size: 22px; |
157 |
font-weight: bold; |
158 |
}
|
159 |
|
160 |
|
161 |
dl { |
162 |
margin: 0px 50px 0px 0px; |
163 |
}
|
164 |
|
165 |
|
166 |
dt { |
167 |
float: left; |
168 |
width: 200px; |
169 |
font-size: 20px; |
170 |
font-weight: bold; |
171 |
font-style: italic; |
172 |
text-align: right; |
173 |
}
|
174 |
|
175 |
dd { |
176 |
width: 620px; |
177 |
float: right; |
178 |
margin-right: 20px; |
179 |
}
|
180 |
|
181 |
dl#contact { |
182 |
margin: 0px; |
183 |
}
|
184 |
|
185 |
dt#contact { |
186 |
margin: 0px; |
187 |
}
|
188 |
|
189 |
dd#contact { |
190 |
margin: 0px; |
191 |
}
|
192 |
|
193 |
p.bus1 { |
194 |
margin: 0px; |
195 |
font-weight: bold; |
196 |
color: #669933; |
197 |
}
|
198 |
|
199 |
p.edu-info { |
200 |
margin: 10px 0px 0px 0px; |
201 |
font-weight: bold; |
202 |
color: #669933; |
203 |
}
|
204 |
|
205 |
p.edu-info a { |
206 |
color: #000; |
207 |
}
|
208 |
|
209 |
p.edu-info a:hover { |
210 |
color: #669933; |
211 |
}
|
212 |
|
213 |
p.time { |
214 |
margin: 0px; |
215 |
}
|
216 |
|
217 |
p.summary { |
218 |
margin: 10px 0px 0px 0px; |
219 |
}
|
220 |
|
221 |
|
222 |
#skills ul.list1 { |
223 |
float: left; |
224 |
list-style: none; |
225 |
margin: 0px 0px 0px -40px; |
226 |
width: 220px; |
227 |
}
|
228 |
|
229 |
#skills ul.list2 { |
230 |
float: left; |
231 |
list-style: none; |
232 |
margin: 0px 0px 0px 0px; |
233 |
width: 220px; |
234 |
}
|
235 |
|
236 |
#skills li { |
237 |
background: url("../images/bullet_green.png") no-repeat; |
238 |
background-position: 0px 2px; |
239 |
padding: 0px 0px 0px 25px; |
240 |
}
|
241 |
|
242 |
abbr { |
243 |
border-width: 0px; |
244 |
}
|
245 |
|
246 |
|
247 |
/* Footer
|
248 |
--------------------------------------------------- */
|
249 |
|
250 |
#footer { |
251 |
margin: 60px 40px 0px 40px; |
252 |
}
|
253 |
|
254 |
#footer img { |
255 |
border: 0px; |
256 |
}
|
257 |
|
258 |
#footer .footer_content { |
259 |
width: 700px; |
260 |
overflow: auto; |
261 |
margin: auto; |
262 |
border: #fff solid 2px; |
263 |
background-color: #dcdcdc; |
264 |
}
|
265 |
|
266 |
#footer ul.icons_1 { |
267 |
float: left; |
268 |
width: 525px; |
269 |
margin: 15px 10px 10px 15px; |
270 |
padding: 0px; |
271 |
}
|
272 |
|
273 |
#footer ul.icons_2 { |
274 |
float: right; |
275 |
width: 100px; |
276 |
margin: 10px 20px 10px 10px; |
277 |
padding: 0px; |
278 |
}
|
279 |
|
280 |
#footer .icons_1 li, #footer .icons_2 li { |
281 |
margin: 0px 0px 0px 7px; |
282 |
padding: 0px; |
283 |
list-style-type: none; |
284 |
display: inline; |
285 |
}
|
286 |
|
287 |
#footer a { |
288 |
color: #000; |
289 |
}
|
290 |
|
291 |
#footer a:hover { |
292 |
color: #669933; |
293 |
}
|
294 |
|
295 |
#footer .credits { |
296 |
float: none; |
297 |
clear: both; |
298 |
margin: 10px 0px 20px 0px; |
299 |
font-size: 12px; |
300 |
text-align: center; |
301 |
}
|
302 |
|
303 |
#footer .credits a { |
304 |
font-weight: normal; |
305 |
}
|
Schritt 2: Das Markup (ohne Schema.org-Mikrodaten enthalten)
Als nächstes brauchen wir eine .html. Dies ist ein grundlegendes Layout, mit dem wir alle wahrscheinlich vertraut sind.
1 |
<!DOCTYPE html>
|
2 |
<html>
|
3 |
<head>
|
4 |
<meta charset=UTF-8"> |
5 |
<meta charset="utf-8"> |
6 |
|
7 |
<title>Online Resume of Your Name</title> |
8 |
|
9 |
<!-- Meta -->
|
10 |
<meta name="description" content="A few lines about yourself"> |
11 |
<meta name="keywords" content="web,developer,designer,resume" /> |
12 |
<meta name="author" content="Your Name"> |
13 |
|
14 |
<!-- CSS Stylesheet -->
|
15 |
<link rel="stylesheet" type="text/css" href="css/style.css" /> |
16 |
|
17 |
<!--[if lt IE 9]>
|
18 |
<script src="http://html5shiv.googlecode.com/svn/trunk/html5.js"></script>
|
19 |
<![endif]-->
|
20 |
|
21 |
</head>
|
22 |
<body>
|
23 |
|
24 |
<!-- Begin Wrapper -->
|
25 |
<div id="wrapper"> |
26 |
|
27 |
<!-- Begin Content Area -->
|
28 |
<div id="content"> |
29 |
|
30 |
<!-- Begin Header -->
|
31 |
<header>
|
32 |
|
33 |
<!-- Begin Contact Section -->
|
34 |
<section id="contact-details"> |
35 |
|
36 |
<!-- Begin Profile Image Section -->
|
37 |
<div class="header_1"> |
38 |
<img src="images/profile.jpg" width="250" height="250" alt="Your Name" /> |
39 |
</div>
|
40 |
<!-- End Profile Image Section -->
|
41 |
|
42 |
<!-- Begin Profile Information Section -->
|
43 |
<div class="header_2"> |
44 |
|
45 |
<h1><span>Your Name</span></h1> |
46 |
<h3>Web Developer / Designer</h3> |
47 |
|
48 |
<ul class="info_1"> |
49 |
<li class="address">555 Street Address, Toledo, Ohio, 43606 U.S.A.</li> |
50 |
</ul>
|
51 |
|
52 |
<ul class="info_2"> |
53 |
<li class="phone">(000) 000-0000</li> |
54 |
<li class="email"><a href="mailto:your-email@gmail.com">your-email@gmail.com</a></li> |
55 |
<li class="site_url"><a href="http://www.webcodepro.net/about.php" title="www.your-website.com">www.your-website.com</a></li> |
56 |
<li class="twitter"><a href="http://twitter.com/twitter-screen-name" title="Follow Me on Twitter">@twitter-screen-name</a></li> |
57 |
</ul>
|
58 |
|
59 |
</div>
|
60 |
<!-- End Profile Information Section -->
|
61 |
|
62 |
</section>
|
63 |
<!-- End Contact Section -->
|
64 |
|
65 |
</header>
|
66 |
<!-- End Header -->
|
67 |
|
68 |
<div class="clear"> </div> |
69 |
|
70 |
<!-- Begin Profile Section -->
|
71 |
<dl>
|
72 |
<dt>Profile:</dt> |
73 |
<dd>
|
74 |
|
75 |
<section class="summary"> |
76 |
Lorem ipsum dolor sit amet, consectetuer adipiscing elit. Aenean commodo ligula eget dolor. Aenean massa. Cum sociis natoque penatibus et magnis dis parturient montes, nascetur ridiculus mus. |
77 |
</section>
|
78 |
|
79 |
</dd>
|
80 |
</dl>
|
81 |
<!-- End Profile Section -->
|
82 |
|
83 |
<div class="clear"> </div> |
84 |
|
85 |
<!-- Begin Skills Section -->
|
86 |
|
87 |
<dl>
|
88 |
<dt>Skills:</dt> |
89 |
<dd>
|
90 |
|
91 |
<section id="skills"> |
92 |
<ul class="list1"> |
93 |
<li>XHTML</li> |
94 |
<li>HTML5</li> |
95 |
<li>PHP</li> |
96 |
<li>JavaScript</li> |
97 |
<li>Magento</li> |
98 |
<li>WordPress</li> |
99 |
</ul>
|
100 |
<ul class="list2"> |
101 |
<li>HTML</li> |
102 |
<li>CSS</li> |
103 |
<li>MySQL</li> |
104 |
<li>jQuery</li> |
105 |
<li>CMS Made Simple</li> |
106 |
<li>Photoshop</li> |
107 |
</ul>
|
108 |
</section>
|
109 |
|
110 |
</dd>
|
111 |
</dl>
|
112 |
|
113 |
<!-- End Skills Section -->
|
114 |
|
115 |
<div class="clear"> </div> |
116 |
|
117 |
<!-- Begin Experience Section -->
|
118 |
<dl>
|
119 |
<dt>Experience:</dt> |
120 |
|
121 |
<dd>
|
122 |
|
123 |
<section id="experience"> |
124 |
|
125 |
<!-- Position #1 -->
|
126 |
|
127 |
<h2 class="top">Web Developer / Designer</h2> |
128 |
<p class="bus1">Company Name 1</p> |
129 |
<p class="time">February 2009 - Present</p> |
130 |
|
131 |
<p>
|
132 |
Lorem ipsum dolor sit amet, consectetuer adipiscing elit. Aenean commodo ligula eget dolor. Aenean massa. Cum sociis natoque penatibus et magnis dis parturient montes, nascetur ridiculus mus. Donec quam felis, ultricies nec, pellentesque eu, pretium quis, sem. Nulla consequat massa quis enim. Donec pede justo, fringilla vel, aliquet nec, vulputate eget, arcu. In enim justo, rhoncus ut, imperdiet a, venenatis vitae, justo. Nullam dictum felis eu pede mollis pretium. |
133 |
</p>
|
134 |
|
135 |
|
136 |
<!-- Position #2 -->
|
137 |
|
138 |
<h2>Web Developer / Programmer</h2> |
139 |
<p class="bus1">Company Name 2</p> |
140 |
<p class="time">November 2007 - February 2009</p> |
141 |
|
142 |
<p>
|
143 |
Lorem ipsum dolor sit amet, consectetuer adipiscing elit. Aenean commodo ligula eget dolor. Aenean massa. Cum sociis natoque penatibus et magnis dis parturient montes, nascetur ridiculus mus. Donec quam felis, ultricies nec, pellentesque eu, pretium quis, sem. Nulla consequat massa quis enim. Donec pede justo, fringilla vel, aliquet nec, vulputate eget, arcu. In enim justo, rhoncus ut, imperdiet a, venenatis vitae, justo. Nullam dictum felis eu pede mollis pretium. |
144 |
</p>
|
145 |
|
146 |
|
147 |
<!-- Position #3 -->
|
148 |
|
149 |
<h2>Web Developer / Programmer</h2> |
150 |
<p class="bus1">Company Name 3</p> |
151 |
<p class="time">March 2006 - November 2007</p> |
152 |
|
153 |
<p>
|
154 |
Lorem ipsum dolor sit amet, consectetuer adipiscing elit. Aenean commodo ligula eget dolor. Aenean massa. Cum sociis natoque penatibus et magnis dis parturient montes, nascetur ridiculus mus. Donec quam felis, ultricies nec, pellentesque eu, pretium quis, sem. Nulla consequat massa quis enim. Donec pede justo, fringilla vel, aliquet nec, vulputate eget, arcu. In enim justo, rhoncus ut, imperdiet a, venenatis vitae, justo. Nullam dictum felis eu pede mollis pretium. |
155 |
</p>
|
156 |
|
157 |
</section>
|
158 |
|
159 |
</dd>
|
160 |
</dl>
|
161 |
<!-- End Experience Section -->
|
162 |
|
163 |
<div class="clear"> </div> |
164 |
|
165 |
<!-- Begin Publications Section -->
|
166 |
<dl>
|
167 |
<dt>Publications:</dt> |
168 |
|
169 |
<dd>
|
170 |
|
171 |
<section id="publications"> |
172 |
|
173 |
<a href="http://net.tutsplus.com/tutorials/php/how-to-create-an-advanced-twitter-widget/" target="_blank" title="How to Create an Advanced Twitter Widget">"How to Create an Advanced Twitter Widget"</a>, <a href="http://net.tutsplus.com/" target="_blank" title="Nettuts+">Nettuts+</a>, 8/25/11 |
174 |
|
175 |
</section>
|
176 |
|
177 |
</dd>
|
178 |
</dl>
|
179 |
<!-- End Publications Section -->
|
180 |
|
181 |
<div class="clear"> </div> |
182 |
|
183 |
<!-- Begin Education Section -->
|
184 |
<dl>
|
185 |
<dt>Education:</dt> |
186 |
<dd>
|
187 |
|
188 |
<section id="education"> |
189 |
|
190 |
<p class="bus1">University of Toledo</p> |
191 |
|
192 |
2801 Bancroft Street |
193 |
<br /> |
194 |
Toledo, Ohio, 43606 U.S.A. |
195 |
|
196 |
<p class="summary">Web Design</p> |
197 |
<p class="time">2003 - 2005</p> |
198 |
|
199 |
<p class="edu-info"> |
200 |
<a href="http://www.utoledo.edu/" target="_blank" title="University of Toledo">www.utoledo.edu</a> |
201 |
</p>
|
202 |
|
203 |
</section>
|
204 |
|
205 |
</dd>
|
206 |
</dl>
|
207 |
<!-- End Education Section -->
|
208 |
|
209 |
<div class="clear"> </div> |
210 |
|
211 |
<!-- Begin Footer -->
|
212 |
<footer id="footer"> |
213 |
|
214 |
<!-- Begin Footer Content -->
|
215 |
<div class="footer_content"> |
216 |
|
217 |
<!-- Begin Schema Person -->
|
218 |
|
219 |
<ul class="icons_1"> |
220 |
<li><a href="https://profiles.google.com/jwagner719" title="Google Profile"><img src="http://www.google.com/images/icons/ui/gprofile_button-32.png" width="32" height="32" alt="Google Profile"></a></li> |
221 |
<li><a href="http://dribbble.com/" title="Dribbble"><img src="images/dribbble.png" width="32" height="32" alt="Dribbble" /></a></li> |
222 |
<li><a href="http://www.linkedin.com/" title="LinkedIn"><img src="images/linkedin.png" width="32" height="32" alt="LinkedIn" /></a></li> |
223 |
<li><a href="http://www.facebook.com/" title="Facebook"><img src="images/facebook.png" width="32" height="32" alt="Facebook" /></a></li> |
224 |
<li><a href="http://www.flickr.com/" title="Flickr"><img src="images/flickr.png" width="32" height="32" alt="Flickr" /></a></li> |
225 |
<li><a href="http://twitter.com/" title="Follow Me on Twitter!"><img src="images/twitter.png" width="32" height="32" alt="Follow Me on Twitter!" /></a></li> |
226 |
</ul>
|
227 |
|
228 |
<ul class="icons_2"> |
229 |
<li><a href="resume.pdf" title="Download Resume PDF"><img src="images/download.png" width="48" height="48" alt="Download Resume PDF" /></a></li> |
230 |
</ul>
|
231 |
|
232 |
<!-- End Schema Person -->
|
233 |
|
234 |
</div>
|
235 |
<!-- End Footer Content -->
|
236 |
|
237 |
<div class="credits"> |
238 |
Social Icons by <a href="http://paulrobertlloyd.com/2009/06/social_media_icons" target="_blank" title="Paul Robert Lloyd">Paul Robert Lloyd</a>, Profile & Download Icons by <a href="http://dryicons.com/" target="_blank" title="DryIcons">DryIcons</a>, Phone Icon by <a href="http://www.comfi.com/telecom-icons/" target="_blank" title="ComFi Telecom">ComFi Telecom</a>, Profile Image User Symbol by <a href="http://thenounproject.com/" target="_blank" title="The Noun Project">The Noun Project</a>. |
239 |
<br /> |
240 |
All used under a Creative Commons Attribution-ShareAlike license: <a href="http://creativecommons.org/licenses/by-sa/3.0/" target="_blank" title="Creative Commons Attribution-ShareAlike license">http://creativecommons.org/licenses/by-sa/3.0/</a> |
241 |
</div>
|
242 |
|
243 |
</footer>
|
244 |
<!-- End Footer -->
|
245 |
|
246 |
</div>
|
247 |
<!-- End Content -->
|
248 |
|
249 |
</div>
|
250 |
<!-- End Wrapper -->
|
251 |
|
252 |
</body>
|
253 |
</html>
|
Ein paar Anmerkungen zum Markup
HTML5-Scheibe
Da Schema.org-Mikrodaten auf der HTML5-Mikrodatenspezifikation basieren, wird HTML5-Markup verwendet, um die Website-Vorlage für den Lebenslauf für eine Seite zu erstellen. Leider erkennen ältere Webbrowser wie IE7 und IE8 bestimmte HTML5-Elemente nicht. Mit HTML5 geschriebene Seiten werden in diesen älteren Browsern nicht korrekt gerendert.
Hier ist ein Screenshot der Online-Lebenslauf-Demo in (IE8 Klicken Sie auf das Bild, um das ganze Bild zu sehen):
Um das Problem mit diesen älteren IE-Browserversionen zu lösen, wurde der folgende Code hinzugefügt zwischen
1 |
<!--[if lt IE 9]>
|
2 |
<script src="http://html5shiv.googlecode.com/svn/trunk/html5.js"></script>
|
3 |
<![endif]-->
|
Dieser Code ist ein HTML5-JavaScript-Shim für IE, um die HTML5-Elemente zu erkennen und zu gestalten.
Hinweis: In IE9+ und anderen modernen Browsern, die HTML5 unterstützen, ist kein HTML5-JavaScript-Shim erforderlich.
Definitionsliste
Definitionslisten, <dd></dd> wurden im Markup anstelle von ungeordneten Listen verwendet. Dies liegt daran, dass es sinnvoller ist, wenn man bedenkt, wie jeder Artikel einen Titel und eine Beschreibung hat.
Abschnitt vs. Artikel
Es scheint einige Verwirrung bezüglich HTML5-Abschnitts- und Artikelelementen zu geben. Das Abschnittselement wurde im Markup verwendet, da keiner der Abschnitte des Lebenslaufs als eigenständiger Inhalt betrachtet wird. Das HTML5-Artikelelement wird für eigenständige Inhalte verwendet, die höchstwahrscheinlich wie ein Blog- oder Nachrichtenartikel syndiziert werden. Dieser Artikel leistet wirklich gute Arbeit, um den Unterschied zwischen HTML5-Artikeln und Abschnittselementen zu erklären.
Schritt 3: Schema.org-Mikrodaten hinzufügen - Person und Postadresse


Die ersten Schematypen, die wir dem Markup hinzufügen werden, sind Person und PostalAddress.
Itemscope-Element und Itemtype-Attribut
Ein itemscope-Element wird <div></div>-Tags hinzugefügt, die um den Inhalt herum platziert werden, der die Informationen zum Schema enthält, wie folgt:
1 |
<div itemscope itemtype="http://schema.org/Person"> |
2 |
|
3 |
Content that contains information about a Person |
4 |
|
5 |
</div>
|
Das itemscope-Element und das itemtype-Attribut für das Person-Schema werden sowohl im Kontakt- als auch im Social-Media-Link-Abschnitt der Lebenslauf-Webseite wie folgt platziert:
1 |
<!-- Begin Contact Section -->
|
2 |
<section id="contact-details"> |
3 |
<div itemscope itemtype="http://schema.org/Person"> |
4 |
|
5 |
Rest of Code Block Here |
6 |
|
7 |
</div>
|
8 |
</section>
|
9 |
<!-- End Contact Section -->
|
1 |
<!-- Begin Social Media and Download Links -->
|
2 |
<div itemscope itemtype="http://schema.org/Person"> |
3 |
|
4 |
Rest of Code Block Here |
5 |
|
6 |
</div>
|
7 |
<!-- End Social Media and Download Links -->
|
Das itemscope-Element und das itemtype-Attribut für das PostalAddress-Schema sind im Person-Schema verschachtelt und werden um die ungeordnete Liste <ul></ul> mit den Adressinformationen wie folgt platziert:
1 |
<!-- Begin PostalAddress Schema -->
|
2 |
<div itemprop="address" itemscope itemtype="http://schema.org/PostalAddress"> |
3 |
<ul class="info_1"> |
4 |
<li class="address"><span itemprop="streetAddress">555 Street Address</span>, <span itemprop="addressLocality"<Toledo</span>, <span itemprop="addressRegion">Ohio</span>, <span itemprop="postalCode"<43606</span> <span itemprop="addressCountry">U.S.A.</span></li> |
5 |
</ul>
|
6 |
</div>
|
7 |
<!-- End PostalAddress Schema -->
|
Itemprop-Attribute
Itemprop-Attribute müssen gegebenenfalls mithilfe von span-Tags hinzugefügt werden, damit Suchmaschinen zusätzliche Informationen über unsere Webseite bereitgestellt werden. Im Folgenden sind die Attribute aufgeführt, die wir aus diesen Schemas verwenden werden:
Personenschema
itemprop="image"itemprop="name"itemprop="jobTitle"itemprop="telephone"itemprop="email"itemprop="url"
PostalAddress Schema
itemprop="streetAddress"itemprop="addressLocality"itemprop="addressRegion"itemprop="postalCode"itemprop="addressCountry"
Endgültiges Markup für die Bereiche Kontakt und Social Media Links
1 |
<!-- Begin Contact Section -->
|
2 |
<section id="contact-details"> |
3 |
<div itemscope itemtype="http://schema.org/Person"> |
4 |
|
5 |
<!-- Begin Profile Image Section -->
|
6 |
<div class="header_1"> |
7 |
<img src="images/profile.jpg" itemprop="image" width="250" height="250" alt="Your Name" /> |
8 |
</div>
|
9 |
<!-- End Profile Image Section -->
|
10 |
|
11 |
<!-- Begin Profile Information Section -->
|
12 |
<div class="header_2"> |
13 |
|
14 |
<h1><span itemprop="name">Your Name</span></h1> |
15 |
<h3><span itemprop="jobTitle">Web Developer / Designer</span></h3> |
16 |
|
17 |
<!-- Begin PostalAddress Schema -->
|
18 |
<div itemprop="address" itemscope itemtype="http://schema.org/PostalAddress"> |
19 |
<ul class="info_1"> |
20 |
<li class="address"><span itemprop="streetAddress">555 Street Address</span>, <span itemprop="addressLocality"<Toledo</span>, <span itemprop="addressRegion">Ohio</span>, <span itemprop="postalCode"<43606</span> <span itemprop="addressCountry">U.S.A.</span></li> |
21 |
</ul>
|
22 |
</div>
|
23 |
<!-- End PostalAddress Schema -->
|
24 |
|
25 |
<ul class="info_2"> |
26 |
<li class="phone"><span itemprop="telephone">(000) 000-0000</span></li> |
27 |
<li class="email"><a href="mailto:your-email@gmail.com" itemprop="email">your-email@gmail.com</a></li> |
28 |
<li class="site_url"><a rel="me" itemprop="url" href="http://www.webcodepro.net/about.php" title="www.your-website.com">www.your-website.com</a></li> |
29 |
<li class="twitter"><a rel="me" itemprop="url" href="http://twitter.com/twitter-screen-name" title="Follow Me on Twitter">@twitter-screen-name</a></li> |
30 |
</ul>
|
31 |
|
32 |
</div>
|
33 |
<!-- End Profile Information Section -->
|
34 |
|
35 |
</div>
|
36 |
</section>
|
37 |
<!-- End Contact Section -->
|
1 |
<!-- Begin Social Media and Download Links -->
|
2 |
<div itemscope itemtype="http://schema.org/Person"> |
3 |
|
4 |
<ul class="icons_1"> |
5 |
<li><a rel="author" itemprop="url" href="https://profiles.google.com/jwagner719" title="Google Profile"><img src="http://www.google.com/images/icons/ui/gprofile_button-32.png" width="32" height="32" alt="Google Profile"></a></li> |
6 |
<li><a rel="me" itemprop="url" href="http://dribbble.com/" title="Dribbble"><img src="images/dribbble.png" width="32" height="32" alt="Dribbble" /></a></li> |
7 |
<li><a rel="me" itemprop="url" href="http://www.linkedin.com/" title="LinkedIn"><img src="images/linkedin.png" width="32" height="32" alt="LinkedIn" /></a></li> |
8 |
<li><a rel="me" itemprop="url" href="http://www.facebook.com/" title="Facebook"><img src="images/facebook.png" width="32" height="32" alt="Facebook" /></a></li> |
9 |
<li><a rel="me" itemprop="url" href="http://www.flickr.com/" title="Flickr"><img src="images/flickr.png" width="32" height="32" alt="Flickr" /></a></li> |
10 |
<li><a rel="me" itemprop="url" href="http://twitter.com/" title="Follow Me on Twitter!"><img src="images/twitter.png" width="32" height="32" alt="Follow Me on Twitter!" /></a></li> |
11 |
</ul>
|
12 |
|
13 |
<ul class="icons_2"> |
14 |
<li><a href="resume.pdf" title="Download Resume PDF"><img src="images/download.png" width="48" height="48" alt="Download Resume PDF" /></a></li> |
15 |
</ul>
|
16 |
|
17 |
</div>
|
18 |
<!-- End Social Media and Download Links -->
|
Schritt 4: Schema.org-Mikrodaten hinzufügen - Artikelliste


Das nächste Schema, das wir dem Markup hinzufügen werden, ist ItemList.
Itemscope-Element und Itemtype-Attribut
Das itemscope-Element und das itemtype-Attribut für das ItemList-Schema werden wie folgt im Skills-Abschnitt platziert:
1 |
<!-- Begin Skills Section -->
|
2 |
<div itemscope itemtype="http://schema.org/ItemList"> |
3 |
|
4 |
Rest of Code Block Here |
5 |
|
6 |
</div>
|
7 |
<!-- End Skills Section -->
|
Itemprop-Attribute
Fügen Sie das Attribut "itemprop" an geeigneten Stellen mit <span></span>-Tags hinzu. Unten sind die Attribute, die wir aus diesem Schema verwenden werden:
ItemList-Schema
itemprop="itemListElement"
Endgültiges Markup für den Skills-Bereich
1 |
<!-- Begin Skills Section -->
|
2 |
<div itemscope itemtype="http://schema.org/ItemList"> |
3 |
|
4 |
<dl>
|
5 |
<dt itemprop="name">Skills:</dt> |
6 |
<dd>
|
7 |
|
8 |
<section id="skills"> |
9 |
<ul class="list1"> |
10 |
<li itemprop="itemListElement">XHTML</li> |
11 |
<li itemprop="itemListElement">HTML5</li> |
12 |
<li itemprop="itemListElement">PHP</li> |
13 |
<li itemprop="itemListElement">JavaScript</li> |
14 |
<li itemprop="itemListElement">Magento</li> |
15 |
<li itemprop="itemListElement">WordPress</li> |
16 |
</ul>
|
17 |
<ul class="list2"> |
18 |
<li itemprop="itemListElement">HTML</li> |
19 |
<li itemprop="itemListElement">CSS</li> |
20 |
<li itemprop="itemListElement">MySQL</li> |
21 |
<li itemprop="itemListElement">jQuery</li> |
22 |
<li itemprop="itemListElement">CMS Made Simple</li> |
23 |
<li itemprop="itemListElement">Photoshop</li> |
24 |
</ul>
|
25 |
</section>
|
26 |
|
27 |
</dd>
|
28 |
</dl>
|
29 |
|
30 |
</div>
|
31 |
<!-- End Skills Section -->
|
Schritt 5: Schema.org-Mikrodaten hinzufügen - Organisation


Als Nächstes wird das Organization-Schema zum Markup hinzugefügt.
Itemscope-Element und Itemtype-Attribut
Das itemscope-Element und das itemtype-Attribut für das Organization-Schema werden um jede im Abschnitt "Erfahrung" aufgeführte "Position" platziert, wie folgt:
1 |
<!-- Position #1 -->
|
2 |
<div itemscope itemtype="http://schema.org/Organization"> |
3 |
|
4 |
Rest of Code Block Here |
5 |
|
6 |
</div>
|
7 |
|
8 |
<!-- Position #2 -->
|
9 |
<div itemscope itemtype="http://schema.org/Organization"> |
10 |
|
11 |
Rest of Code Block Here |
12 |
|
13 |
</div>
|
14 |
|
15 |
<!-- Position #3 -->
|
16 |
<div itemscope itemtype="http://schema.org/Organization"> |
17 |
|
18 |
Rest of Code Block Here |
19 |
|
20 |
</div>
|
Itemprop-Attribute
Fügen Sie das Attribut "itemprop" an geeigneten Stellen mit <span></span>-Tags hinzu. Im Folgenden sind die Attribute aufgeführt, die wir aus diesem Schema verwenden werden:
Organisationsschema
itemprop="jobTitle"itemprop="name"itemprop="description"
Endgültiges Markup für den Erfahrungsbereich
1 |
<section id="experience"> |
2 |
|
3 |
<!-- Position #1 -->
|
4 |
<div itemscope itemtype="http://schema.org/Organization"> |
5 |
|
6 |
<h2 class="top"><span itemprop="jobTitle">Web Developer / Designer</span></h2> |
7 |
<p class="bus1"><span itemprop="name">Company Name 1</span></p> |
8 |
<p class="time">February 2009 - Present</p> |
9 |
|
10 |
<p itemprop="description"> |
11 |
Lorem ipsum dolor sit amet, consectetuer adipiscing elit. Aenean commodo ligula eget dolor. Aenean massa. Cum sociis natoque penatibus et magnis dis parturient montes, nascetur ridiculus mus. Donec quam felis, ultricies nec, pellentesque eu, pretium quis, sem. Nulla consequat massa quis enim. Donec pede justo, fringilla vel, aliquet nec, vulputate eget, arcu. In enim justo, rhoncus ut, imperdiet a, venenatis vitae, justo. Nullam dictum felis eu pede mollis pretium. |
12 |
</p>
|
13 |
|
14 |
</div>
|
15 |
|
16 |
<!-- Position #2 -->
|
17 |
<div itemscope itemtype="http://schema.org/Organization"> |
18 |
|
19 |
<h2><span itemprop="jobTitle">Web Developer / Programmer</span></h2> |
20 |
<p class="bus1"><span itemprop="name">Company Name 2</span></p> |
21 |
<p class="time">November 2007 - February 2009</p> |
22 |
|
23 |
<p itemprop="description"> |
24 |
Lorem ipsum dolor sit amet, consectetuer adipiscing elit. Aenean commodo ligula eget dolor. Aenean massa. Cum sociis natoque penatibus et magnis dis parturient montes, nascetur ridiculus mus. Donec quam felis, ultricies nec, pellentesque eu, pretium quis, sem. Nulla consequat massa quis enim. Donec pede justo, fringilla vel, aliquet nec, vulputate eget, arcu. In enim justo, rhoncus ut, imperdiet a, venenatis vitae, justo. Nullam dictum felis eu pede mollis pretium. |
25 |
</p>
|
26 |
|
27 |
</div>
|
28 |
|
29 |
<!-- Position #3 -->
|
30 |
<div itemscope itemtype="http://schema.org/Organization"> |
31 |
|
32 |
<h2><span itemprop="jobTitle">Web Developer / Programmer</span></h2> |
33 |
<p class="bus1"><span itemprop="name">Company Name 3</span></p> |
34 |
<p class="time">March 2006 - November 2007</p> |
35 |
|
36 |
<p itemprop="description"> |
37 |
Lorem ipsum dolor sit amet, consectetuer adipiscing elit. Aenean commodo ligula eget dolor. Aenean massa. Cum sociis natoque penatibus et magnis dis parturient montes, nascetur ridiculus mus. Donec quam felis, ultricies nec, pellentesque eu, pretium quis, sem. Nulla consequat massa quis enim. Donec pede justo, fringilla vel, aliquet nec, vulputate eget, arcu. In enim justo, rhoncus ut, imperdiet a, venenatis vitae, justo. Nullam dictum felis eu pede mollis pretium. |
38 |
</p>
|
39 |
|
40 |
</div>
|
41 |
|
42 |
</section>
|
Schritt 6: Schema.org-Mikrodaten hinzufügen - Artikel


Als nächstes wird das Article-Schema zum Markup hinzugefügt.
Itemscope-Element und Itemtype-Attribut für Artikel
Das itemscope-Element und das itemtype-Attribut für das Article-Schema werden wie folgt in den im Abschnitt "Veröffentlichungen" aufgelisteten "Artikel" platziert:
1 |
<section id="publications"> |
2 |
<div itemscope itemtype="http://schema.org/Article"> |
3 |
|
4 |
Rest of Code Block Here |
5 |
|
6 |
</div>
|
7 |
</section>
|
Itemprop-Attribute
Fügen Sie das Attribut "itemprop" an geeigneten Stellen mit <span></span>-Tags hinzu. Im Folgenden sind die Attribute aufgeführt, die wir aus diesem Schema verwenden werden:
Artikelschema
itemprop="name"itemprop="url"
Endgültiger Aufschlag für den Abschnitt Veröffentlichungen
1 |
<section id="publications"> |
2 |
<div itemscope itemtype="http://schema.org/Article"><span itemprop="name"> |
3 |
<a itemprop="url" href="http://net.tutsplus.com/tutorials/php/how-to-create-an-advanced-twitter-widget/" target="_blank" title="How to Create an Advanced Twitter Widget">"How to Create an Advanced Twitter Widget"</a></span>, <a href="http://net.tutsplus.com/" target="_blank" title="Nettuts+">Nettuts+</a>, 8/25/11 |
4 |
</div>
|
5 |
</section>
|
Schritt 7: Schema.org-Mikrodaten hinzufügen - EducationalOrganization and PostalAddress


Als nächstes werden die Schemas EducationalOrganization und PostalAddress zum Markup hinzugefügt.
Itemscope-Element und Itemtype-Attribut für EducationalOrganization
Das itemscope-Element und das itemtype-Attribut für das EducationalOrganization-Schema werden wie folgt im Education-Abschnitt platziert:
1 |
<section id="education"> |
2 |
<div itemscope itemtype="http://schema.org/EducationalOrganization"> |
3 |
|
4 |
Rest of Code Block Here |
5 |
|
6 |
</div>
|
7 |
</section>
|
Itemscope-Element und Itemtype-Attribut für PostalAddress
Das itemscope-Element und das itemtype-Attribut für das PostalAddress-Schema sind im EducationalOrganization-Schema verschachtelt und werden wie folgt um den Code mit den Adressinformationen im Education-Abschnitt platziert:
1 |
<div itemprop="address" itemscope itemtype="http://schema.org/PostalAddress"> |
2 |
<span itemprop="streetAddress">2801 Bancroft Street</span> |
3 |
<br /> |
4 |
<span itemprop="addressLocality">Toledo</span>, <span itemprop="addressRegion">Ohio</span>, <span itemprop="postalCode">43606</span><span itemprop="addressCountry">U.S.A.</span> |
5 |
</div>
|
Itemprop-Attribute
Fügen Sie das Attribut "itemprop" gegebenenfalls mit <span></span>-Tags hinzu. Im Folgenden sind die Attribute aufgeführt, die wir aus diesen Schemas verwenden werden:
Bildungsorganisationsschema
itemprop="name"itemprop="url"
PostalAddress Schema
itemprop="streetAddress"itemprop="addressLocality"itemprop="addressRegion"itemprop="postalCode"itemprop="addressCountry"
Endgültiger Aufschlag für den Bildungsabschnitt
1 |
<section id="education"> |
2 |
<div itemscope itemtype="http://schema.org/EducationalOrganization"> |
3 |
|
4 |
<p class="bus1"><span itemprop="name">University of Toledo</span></p> |
5 |
|
6 |
<div itemprop="address" itemscope itemtype="http://schema.org/PostalAddress"> |
7 |
<span itemprop="streetAddress">2801 Bancroft Street</span> |
8 |
<br /> |
9 |
<span itemprop="addressLocality">Toledo</span>, <span itemprop="addressRegion">Ohio</span>, <span itemprop="postalCode">43606</span><span itemprop="addressCountry">U.S.A.</span> |
10 |
</div>
|
11 |
|
12 |
<p class="summary"><span itemprop="name">Web Design</span></p> |
13 |
<p class="time">2003 - 2005</p> |
14 |
|
15 |
<p class="edu-info"> |
16 |
<a itemprop="url" href="http://www.utoledo.edu/" target="_blank" title="University of Toledo">www.utoledo.edu</a> |
17 |
</p>
|
18 |
|
19 |
</div>
|
20 |
</section>
|
Über das Autorenschafts-Markup


Das Bild zeigt das Authorship Markup (John Resig), das in den Google-Suchergebnissen angezeigt wird.
Im Juni 2011 begann Google mit der Unterstützung von "Authorship Markup". Durch die Verwendung von Markups wie
rel="author"undrel="me"können Suchmaschinen Inhalte erkennen, die von demselben Autor im gesamten Web erstellt wurden. Mithilfe von Authorship Markup kann eine Website mit mehreren Autoren alle Artikel und Beiträge jedes Autors mit seiner eigenen spezifischen "Autorenseite" verlinken.
Einzelne Artikel und Beiträge einer Website mit mehreren Autoren müssen mit dem Tag rel="author" auf die entsprechende Autorenseite verlinken. Wenn die Autorenseite auch einen Link zum Google-Profil des Autors mit dem Tag rel="me" enthält, können die Autoreninformationen in den Suchergebnissen erscheinen.
Um Nutzern dabei zu helfen, qualitativ hochwertige Inhalte zu entdecken, führt Google die Anzeige von Autoreninformationen in den Suchmaschinenergebnissen durch. Diese Funktion wird nach und nach eingeführt und kann ein sehr wichtiger Bestandteil von Suchmaschinenergebnissen und -rankings werden.
Rel-Tags
Sowohl der Kontakt- als auch der Social-Media-Links-Abschnitt der einseitigen Lebenslauf-Site-Vorlage enthalten URLs, die auf eine primäre Website und Social-Media-Seiten verweisen. Das Attribut "rel" muss den Links dieser Abschnitte hinzugefügt werden, damit das Authorship Markup implementiert werden kann. Mit dem Autorenschafts-Markup können Suchmaschinen Inhalte identifizieren, die von demselben Autor im gesamten Web erstellt wurden.
Es gibt zwei spezifische rel-Tags, die für das Markup der Autorschaft verwendet werden:
rel="me"rel="author"
Die meisten Links auf der Lebenslauf-Webseite verweisen auf Websites, bei denen es um dieselbe Person geht. Also wurde das rel="me"-Tag hinzugefügt. Für den Link zum Google-Profil wurde das Tag rel="author" hinzugefügt. Je nachdem, wo Sie Ihren Online-Lebenslauf veröffentlichen, müssen Sie möglicherweise stattdessen das rel="me"-Tag für den Google-Profillink verwenden.
Schritt 8: Erstellen Sie ein Google-Profil
Wenn Sie Ihre Originalinhalte mithilfe des Autorenschafts-Markups im gesamten Web identifizieren möchten, müssen Sie zunächst ein Google-Profil erstellen.
Wenn Sie bereits eine Google-Profilseite haben, sollten Sie Ihre Profilinformationen entsprechend aktualisieren (ein Bild von sich, Angaben zu Ihrer Person, Beruf etc.)
Sie müssen auch sicherstellen, dass auf der Seite ein +1-Tab angezeigt wird.
Wenn Ihr Google-Profil eine gute, klare Kopfaufnahme von sich enthält, kann es als Miniaturansicht in den Suchergebnissen angezeigt werden.
Schritt 9: Webseite(n) mit Ihrem Google-Profil verknüpfen
Laut Google müssen Sie zwei Dinge tun, um die Urheberschaft einer Webseite festzulegen:
- Verknüpfen Sie diese Webseite mit Ihrem Google-Profil
- Aktualisieren Sie Ihr Google-Profil mit einem Link zurück zur Startseite der Website, auf der sich die Webseite befindet.
Sie können Ihre Inhalte über einen Textlink mit Ihrem Google-Profil verknüpfen:
1 |
<a href="[https://plus.google.com/your_profile]?rel=me">Google+</a> |
oder indem Sie den Code der Google Profile-Schaltfläche verwenden:
1 |
<a rel="me" href="https://profiles.google.com/your_profile"> |
2 |
<img src="http://www.google.com/images/icons/ui/gprofile_button-32.png" width="32" height="32"> |
3 |
</a>
|
Google hat vor Kurzem Änderungen an den Markup-Anweisungen für Autoren vorgenommen, die sich auf die Verwendung der Tags
rel="author"undrel="me"auswirken. Die neuen Anweisungen besagen,rel="author"sowohl für die Text- als auch für die Profilschaltflächen-Links zu verwenden. Anstelle vonrel="author"muss jedoch das Tagrel="me"verwendet werden. Siehe Screenshot unten.


Screenshot von "Fehler: Autorenprofilseite hat keinen rel=me-Link zu einem Google-Profil"
Am Beispiel von John Resig:
- Auf der About-Seite der primären Website von John Resig hat er mit rel="me" auf sein Google-Profil verlinkt.
- In John Resigs Google Plus-Profil verlinkte er auf die Startseite und die About-Seite seiner Hauptwebsite
Schritt 10: Ausfüllen des Google-Autorenschaftsformulars (Wichtig!)
Sie haben die Schema.org-Mikrodaten hinzugefügt und die Schritte 8 und 9 ausgeführt. Füllen Sie das Google Authorship Request-Formular aus und senden Sie es ab.
Ihr Autorenschafts-Markup funktioniert möglicherweise nicht richtig, bis das Google-Autorenschaftsformular ausgefüllt und übermittelt wurde.
Schritt 11: Mikrodaten-Markup mit dem Rich Snippets Testing Tool testen
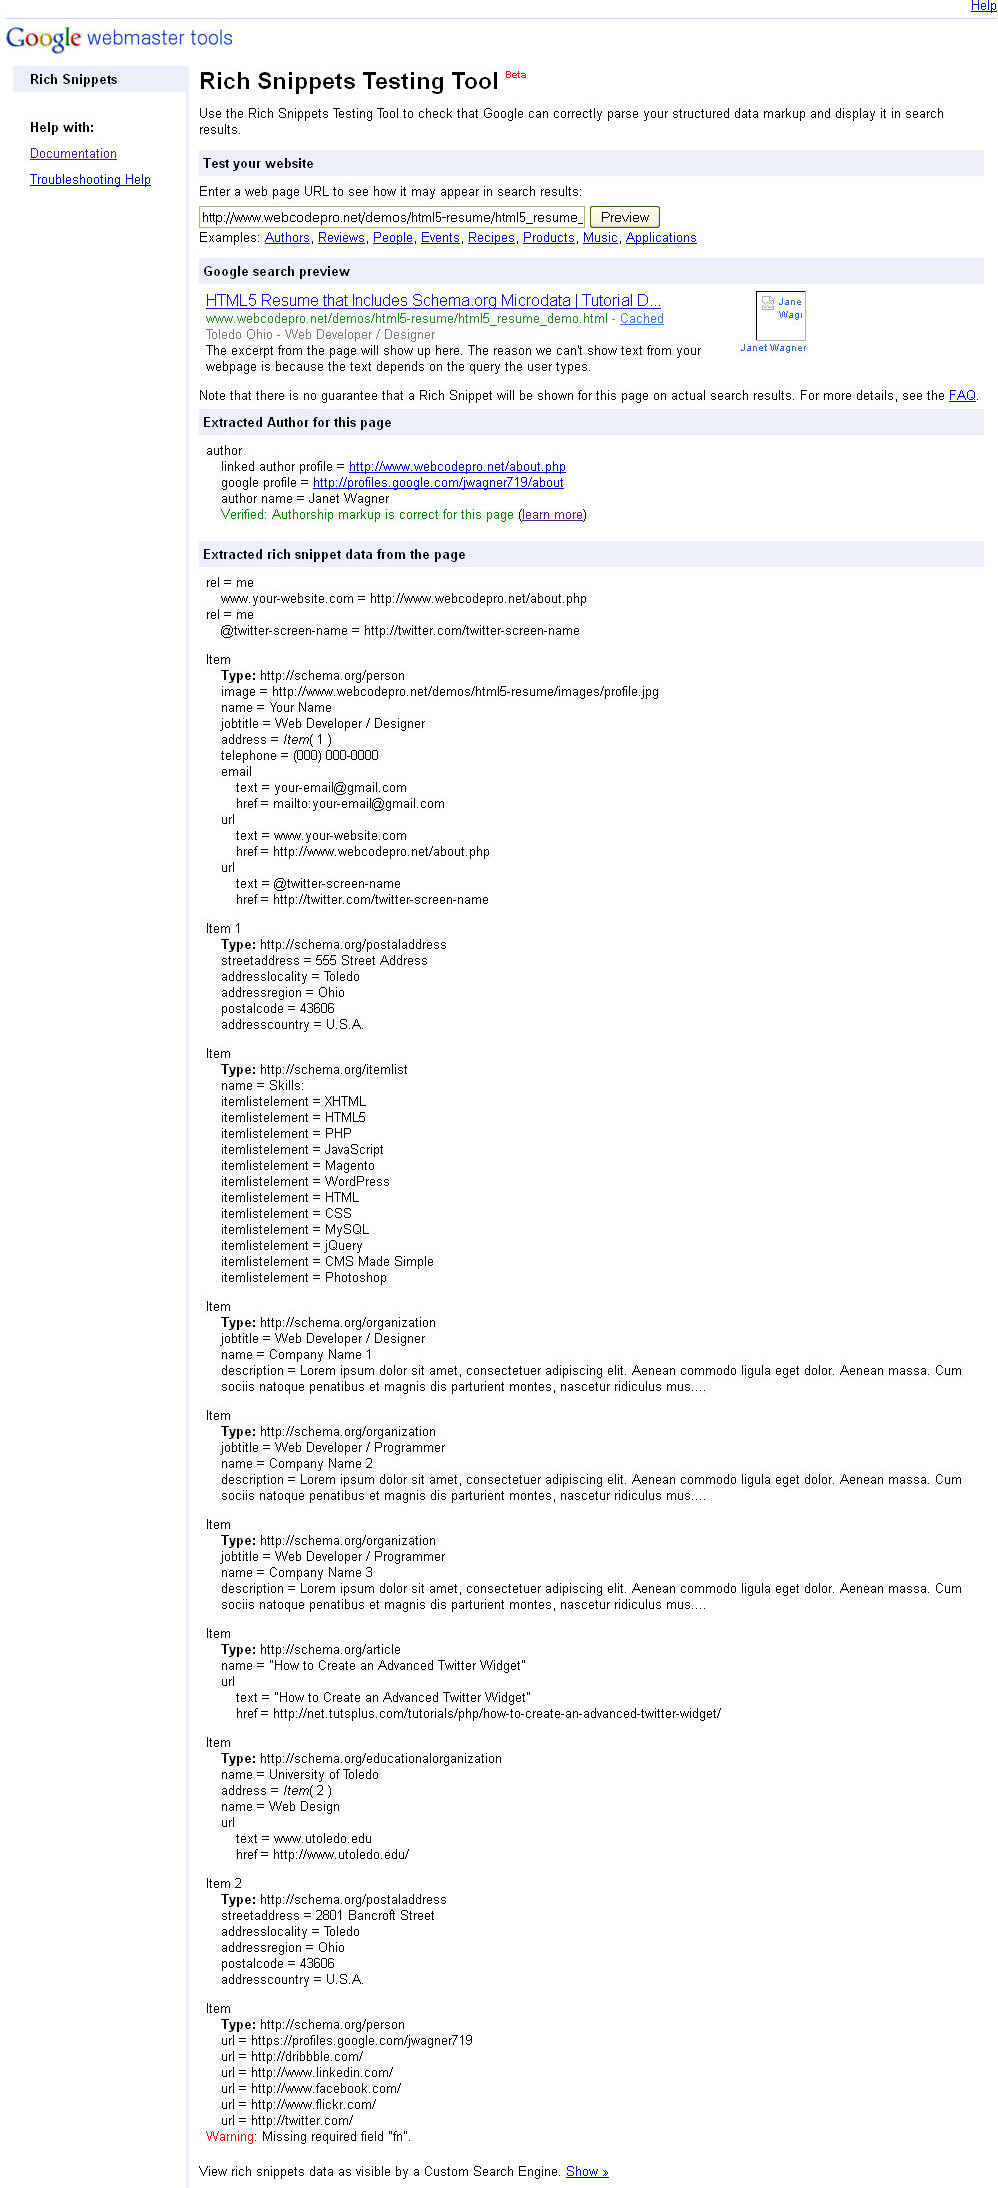
Klicken Sie auf das Bild, um die vollständigen Testergebnisse anzuzeigen
Sie können sicherstellen, dass Google Ihr Mikrodaten-Markup korrekt analysieren und in den Suchergebnissen anzeigen kann, indem Sie Ihre Webseite mit dem Google Rich Snippets Testing Tool überprüfen. Dieses Testtool kann verschiedene Arten von strukturierten Datenauszeichnungen überprüfen, einschließlich Mikrodaten, Mikroformate und RDFa.
Hinweis: Das Google Rich Snippets Testing Tool befindet sich in der Betaphase und kann zu unerwarteten Ergebnissen führen. Die im Screenshot in voller Größe angezeigten Ergebnisse enthalten einen Fehler "Warnung: Fehlendes erforderliches Feld fn." Schema.org verwendet das "fn"-Tag nicht, jedoch wird das Tag mit Mikroformaten verwendet. Dies ist höchstwahrscheinlich ein Fehler.
Alles erledigt!
Sie haben jetzt einen gut aussehenden Online-Lebenslauf mit HTML5 und Schema.org-Mikrodaten erstellt, der Informationen über Sie enthält, die in den Suchmaschinenergebnissen angezeigt werden können. Darüber hinaus können Sie durch die Verwendung von Authorship Markup Suchmaschinen dabei helfen, alle Ihre Originalinhalte im Web zu identifizieren!
Haben Sie Fragen? Lass es uns in den Kommentaren wissen und vielen Dank fürs Lesen!
 By
By


