

These days more and more sites are designed based on the single-page approach (known as single-page or one-page sites). In this article, we’ll explore how to create such an experience for a demo site by taking advantage of fullPage.js.
fullPage.js v4
This tutorial uses an outdated version of fullPage.js (v2), and there aren’t any plans to update the whole tutorial. However, there’s a new demo available (shown below) that uses the latest major plugin version (v4). The core plugin functionality remains more or less the same, so you can continue reading the tutorial and then refer to the new demo. For any differences or things that aren’t covered, refer to the plugin’s documentation.
fullPage.js version 4 requires a commercial license for commercial use (unlike version 2).
The official WordPress plugins for fullpage.js are:
Have a look at what we’re going to build on this Codepen demo. Additionally, all the files for this demo can be found on this Github repository.
What is fullPage.js?
fullPage.js is a jQuery-based plugin which allows us to build one-page scrolling websites. Created by web developer Alvaro Trigo, as we’ll see in the upcoming sections, it comes with a number of different customization options.
In addition, this plugin provides well-organized documentation with many hands-on examples.
Happily, it works not only in all modern browsers, but also in some older examples like IE 8 and Opera 12.
Getting Started with fullPage.js
To get started with fullPage, you have to download and install the following files in your project:
- The jQuery library (≥1.6.0)
- The
jquery.fullPage.cssCSS file - The
jquery.fullPage.jsJS file or its minified version (i.e.jquery.fullPage.min.js)
You can grab a copy of those files by visiting the Github repo, by using a package manager (e.g. Bower), or by loading the necessary assets through a CDN (e.g. cdnjs). For this tutorial, we’ll choose the last option.
Place a link to the CSS file within the <head> of your HTML document:
1 |
<link href="https://cdnjs.cloudflare.com/ajax/libs/fullPage.js/2.6.6/jquery.fullPage.css" rel="stylesheet"> |
...and the JS scripts before the closing <body> tag:
1 |
<script src="https://cdnjs.cloudflare.com/ajax/libs/jquery/2.1.4/jquery.js"></script> |
2 |
<script src="https://cdnjs.cloudflare.com/ajax/libs/fullPage.js/2.6.6/jquery.fullPage.min.js"></script> |
Now, we're ready to dive deeper into the plugin!
Creating Fullpage Sections
First, we have to specify the sections of our site. To do this, we assign the section class to the target elements and wrap them within a container which has a unique identifier. Later, this identifier will be used to initialize an instance of fullPage.
By default, the plugin considers the first section to be the active one. But, if we want, we can change that behavior by adding the active class to the desired section.
Here’s the required HTML structure for our example:
1 |
<div id="fullPage"> |
2 |
<section class="vertical-scrolling"> |
3 |
<h2>fullPage.js</h2> |
4 |
<h3>This is the first section</h3> |
5 |
<div class="scroll-icon"> |
6 |
<p>Jump into the last slide</p> |
7 |
<a href="#fifthSection/1" class="icon-up-open-big"></a> |
8 |
</div>
|
9 |
</section>
|
10 |
<section class="vertical-scrolling"> |
11 |
<!-- content here -->
|
12 |
</section>
|
13 |
<section class="vertical-scrolling"> |
14 |
<!-- content here -->
|
15 |
</section>
|
16 |
<section class="vertical-scrolling"> |
17 |
<!-- content here -->
|
18 |
</section>
|
19 |
<section class="vertical-scrolling"> |
20 |
<!-- content here -->
|
21 |
</section>
|
22 |
</div>
|
Notice that all sections share a common class name (i.e. vertical-scrolling) which we’ve chosen to be different to the predefined one (i.e. section). That being the case, we need to inform the plugin about this change during the initialization process.
Creating Horizontal Slides
Each of these vertically stacked sections can optionally be a horizontal slider with one or more slides. To identify the slides, we apply the slides class to the target elements and nest them within the corresponding section.
Furthermore, it’s important to mention that, technically speaking, the first slide is equal to the parent section. We’ll examine this behavior soon enough!
Back to our example, the code snippet below shows how we set up two slides within our fifth section:
1 |
<section class="vertical-scrolling"> |
2 |
<div class="horizontal-scrolling"> |
3 |
<h2>fullPage.js</h2> |
4 |
<h3>This is the fifth section and it contains the first slide</h3> |
5 |
</div>
|
6 |
<div class="horizontal-scrolling"> |
7 |
<h2>fullPage.js</h2> |
8 |
<h3>This is the second slide</h3> |
9 |
<p class="end">Thank you!</p> |
10 |
</div>
|
11 |
</section>
|
Again, as you can see, we’ve given our slides a custom class name (i.e. horizontal-scrolling).
Controling the Site Appearance
We can control the appearance of our sections and slides by taking advantage of the available configuration parameters. One of those parameters is the sectionColor property that gives us an easy way to define the CSS background-color property for each section.
Moreover, we can set our own styles so as to further customize the pages. For example, imagine that we want to apply a full background image to the second section. Here’s how we could accomplish it:
1 |
section:nth-of-type(2) { |
2 |
background: url('https://unsplash.it/1910/1221?image=626') no-repeat center / cover; |
3 |
}
|
Customizing the Navigation Options
The plugin offers many built-in options for moving through sections and slides. Some of those options are activated by default (e.g. mouse wheel and keyboard), while others are manually triggered via the configuration object (e.g. circle dots).
In our project, we want to add extra navigation in the form of dots. In addition, we choose to hide the left and right arrows which normally appear on the slider. So, after enabling the dot navigation, we can change its appearance by overwriting the default styles. Here are the new rules:
1 |
#fp-nav ul li a span, |
2 |
.fp-slidesNav ul li a span { |
3 |
background: white; |
4 |
width: 8px; |
5 |
height: 8px; |
6 |
margin: -4px 0 0 -4px; |
7 |
}
|
8 |
|
9 |
#fp-nav ul li a.active span, |
10 |
.fp-slidesNav ul li a.active span, |
11 |
#fp-nav ul li:hover a.active span, |
12 |
.fp-slidesNav ul li:hover a.active span { |
13 |
width: 16px; |
14 |
height: 16px; |
15 |
margin: -8px 0 0 -8px; |
16 |
background: transparent; |
17 |
box-sizing: border-box; |
18 |
border: 1px solid #24221F; |
19 |
}
|
And below is a screenshot that demonstrates the changes we’ve made:
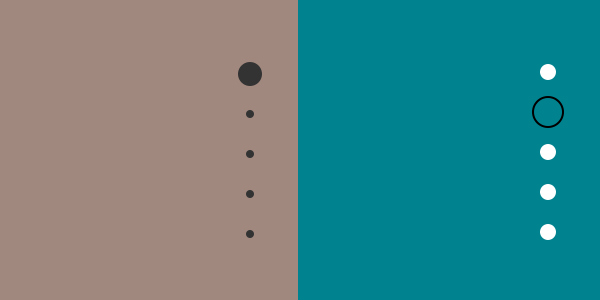
Please note that we include the rules above in our custom stylesheet, hence avoiding changes to the plugin’s CSS file.
Creating Links to Sections and Slides
fullPage.js allows us to change the URL of our site as we scroll through the different sections. To do so, we use the anchors parameter. More specifically, this parameter is an array that holds the anchor links which need to be shown on the URL for each section. For instance, in our example we specify the following anchor links (which should be unique):
1 |
anchors: ['firstSection', 'secondSection', 'thirdSection', 'fourthSection', 'fifthSection'] |
That done, when we visit the first section, the site URL will have the #firstSection identifier at the end, on the second the URL will end in #secondSection and so on.
In the same way, the plugin also modifies the URL while we scroll through the slides. At this point though, we have to recall that basically the first slide (which has an index of 0) is the related parent section. With that in mind, in our project when we are in the first slide of the fifth section, the URL will end in the #fifthSection anchor link. Loading the second slide of the same section will trigger a URL that ends in #fifthSection/1 because the second slide (which has an index of 1) is actually our “first” slide.
It’s worth mentioning that we can modify the anchors for our slides by adding the data-anchor attribute to them with the desired anchor names (which should also be unique), just like the following example:
1 |
<div class="horizontal-scrolling" data-anchor="firstSlide"><!-- more content here --></div> |
Linking Menus to Sections and Slides
To better understand how we can link a menu to the fullPage, let’s have a look at our fixed header. The screenshot below shows how it appears:

And the HTML:
1 |
<div class="header-top clearfix"> |
2 |
<h1 class="l-left"> |
3 |
<a href="#firstSection">Your Logo</a> |
4 |
</h1>
|
5 |
<a class="l-right toggle-menu" href="#"> |
6 |
<i></i>
|
7 |
<i></i>
|
8 |
<i></i>
|
9 |
</a>
|
10 |
</div>
|
As long as the hamburger menu icon is triggered, the main menu overlay appears:

Here’s the code related to this menu:
1 |
<nav class="hide"> |
2 |
<ul id="menu"> |
3 |
<li data-menuanchor="firstSection"> |
4 |
<a href="#firstSection" title="First Section">First Section</a> |
5 |
</li>
|
6 |
<li data-menuanchor="secondSection"> |
7 |
<a href="#secondSection" title="Second Section">Second Section</a> |
8 |
</li>
|
9 |
<!-- more list items here -->
|
10 |
</ul>
|
11 |
</nav>
|
So, to let fullPage know about the menu, we have to register it by using the menu configuration property. Next we need to link the menu items to the relevant sections. To do this, we add the data-menuanchor attribute to our items with the respective links as the values. As long as those values match, the plugin appends the active class (as we scroll) to the corresponding menu item.

Note that the plugin doesn’t yet append the active class to the slides. To fix this, we can use either jQuery (best solution) or CSS. In our example, we solve this problem by adding the following CSS rule:
1 |
body.fp-viewing-fifthSection-1 #menu li:last-child a { |
2 |
background: #453659; |
3 |
}
|
See the result below:

In actual fact, we didn’t add the active class to the second slide. By taking advantage of the different body classes that the plugin appends to each section and slide, we merely give this item the styles of the active class.
Firing Callbacks for Sections
The afterLoad callback is fired once a section is loaded and the onLeave callback once a user leaves it.
In our project, we hide the vertical dot navigation when the fifth section is loaded:

Here’s how we achieve it:
1 |
afterLoad: function(anchorLink, index) { |
2 |
if (index == 5) { |
3 |
$('#fp-nav').hide(); |
4 |
}
|
5 |
}
|
6 |
|
7 |
onLeave: function(index, nextIndex, direction) { |
8 |
if(index == 5) { |
9 |
$('#fp-nav').show(); |
10 |
}
|
11 |
}
|
Firing Callbacks for Slides
The afterSlideLoad callback is triggered when a slide is loaded and the onSlideLeave callback when the user leaves it.
In our case, we focus on the second slide to perform a number of different actions. For instance, once the slide is loaded we disable the possibility for scrolling up. In addition, we change the background-color property of this slide as well as the appearance of the elements that belong to it.

Part of the code we use is shown below:
1 |
afterSlideLoad: function( anchorLink, index, slideAnchor, slideIndex) { |
2 |
if(anchorLink == 'fifthSection' && slideIndex == 1) { |
3 |
$.fn.fullpage.setAllowScrolling(false, 'up'); |
4 |
$(this).css('background', '#374140'); |
5 |
$(this).find('h2').css('color', 'white'); |
6 |
$(this).find('h3').css('color', 'white'); |
7 |
$(this).find('p').css({ |
8 |
'color': '#DC3522', |
9 |
'opacity': 1, |
10 |
'transform': 'translateY(0)' |
11 |
});
|
12 |
}
|
13 |
}
|
14 |
|
15 |
onSlideLeave: function( anchorLink, index, slideIndex, direction) { |
16 |
if(anchorLink == 'fifthSection' && slideIndex == 1) { |
17 |
$.fn.fullpage.setAllowScrolling(true, 'up'); |
18 |
}
|
19 |
}
|
Initializing the Plugin
This is the last required step in order to trigger the functionality of fullPage. Here, we pass as part of the configuration object all our customizations. Look at the relevant code snippet below:
1 |
$('#fullpage').fullpage({ |
2 |
sectionSelector: '.vertical-scrolling', |
3 |
slideSelector: '.horizontal-scrolling', |
4 |
controlArrows: false |
5 |
// more options here
|
6 |
});
|
Conclusion
In this tutorial, we enjoyed a quick tour of the fullPage.js jQuery plugin and learned how to build a responsive full-page scrolling site. It’s important to understand that this type of website isn’t suitable for all the cases. Besides their attractive design, they have many restrictions and their maintainability can be difficult, especially for dynamic sites. Plus, this format can cause complications with SEO.
Next Steps
If you’d like to use the demo site as the basis for experimenting with the plugin, I suggest the following challenges:
- Incorporate the excellent animate.css library into the project and try to create scroll-based animations.
- Use your jQuery knowledge to enable the
activeclass to the second slide (see Linking Menu to Sections and Slides section).
Finally, if you have any experience with one-page sites feel free to share your thoughts with us in the comments below!


