


- Overview
- Transcript
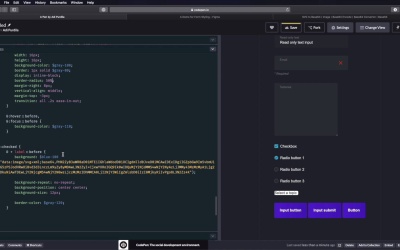
3.4 Styling Radio Buttons
In this lesson we’ll style some radio buttons. This is a very similar process to what we did on the checkboxes, so let’s get started.
Related Links
1.Introduction
1.1Welcome to the Course01:47
2.The Basics of Styling HTML Forms
2.1A Few Words on Styling HTML Forms07:12
2.2Working With the Appearance Property07:03
2.3Working With Typography05:34
2.4Working With the Box Model06:03
2.5Positioning Form Elements06:40
3.Advanced Techniques for Styling HTML Forms
3.1Styling Text Inputs20:15
3.2Styling Buttons06:25
3.3Styling Checkboxes10:20
3.4Styling Radio Buttons03:26
3.5Styling Select Elements08:06
3.4 Styling Radio Buttons
Welcome back to the course. In this lesson, we're gonna style the radio buttons. And this is actually a process that's almost identical to what we did on the check boxes. So let's quickly take care of these elements. The check boxes look like this. Instead of being square, they are rounded, of course. But they have the exact same characteristics as the check boxes, so same background, same border. When they're checked, they have the same background and border. But instead of a check mark, they have a little bullet, a little circle here in the middle. So, let's go in here, and actually what I'm gonna do is copy all of the code that we wrote for the check boxes. And instead of input type check box, I'm gonna say input type radio, right? So, [LAUGH] now this look exactly like check boxes. But let's make the necessary changes here. So display none. That stays label cursor pointer user, select None. And then we're creating the Before element. Again 16 by 16, background color, border. Border radius, instead of three pixels, we're gonna make 50% to make these round, just like that. What else? Margin right, this is correct, vertical line, margin top. The transition stays, the hover and focus. This is the exact same color. And then on Checked, label Before background bill 100. But we just need to change this check mark to this bullet, so let's export that. Let's load it, encode it. So I'm just gonna copy the URL version, copy, and replace it here. Paste that in. And that's a little bit too big. Background repeat position these stay the same but on Background size we'll try something a bit smaller like 10, or maybe 8, Okay, an 8 seems to work just fine. And that's it. Thanks to the power of copy paste, we now have working radio buttons. And let's actually do a quick test and load this in other browsers to make sure it works properly. Check box, works just fine. Radio buttons, they work just fine here in Firefox. Let's do the same in Chrome, they work just fine. We're almost done styling our little forum kit here. The last element on our kit is the Select, and actually this one is the hardest one to style. So we'll tackle it in the next lesson.


