
 Lessons: 5Length: 47 minutes
- Overview
- Transcript
2.3 Adding Content to Your Website
Welcome back to the course. In this lesson, we’re adding our website content, and we’ll also learn a few handy tips and tricks for easily working with Hugo themes. Let’s begin.
2.3 Adding Content to Your Website
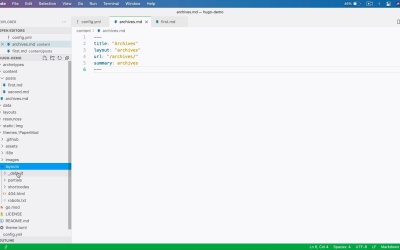
[MUSIC] Welcome back to the course. In this lesson, we're adding our website's content and we're also learning a few handy tips and tricks for easily working with Hugo themes. Let's go. All right, so let's talk about the folder structure for a bit. Because I showed you the working directory here called hugo-demo, but I didn't actually go through these subfolders in more detail. Let's start with content or the content folder. This is where all of your actual content will be posts, articles, pages, folders, subfolders, all of it will be hosted right here. And we'll get to this in just a little bit. Layouts is usually for theme overrides. So, a theme comes with its own layouts folder. And this contains all the HTML files that are used to render your website, right? And whenever you want to modify such a layout, you can either change the file here directly or you can copy this file into your own layouts folder and overwrite it there. I'll show you that in just a little bit. Static is for all the static assets like images, and themes is the folder that contains, well, all your themes. Now, let's talk about the actual content, how do you add content to your website? Well, you can go to the terminal, and you can say hugo new. And let's say I wanna create a new post. I need to put that in the posts' folder. So I'm gonna say posts/ and then the name of my post. Let's say first.md. And .md indicates this has a markdown extension. This is very important. Make sure to remember to use that. And that created the posts folder in my content. And inside that, I have a first.md. So let's go back to Visual Studio Code. And let's open that. And as you can see, Hugo already created this header for us. This is called the front matter, right? And it's basically a set of instructions or settings for a particular piece of content. In our case, for a post. So everything that's inside front matter is inside these three dashes. And it's basically a collection of key value pairs. This is the key, this is the value. So this is the title of the post, the date at which it was created and then draft by default is set to true, but we can set it to false. And that will get it to be displayed on the actual website. If you set the draft to true, then it's not gonna be displayed on the website. And this is a great way of keeping track of what articles you're ready to publish and the ones that are not yet ready. So let's go back to the terminal and we'll do hugo server to open up a server back to our website. And if we do a refresh here, you'll see that we now have our first post displayed right here. If we click it, it opens up the single page for that post. Now, we can add some content here in the form of Markdown. And if you don't know how Markdown is written, or you can simply do a Google search, and you'll find tons of resources on Markdown syntax. Here's one on GitHub guides and you can see here how you can write Markdown. Basically, you would use a very simple syntax. Let's say I want the heading, I would say, this is a heading one, This is a heading two. And then whatever paragraphs you have, you just write it like so. This is a paragraph. Of course, Markdown has a lot of special syntax you can use for italicize text, bold text, lists, images, links, blockquotes, and so on and so forth. So now that we've written our content in one of these posts and we save it. The Hugo server automatically detected the change through rebuilt, our website, and it refreshed our page. And here is our heading one, heading two, paragraph, all is well. So that's one way of creating new content. You just open up your terminal, and you say hugo new and whatever you write after new is gonna be placed in the content folder. In my case, I said I wanted this first.md file to be created under posts. But you don't have to use the terminal. For example, you can go into your file Finder window, your explorer window, or in your code editor and you can say, okay, inside posts, I want a new file, let's call it second.md. If you're gonna do this manually, you'll have to write the front matter manually as well, second post. Of course, you'll have to write the date here yourself. Let's add some content to that as well. So now if we go back to our home page, you can see that we have two posts being displayed. Pretty cool, right? Now, how do you add an image to a post? Well, it's actually quite simple. Let's add to this first.md. And here on the front matter, I'm gonna say, cover and then image. I'm gonna place an image link there in just a little bit, you can specify an alt. You can also specify a caption if you want. And for the image, let's go into static and I'm just gonna paste the image here that I had lying around on my computer. This is a photo that I took and let's rename that as headphones, for example. So this is placed as you saw under the static folder. You can create a subfolder here as well if you want, let's say img, and I'm gonna place these inside img. And then here in front matter, I'm gonna say img/headphones.jpg. Save that. And now Let's see, why isn't this working? Maybe it's because I have a uppercase extension there. And there it is. This is how you add a cover image to a post, right? This is what it looks like on the homepage. If you click on it, this is how it's being displayed. Now, you can do a lot more to customize your Hugo website. And you can do that simply by using the configuration file. And these changes really depend from theme to theme. So make sure to read the theme documentation to see exactly what's possible. For this particular theme, PaperMod, here are some of the things we can do. I'm gonna open the config yml. And I'm gonna do the following. Let's say we want a menu displayed, right? To go to the maybe categories, tags, maybe archives, how do we do that? Well, it's simple. We say, menus, or sorry, menu, we say main. And then we need to tell Hugo what kind of menu items we want. First, we start with an identifier, let's say one for categories. Then the name should be categories. So this is the actual text of the link. Url, I'm gonna say slash categories, and then slash again. And then we can specify a weight. So the weight is used to determine the order of the menu items. Then it's simply a matter of rinse and repeat. Let's make one for tags, or give it a weight 20. So the order is category and then tags. Let's duplicate this again for archives, and we'll set a weight the 30 on this. So now, just like that, we have a menu on the right side of our header, and if we click it, it takes us to each respective page. We don't have yet all the pages, for example, we don't have an archives page, but we can easily create that under content. Let's create a new file. We'll call it archives dot md. And in here, let's use front matter. We'll say title, archives. Layout, and actually, let me do this. Archives, and I'll show you why we set that in just a little bit. Url, it's gonna be slash archives slash again. And then we'll also add summary, archives. And finally, let's close that front matter. So now, we have an archives page. Now, where did this come from? Well, if we look into our theme, under layouts, default, we have an archives html, right? So this is the template that we're using in this page. See here, layout, archives. This is the file that we are referring to. As you'll see, if I do this, and we go back to the page, that change is reflected back. Now, this is actually a good opportunity to show you a theme overwrites. So let's say that you want to use this archives template, but with some of your own changes. Well, you can do the changes directly in the theme directory. But if you're gonna update that theme at some point, those changes will be lost. To get around that, you can create a local copy of the file you wanna change, and that will stay safe in case you're updating the theme. And here's how you do that. You go into your layouts folder, and you have to match the exact folder structure from your theme. So, archives html, inside our themes folder is under layouts, underscore default, archive dot html. So we'll go here, under layouts. We'll set or we'll create a new folder, call it default. And inside that default folder, archives html. We're gonna copy the contents of the original file, paste them here. And we can then make whatever changes we want. Let's say that I want an hr below the title. So now, if I go back to my website, you'll see that our version of archives html is being used because we have this hr while the theme version of the file does not have that change. So that's how you can easily change any layout from your theme by using these overwrite. Just again, remember to match the exact folder structure from your themes folder into your layouts. So that is the archives page. All done. What else can we do to the content in Hugo? Well, we can add tags, and we can add categories, right? Because we have these pages for a good reason. So on each post, we can add tags and categories. Here's how you do that. Let's open a first md, for example. And to add tags, you simply say tags. And here, we actually have an array, a list of items, right? And you would set your tags, let's say html and css. And you can also add categories. So categories, again, a list. Let's say, for example, tech. So now, if we go back to our website, you can see that our first post displays the tags at the very bottom. And now, if we go to categories, you can see that the tech category's displayed. Same goes for tags. We can see all the available tags, and they have a little number here showing us how many posts are tagged with that particular entity. And if we click on any of them, it shows us the post for that specific category or tag. Pretty cool, right? Very, very simple. Now, when it comes to how posts are displayed, we can also add a couple of things. For example, we can enable hyperlinks to the full image size on posts. So currently, if we click on this image inside the post single page, nothing happens. However, we can say params, and then inside, cover. And then under that, link full images true. Once we do that, This will enable us to click on an image on the cover image of a post and open it at full size. What if we want to add some breadcrumbs? We can do that by saying ShowBreadCrumbs and set it to true. So now, each post will display these breadcrumbs on the top of it. And by the way, all of these options are theme specific, so you'd have to consult your theme documentation for that. We can also display a reading time, we can say, ShowReadingTime true, and that will display a reading time indication here, just after the date. We can display some share buttons. Right under the post, social sharing. We can also display navigation suggestions below a post by saying showPostNavLinks, then true. So that's gonna display next page here, preview page here, really, really simple. Finally, we can also make some changes to our homepage by choosing to display some additional information. Now, for this a theme in particular, we can enable something called home info mode. And it goes something like this homeInfoParams, title, I'm gonna say, hello stranger. And then the content. And you can type in like an introductory message. Then you can decide, okay, I want some social icons. You would give these a name, and based on the name, this is gonna generate an icon and then you can specify a URL, so where does that link take you to, let's just say, facebook.com. And you can repeat this for as many icons as you want, in my case I just added Facebook, Twitter, and GitHub. So now, if we go back to our, page here, I also went ahead and did change the single quotes, double quotes here and remove the quotes on the content because it was giving out errors. Now, you really have to consult the YAML documentation to see exactly what the syntax is. So once we did all of this, our page now has this home info section with a title, a content, and those three social icons that we added. So that's our basic website. We have a simple header, with the ability to change, The color scheme from light to dark. We have a menu, we have this intro section, hero area, whatever you wanna call it. And then we have our post. And then finally, at the bottom of footer, and we also have this nice back to top. Now, probably a lot of you are thinking about how do I edit all of this? How do I edit the layouts? How do I add my own logo? Well, it's very, very simple. You need to find the layout or the template that you want to edit. Let's say for example, you want to add your own logo, right? Well, that particular template can be found under themes, layouts, and probably under partials. Let's see, header.html. And it is, as you can see here, we have a div class logo, and this is actually already implemented. You can display an image with your logo, you just need to use the proper parameters. And you can check out the theme documentation for this, but let's say that you don't wanna be bothered with any of that. What if you just want to display an image as a logo? Well, you need to duplicate this file in your own layouts folder using of course, the proper folder structure. So in our case it would be layouts, partials, header.html, right? You would then remove, All of this, And add your own image with your own logo, and you should be good to go. In fact, any kind of change that you wanna make to the layout of your website can be made to these files right here. These are all the HTML files, if you wanna access the CSS, then you need to go to Assets, CSS, and you'll find everything here. Again, to make sure that your changes are preserved, don't just edit the CSS directly in the themes folder. But instead, copy that File into your working directory, and make your changes. Making sure of course, to preserve the folder structure. All right, so now our website is complete, at least the demo version, right? On a real website, you'll probably spend a lot more time, tweaking everything, and making sure all of your content is added, all of your styling is on point. But for the purposes of this course of learning the basics of Hugo, I believe this very simplistic website that we created will do just fine. Now, the last step in our journey to create a website is to publish it, right? To a live server so that it's accessible to everyone. I'll show you how we can do that for free in the next lesson. So I'll see you there.


