


- Overview
- Transcript
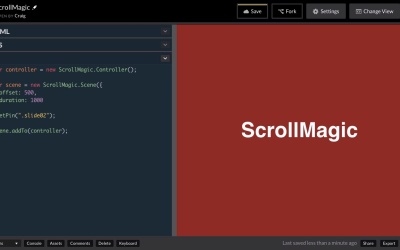
3.1 Pinning an Element
One of the two major things you’ll be doing in ScrollMagic is pinning an element in place. In this lesson, I will demonstrate how to pin an HTML element in a fixed position for a specified range of scrollbar movement.
Related Links
1.Introduction
1.1Introduction00:40
2.Scrollmagic Setup
2.1Using ScrollMagic03:35
2.2Controllers and Scenes03:43
3.Scroll Events with Scrollmagic
3.1Pinning an Element09:38
3.2Pinning a Menu07:03
3.3Scrollable GSAP Animations10:18
4.Conclusion
4.1Final Thoughts00:36
3.1 Pinning an Element
Hello, and welcome back. Now that we have an understanding of what controllers and scenes are in the ScrollMagic, let's create a scene to pin our second slide in place. So we have three slides here. Our first one with the red background, then with the green, then with the gray. So what we're gonna do is once we get down to our second slide here, we're going to pin it in place. And we're gonna be able to keep scrolling down with that item pinned in place until we get to a certain level of scrolling. And then our final piece of content, our final slide, will scroll into place. And it might seem like kind of a pointless piece of functionality, but we'll see later on why that's useful. So let's jump into our JavaScript. Actually, before we do, let's just review our HTML. So again we have three sections. Each of them with a class of slide. And they also have a second class of slide01, 02, and 03. So let's jump into our Java Script. And let's create our controller, first of all, which is the easy part. We just say var and then give it a name. We're just gonna call it controller for the sake of ease. And we're gonna set this to a new ScrollMagic.Controller(), semicolon to end your statement. Then we're gonna create our scene. Now, our scene is going to define what item we're going to apply a ScrollMagic effect to. And in this case it's going to be our second slide. And what we're gonna do with that is we're going to set a pin in that slide for a certain amount of scrolling, for a certain duration, as we move the scroll bar up and down. So we're gonna create our scene. And let's just call it scene for now. var scene = new ScrollMagic.Scene, with a capital S. And then, again, inside the parentheses for our scene constructor we also need a JavaScript object, which is created using curly brackets. And then we'll nudge that closing curly bracket down a couple of lines. And then in between those curly brackets we're going to put a couple of properties here. So the first property we're gonna look at is called offset. And this determines how far we can scroll down on the page before this scene starts to take effect. In other words, how far do we want to scroll before we pin that second slide in place? Well, we wanna scroll down the full height of the window, because that will get us to the second slide. But for now let's just set it to a hard coded value of 500. That will allow us to scroll down 500 pixels, and then once we've reached 500 pixels, that second slide will pin itself in place. And we'll see that in action in just a second. The second thing we need is a duration. So we're gonna say, comma, go down to the next line. And then we're going to set our duration to another value, let's say 1,000. This will allow us to keep scrolling another 1,000 pixels before that second slide becomes unpinned, before it starts scrolling again. So, again, we're gonna start our scrolling at 500, or we're gonna start pinning our second slide, I should say, after we've scrolled 500 pixels. And then we're gonna be able to keep scrolling down for 1,000 pixels without that second slide moving at all. And then it will just continue to scroll as normal. Now, this isn't gonna work yet because we haven't actually set that pin. We've created the scene, but we haven't told that scene what we want to do with it. Do we want to set a pin for it or do we want to apply a tween to it? Well, we want to set a pin in it. So we're gonna come to the end of that closing parenthesis there. And I'm gonna say .set, and then Pin with a capital P. And then inside parentheses and inside quotation marks, we're gonna type in a CSS selector for the element that we want to pin in place once we reach that offset. And the element we want to pin is that second slide. And if you look back at your HTML, you can see that that second slide has a class name of slide02. So the CSS selector for that would simply be .slide02. And that's the item we want to pin in place. So after the closing parenthesis for that we can put our semicolon to end our statement. And you'll notice a lot of people when they do this will just nudge that .setPin down to the next line. Either way it's gonna work the same way. So then we'll skip a couple of lines. And this still isn't going to work, because our scene has been created, but it hasn't been attached to a controller yet. And there are a couple of ways we can do this. One way that we've already looked at is we can point to the scene, which we've simply called a scene, and then call in the addTo method. So scene.addTo, with a capital T, and then the inside parentheses we would type in the name of our controller, which in this case is just controller. So that will attach it to the controller. And now, if we scroll down, once we get to 500 pixels, which turns out to be about at this point here, you'll see that that first slide keeps scrolling up while the second slide is pinned into place. And for 1,000 more pixels of scrolling, it stays in place. And then finally it scrolls off and the last slide scrolls on. So just to show you that there are multiple methods of adding scenes, let's go ahead and comment this first one out. And I'll show you the other way to do it. The other way to do it is to point to the controller first, and then we would say addScene, with a capital S, open and close parentheses. And then the addScene method is expecting an array of scenes. So an array in JavaScript is put inside square brackets. So we have our opening and closing square brackets, and then in between those square brackets we would put in a list of scenes that we want to attach to this controller. Well, in this case we're just attaching one scene. And we called it, simply, scene. And so this will achieve the same effect. If you have multiple scenes, you would say scene1, comma, scene2, etc. But again we just have one scene, so we just include one. And then when we scroll down we'll see that it has the exact same effect and it. And it did not stop, because we need to take that 1 off. We don't have anything called scene1. It's just called scene. So let's try that again. We'll scroll down. And sure enough, once it gets to 500 pixels, that second slide gets pinned in place. So, again, there are two ways to do that. Really, the way I decide which one to use is if I want to add a single scene, I use the scene.addTo method, because it's a little less to type. And if you want to add multiple scenes, it's a lot easier to do it this way so that you don't have to type in multiple addTo methods. So now I want to show you, before we move on, one more attribute of this setPin method that we can add, or one more parameter that we can add. And this new parameter is going to be another JavaScript object. So we're gonna say, comma, space, and then we'll type in a set of opening and closing curly brackets. And then inside those curly brackets I'm gonna point to a property called pushFollowers, with a capital F. And by default this is set to true. I'm gonna set it to false. Now, we saw a moment ago that when we scroll down to that second slide and kept scrolling, that second slide stayed in place for a while. And then eventually it started moving up and the third slide moved in. And that's because, by default, when we set a pin in an element, everything that comes after that element is basically going to be pinned in place too. All of the followers, if you will, of that element are going to be pinned in place too. And only after this duration here is reached will those followers finally move into place. Well, if we set pushFollowers to false, then this element here is going to be the only element that is pinned in place. Everything else, including all of the elements that come after it, are going to keep moving. So now if we come over here and start scrolling down, we'll see that our second slide gets pinned into place. But as we keep scrolling, our third slide is still moving. And it comes into place, it basically overlaps that second slide. So one thing I want to do here is I wanna change these values here for offset and duration. Right now our offset is just set to 500 pixels, but that's not really a convenient place for us to pin it. We don't want to pin it until it gets all the way to the top. So one way we can do that is we can just set the offset to the height of the window. So if our window is 1,000 pixels high, then we want to scroll down 1,000 pixels before our second item gets pinned into place. So one way we can do that is we can use jQuery to call on the height of the window. And the way we do that is we type a dollar sign, and then inside parentheses the word window, and then .height(). And then for our duration we can actually set that to the same value, so we scroll down again the height of the window before that duration ends. So let's try that. Let's start scrolling down, and hopefully once it gets to the top, there we go. Once our second slide here gets to the top of the window, it gets pinned in place and our third slide keeps moving on. So if, for some reason, your third slide ends up behind your second slide, you might not see it move on at all, even though it's animating on. If it ends up behind that second slide, you're not gonna see it. So you could go into your CSS and set the z-index for your slides if you want to make sure that that sort of third slide, excuse me, ends up in front of the second one. But those are the basics of pinning an element in place using the ScrollMagic library. Thank you for watching, and I'll see you in the next lesson.


