Skip to content

Envato: Get every type of asset for any type of project, and a full stack of AI tools

From $16.50/m
envato-tuts+
envato-tuts+
  • Design
  • Business
  • Photo
  • Video
  • Web Design
    Web Design View all Web Design
    Start Learning
    • Software
      Software
      • Sketch
      • Figma
      • Adobe XD
      • Sublime Text
      • Visual Studio Code
      • MailChimp
      • Webflow
      • Campaign Monitor
      • AI Tools
    • WordPress
      WordPress View all WordPress
      • WordPress CMS
      • WordPress Themes
      • WordPress Plugins
      • WordPress Hosting
      • Elementor
    • HTML/CSS
      HTML/CSS View all HTML/CSS
      • HTML
      • CSS
      • JavaScript for Designers
      • Bootstrap
      • Animation
      • HTML Templates
      • Landing Pages
      • SVG
    • Email
      Email View all Email
      • Email Design
      • Email Templates
      • Email Marketing
      popular software in Email
      • Campaign Monitor
      • MailChimp
    • UX/UI
      UX/UI View all UX/UI
      Learn UI Design
      • Forms
      • Icon Design
      • Navigation
      • Prototyping
      • Wireframing
      • Web Typography
      • Material Design
      • Design Theory
      • Design Systems
      Learn UX Design
      • User Research
      • User Testing
      • Responsive Design
      • Usability
      • Accessibility
      popular software in UX/UI
      • Sketch
      • Figma
      • Adobe XD
      • Webflow
    • SEO
      SEO View all SEO
      • Content Strategy
      • Conversion
      • Performance
    • eCommerce
      eCommerce View all eCommerce
      • Shopify
      • WooCommerce
      • BigCommerce
      • Magento
    popular software in Web Design
    • Sketch
    • Figma
    • Adobe XD
  • Code
  • Music

  • Sign In
  • Tuts+ YouTube
  • Envato
  • Go to Envato
  • |
  • Tuts+ YouTube
  • |
  • Sign In
  • envato-tuts+
  • Design
  • Business
  • Photo
  • Video
  • Web Design
    • Software
        • Start Learning
        • Sketch
        • Figma
        • Adobe XD
        • Sublime Text
        • Visual Studio Code
        • MailChimp
        • Webflow
        • Campaign Monitor
        • AI Tools
    • WordPress
        • Start Learning
        • WordPress CMS
        • WordPress Themes
        • WordPress Plugins
        • WordPress Hosting
        • Elementor
      All WordPress
    • HTML/CSS
        • Start Learning
        • HTML
        • CSS
        • JavaScript for Designers
        • Bootstrap
        • Animation
        • HTML Templates
        • Landing Pages
        • SVG
      All HTML/CSS
    • Email
        • Start Learning
        • Email Design
        • Email Templates
        • Email Marketing
      All Email
      • popular software
      • Campaign Monitor
      • MailChimp
    • UX/UI
        • Learn UI Design
        • Forms
        • Icon Design
        • Navigation
        • Prototyping
        • Wireframing
        • Web Typography
        • Material Design
        • Design Theory
        • Design Systems
        • All UI Design
        • Learn UX Design
        • User Research
        • User Testing
        • Responsive Design
        • Usability
        • Accessibility
        • All UX Design
      • popular software
      • Sketch
      • Figma
      • Adobe XD
      • Webflow
    • SEO
        • Start Learning
        • Content Strategy
        • Conversion
        • Performance
      All SEO
    • eCommerce
        • Start Learning
        • Shopify
        • WooCommerce
        • BigCommerce
        • Magento
      All eCommerce
  • Code
  • Music
  1. envato-tuts+
  2. Home
  3. Web Design
  4. UX/UI
  5. UX Design

Learn Figma Auto Layout in 30 Minutes | FREE COURSE

Adi Purdila
Adi Purdila Nov 8, 2023
Copied to clipboard!

Lessons

Play lesson (2 mins)
Read Related Content

Play lesson (6 mins)
Read Related Content

Play lesson (9 mins)
Read Related Content

Play lesson (9 mins)
Read Related Content

Play lesson (5 mins)
Read Related Content

Play lesson (10 mins)
Read Related Content

Figma's Auto Layout tool is a game-changer for UI designers. Learn how to use Auto Layout in just 30 minutes in this free course.

Introduction

Figma is my favorite tool for UI design, and there are some very good reasons for that. But the main reason I use Figma is the Auto Layout feature. With it, you can group elements in a way that allows you to quickly align them, but also add spacing between and padding around those elements. You can also easily change the order of the items in that group, and you can switch from horizontal to vertical display with the click of a button.

Figma auto layout in useFigma auto layout in useFigma auto layout in use

"If you're going to use Figma for UI or UX design, then you need to learn Auto Layout—it's going to make your life ten times easier. "

In this course, you'll learn about:

  • adding Auto Layout in Figma
  • spacing, padding, and alignment
  • spacing modes
  • resizing with Auto Layout

Getting Started With Figma Auto Layout

OK, let's see how Auto Layout works in Figma with a simple example. We'll start by looking at how to add Auto Layout to a frame.

You can add Auto Layout to frames and components, but not to groups.

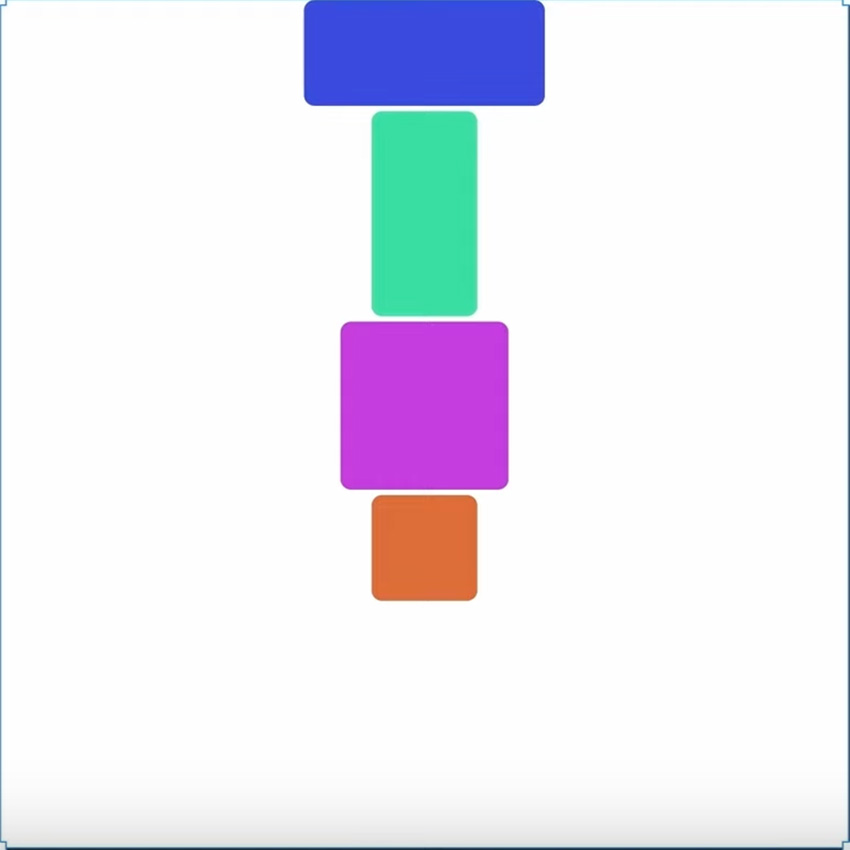
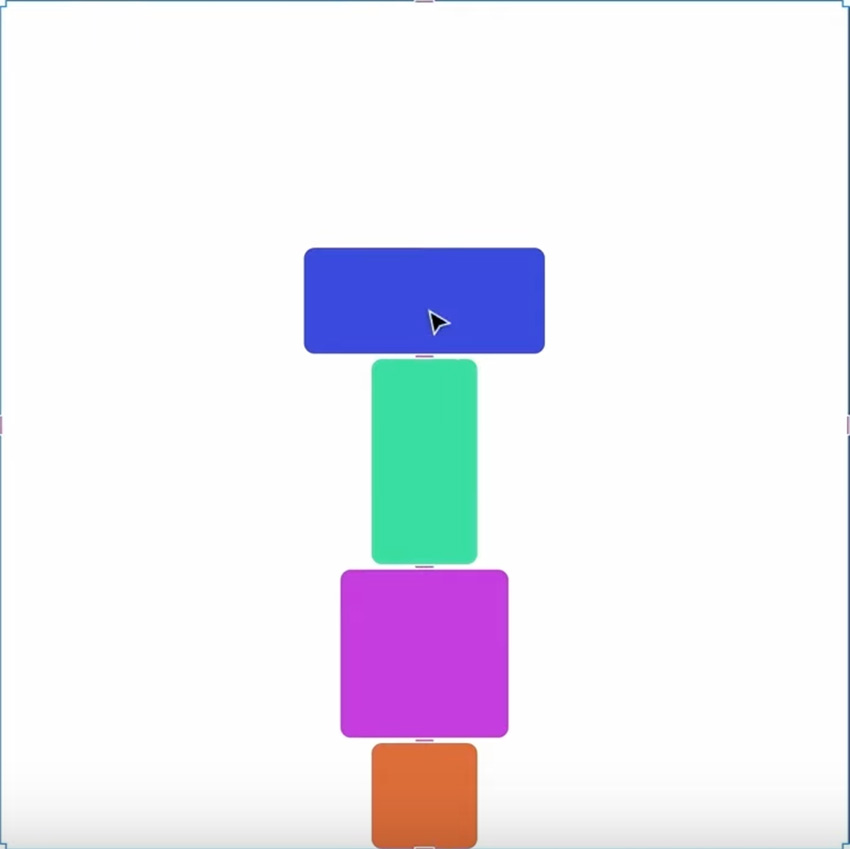
There are several ways to add Auto Layout. First of all, you need to have at least one element selected. In this example, I'm going to select all four boxes and then right-click > Add auto layout.

add auto layoutadd auto layoutadd auto layout

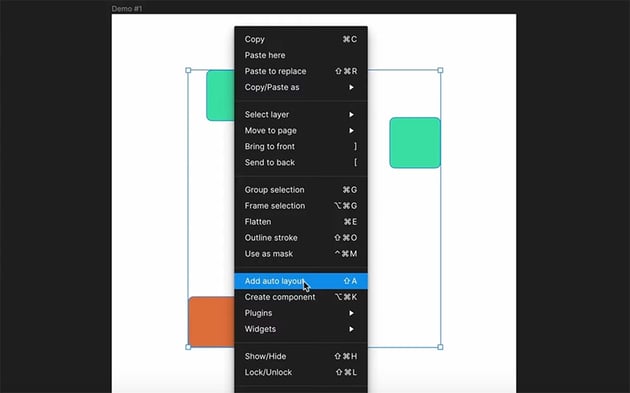
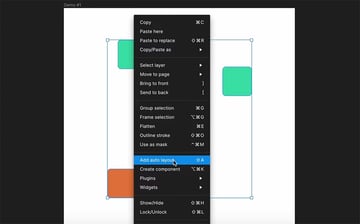
You can also use the shortcut Shift-A, or you can go to the menu and select Object > Add auto layout. When you do any of these three actions, Figma will automatically create a frame with the elements that you selected.

new auto layoutnew auto layoutnew auto layout

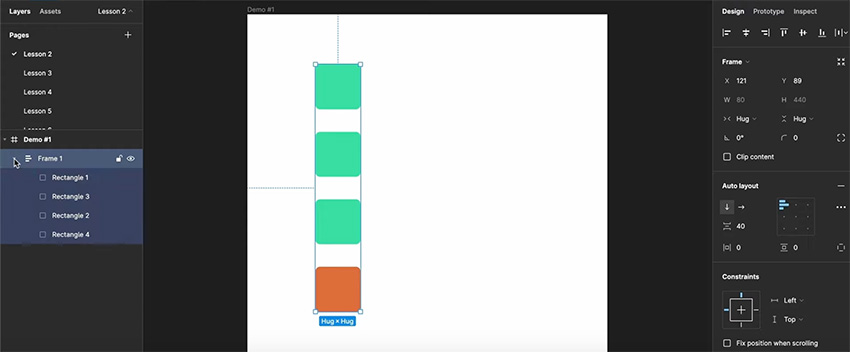
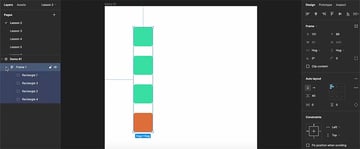
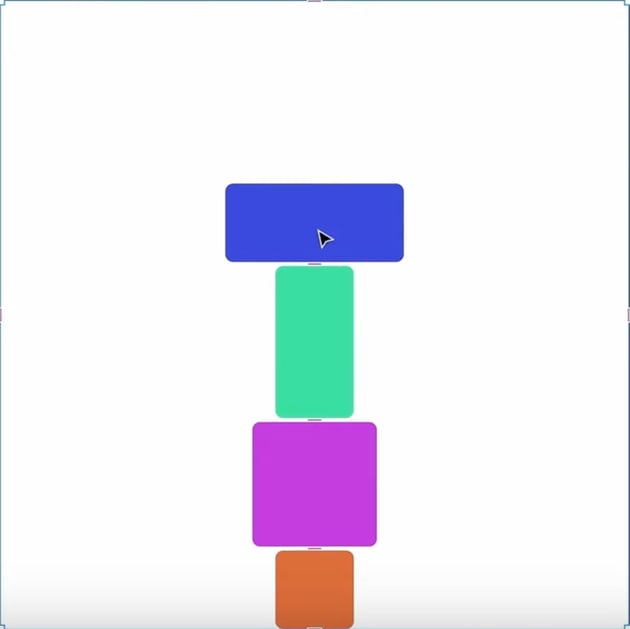
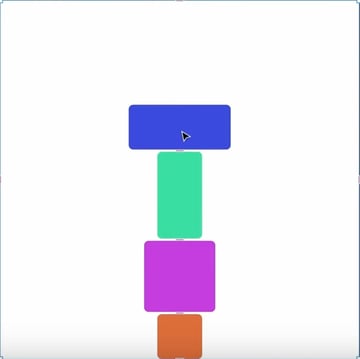
As you can see, they are automatically aligned and evenly spaced, and because of the original arrangement of the boxes, they are stacked vertically. It's easy to change that, though, simply by clicking the arrow buttons in the Auto layout section.

horizontal layouthorizontal layouthorizontal layout
If you need to remove an auto layout, just right-click > Remove auto layout (Shift-Option-A) or click on the minus sign in the Inspector panel.

One last thing: if you move one of the elements inside the frame, it will maintain the same layout, so its position is constrained. If you want to be able to move it freely, you need to apply absolute positioning by clicking the little Absolute position button to the right of Frame in the Inspector panel.

Changing Spacing and Padding

Now, let's see how to work with spacing and padding in Figma. Let's say we have a simple menu with four menu items. Normally, it would be a bit of a pain to ensure that we have the same spacing between all the items, but Auto Layout makes it much easier. Just select them and hit Shift-A to create an auto layout, and then you can easily change the spacing in the Auto layout panel.

menu spacingmenu spacingmenu spacing

Now, if you add another menu item, Figma will automatically set even spacing between the items. Simple!

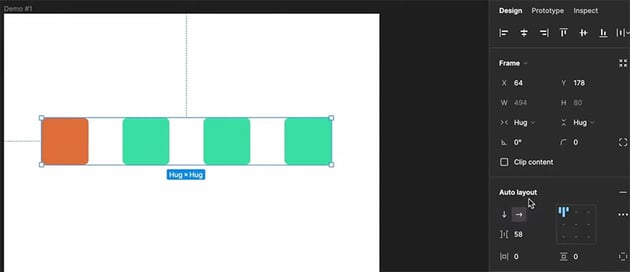
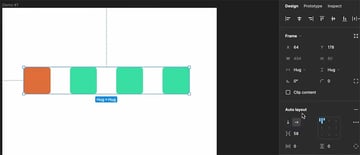
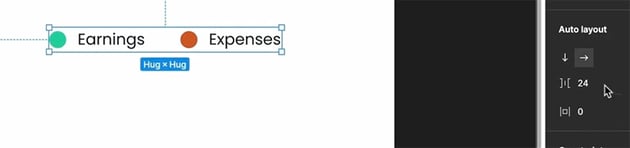
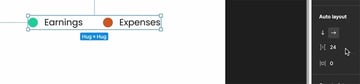
Here's another example, with two shapes and two pieces of text. We can easily select each pair, create an auto layout with Shift-A, and apply the same spacing between the text and shapes to keep them consistent.

changing spacing in auto layoutchanging spacing in auto layoutchanging spacing in auto layout

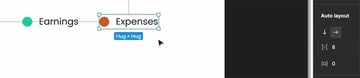
We can then create a new auto layout with all four elements, and set the spacing between earnings and expenses.

spacing examplespacing examplespacing example

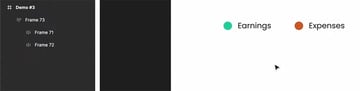
This is an example of nesting frames with Auto Layout. You can see that the main frame, frame 73, also has two additional frames that each have auto layout applied. This concept of nesting becomes very powerful on larger projects.

nestingnestingnesting

Padding

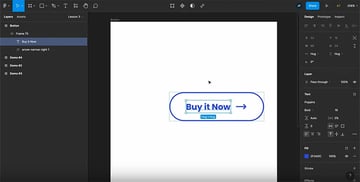
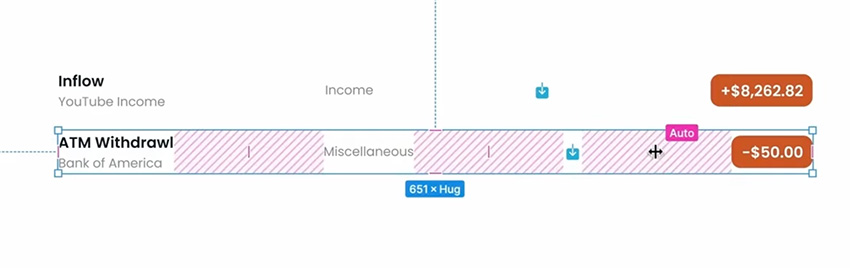
So far, we've talked about the spacing between items, but what about the padding? To demonstrate that, let's look at a new example: a button. In this example, I've created an auto layout with text and an arrow icon. I've applied spacing of 8 px in the usual way, but this time I've also applied padding using the options below that—in this case we have 32 px horizontal padding and 16 px vertical padding.

padding examplepadding examplepadding example

By default, your changes will apply the same padding to both top and bottom (or left and right). But if you want to change all four sides individually, just click the little button to the right of the controls, and you can then set individual padding values for each side.

padding individual buttonspadding individual buttonspadding individual buttons

There's also a faster way to change the padding. If you hover on a frame that has auto layout and has padding applied, you will see some pink handles. Click on a handle to open up a dialog box where you can enter a value.

padding handlespadding handlespadding handles

You can also click and drag to change the padding value dynamically. Here are some other things you can do:

  • If you hold down Shift while dragging, you'll change the padding value in increments of 10.
  • If you hold down Option, you'll also affect the opposing side.
  • If you hold down both Option and Shift, you can change all four values at the same time.

Changing Alignment

Aligning elements in Figma is easy. Just add them to an auto layout, and then use the alignment buttons in the Auto layout panel to set the alignment. Here are some examples:

top righttop righttop right
Top Right Alignment
top centertop centertop center
Top Center Alignment
top lefttop lefttop left
Top Left Alignment
centrecentrecentre

Center Alignment

bottom centrebottom centrebottom centre

Bottom Center Alignment

If you want to get more precise with text alignment, you can click the three dots in the Auto layout panel and choose Text baseline alignment.

text baseline alignmenttext baseline alignmenttext baseline alignment

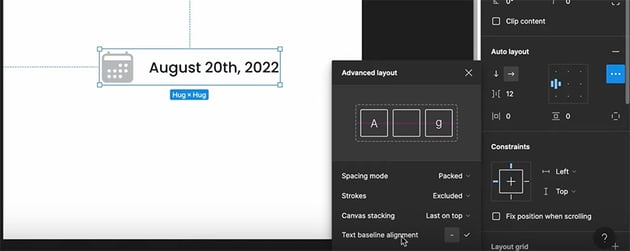
Then, if you bottom-align your text with another element like an icon, the baseline of the text will line up precisely with the bottom of the icon.

closeup of baseline alignmentcloseup of baseline alignmentcloseup of baseline alignment

If you have a shape with a stroke, you can also choose whether you want the stroke to be included or excluded in the alignment.

stroke included or excludedstroke included or excludedstroke included or excluded

Working With Different Spacing Modes

In the examples so far, we've been using the default distribution or spacing mode, and that's called "Packed". But that's not the only one. So now let's talk about the different spacing modes in Figma.

In this example, we have a menu, an icon, and a button. We can change the spacing mode by clicking those three dots to open the Advanced layout menu and choosing the Spacing mode from there.

spacing modes in figmaspacing modes in figmaspacing modes in figma

Here's the difference between the two options:

  • Packed will use a fixed spacing between the items.
  • Space Between will use automatic spacing between the items.

So if we use Space Between, we can resize the menu, and the spacing between the items will change automatically to keep them evenly distributed.

spacing mode examplespacing mode examplespacing mode example

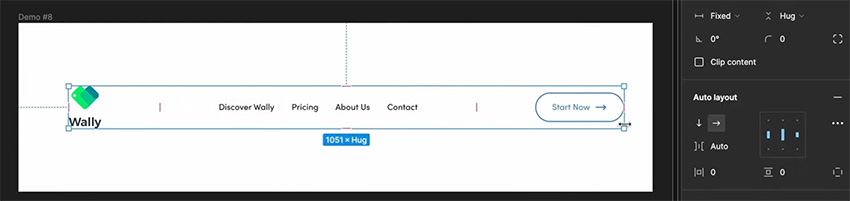
If we use Packed, on the other hand, the space between the items will remain at the fixed values we specified.

Resizing and Auto Layout

Finally, let's look at resizing, a powerful option that allows us to control the size of the objects inside the frame and even the size of the frame itself with Auto Layout.

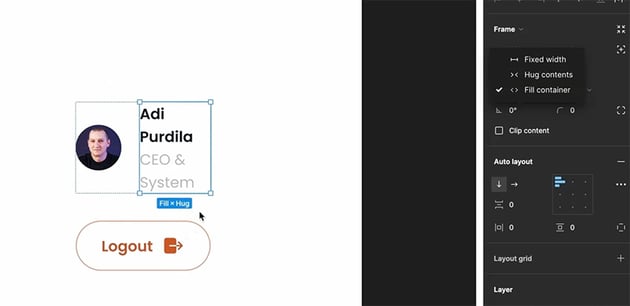
We have three options for both horizontal and vertical resizing, accessed in the menu shown below. They are:

  1. Fixed width
  2. Hug contents
  3. Fill container
resizing optionsresizing optionsresizing options

Fixed width is quite self-explanatory: it means that the element has a fixed width that will not change.

Hug contents, on the other hand, means that the element is only as wide as its contents—so if you type in more text, the element expands, and if you delete text, it gets smaller. That's the default setting, which we've been using so far in this course.

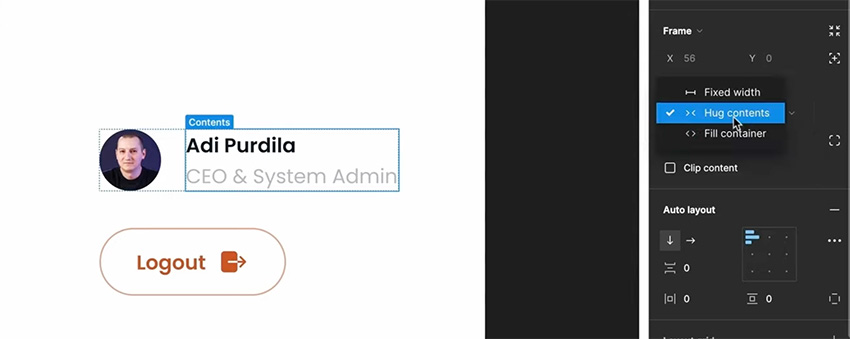
Fill container means that the element expands to the size of its parent container. Let's see an example of what that looks like.

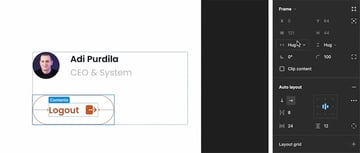
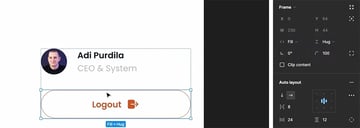
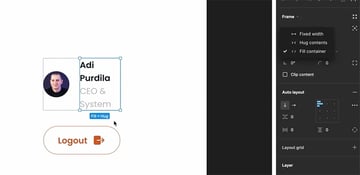
In the example below, the "Logout" button is set to the default Hug contents.

hug contentshug contentshug contents

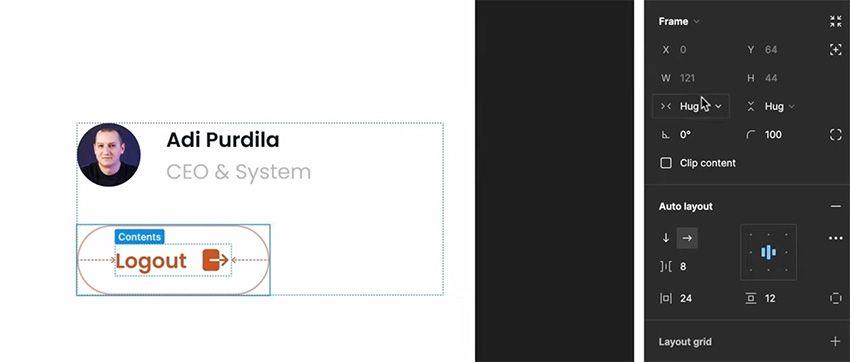
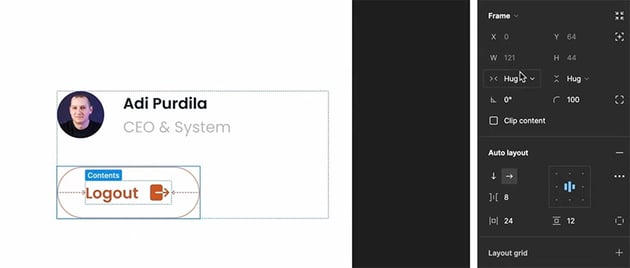
But if we change the horizontal setting to Fill container, it expands to the edge of its parent container.

fill containerfill containerfill container

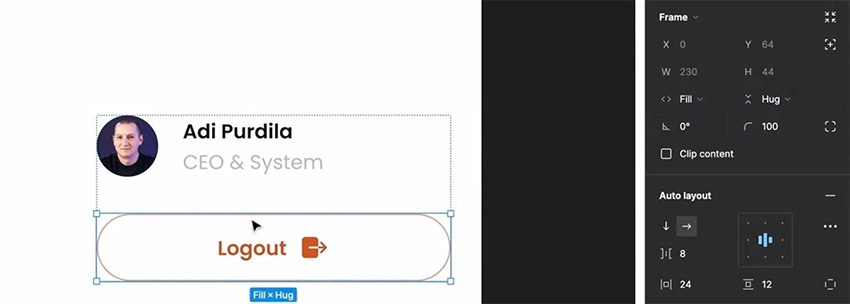
This can be useful when you want to resize the frame, e.g. for different screen sizes. The elements will resize automatically, while maintaining their alignment and adjusting their width to fill the container.

resized elementsresized elementsresized elements

The Fixed width setting can also be useful in other cases. Here's an example, in which the elements are misaligned because they are set to Hug contents, and the width is different for each row.

misaligned rowsmisaligned rowsmisaligned rows

If we set each item to be a Fixed width, on the other hand, and make sure that the widths are the same on each row, then they'll be nicely aligned again.

alignment fixedalignment fixedalignment fixed

So that's it for Figma Auto Layout, which in my opinion is its best feature. I hope you found this course useful, that you learned something new, and that you will be using Auto Layout in your own Figma projects.

Now that you're already saving time with Auto Layout, why not take it to the next level and download some awesome Figma templates from Envato Elements?

Learn More About Figma

Still hungry to learn more? Check out these video courses to take your Figma skills even further.

Introduction To Figma | FREE COURSE
Figma Components: From Zero to Hero | FREE COURSE
How I Design for IMPACT With Figma | FREE COURSE

Or if you prefer written tutorials, try the free Figma tutorials here on Envato Tuts+. Here are some great options for you:

  • Introduction To Figma (Free Beginners’ Course)
    Adi Purdila
    14 Nov 2022
  • 4 Ways to Resize Elements in Figma
    Adi Purdila
    17 Jul 2020
  • How to Create a Frosted Glass Effect in Figma
    Adi Purdila
    29 Jul 2020
  • 4 Figma AI Updates to Elevate Your Design Workflow
    Janila Castañeda
    18 Oct 2023
  • How to Use Figma for Responsive Web Design
    Janila Castañeda
    14 Jun 2023
  • We Tested the Latest Figma Updates (Little Big Updates April 2023)
    Adi Purdila
    24 Apr 2023
Adi Purdila
Adi Purdila
Adi Purdila is a web design instructor for Tuts+. With over 100 courses and 200 tutorials published to date, Adi's goal is to help students become better web designers and developers by creating content that’s easy to follow and offers great value. Being self-taught himself, Adi strongly believes that constant learning (academic or otherwise) is the only way to move forward and achieve your goals. When not typing away at his keyboard, he loves woodworking and caring for his ever-growing family of rescue pets. You can stay up to date with what he's doing by following him on social media or visiting his website at adipurdila.com.
adipurdila
One subscription. Unlimited downloads of assets. Full stack of AI tools.
Find everything from photos to fonts, and templates to so much more.
Unlimited Downloads
From $16.50/month
Get access to over one million creative assets on Envato.
Over 9 Million Digital Assets
Everything you need for your next creative project.
Create Beautiful Logos, Designs
& Mockups in Seconds
Design like a professional without Photoshop.
Join the Community
Share ideas. Host meetups. Lead discussions. Collaborate.
envato-tuts+
DiscoverAbout EnvatoOur Pricing & PlansStock VideoVideo TemplatesRoyalty-Free MusicStock PhotosFontsPopular Searches
License & User TermsLicense TermsTerms & ConditionsPrivacy PolicyAcceptable Use PolicyFair Use PolicyCookiesCookie SettingsDo not sell or share my personal information
ResourcesDiscover Tuts+Video & MusicDesignMarketingWeb DesignExplore Blog
HelpHelp CenterBecome an Affiliate
About UsWho We AreOur ProductsOur PurposeJoin Our TeamCompany Blog
AuthorsBecome an AuthorAuthor Sign InAuthor Help Center
Envato MarketEnvato Tuts+Placeit by EnvatoMixkitAll ProductsSitemap

© 2025 Envato Trademarks and brands are the property of their respective owners.