

- Overview
- Transcript
2.3 Implementing Table Pagination and Sorting
Due to their nature, tables can get quite big. It isn’t uncommon for data to require lots and lots of rows, and displaying all of these in a single page might not be the best approach.
One solution to this is table pagination, where rows are split into multiple pages. Let’s see how we can do that. We'll also look at how to create a table that users can sort.
Related Links
2.3 Implementing Table Pagination and Sorting
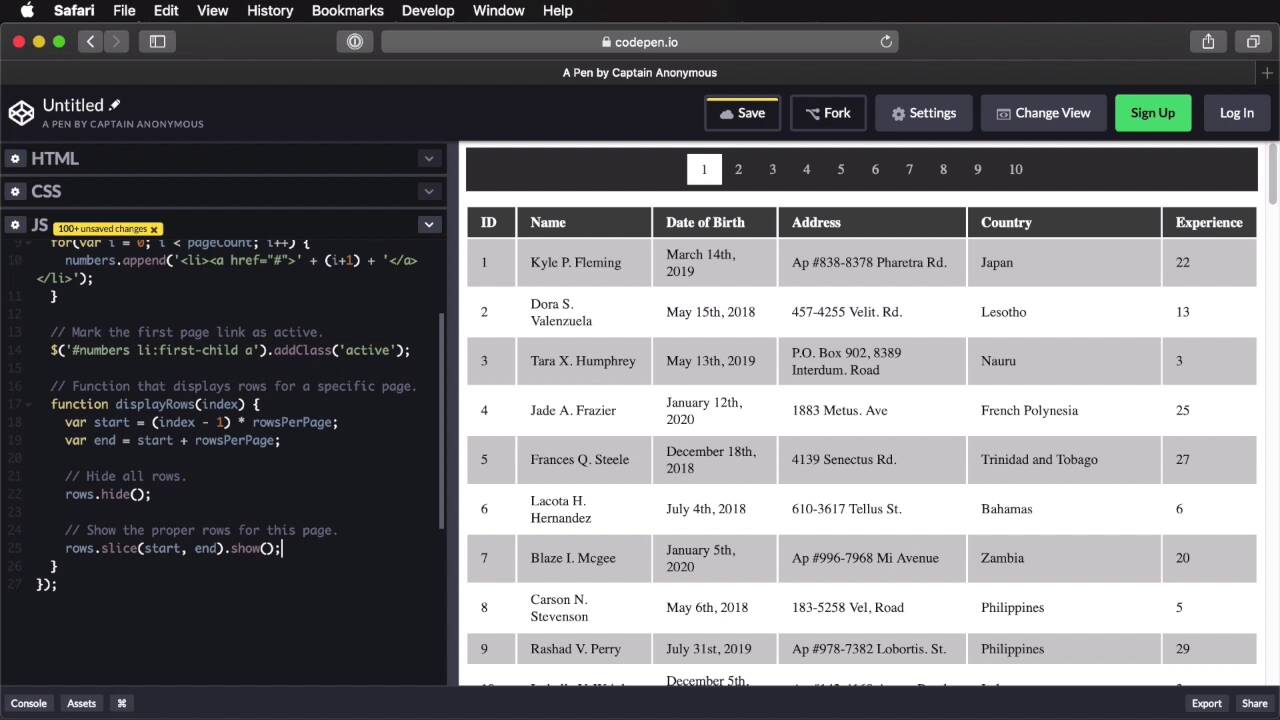
Because of their nature, tables can get quite large. It can lots and lots and lots of rows and displaying all of these in a single page might not be the best approach. So one solution to this is to split these rows into multiple pages. So let's see one way we can do this. Right here, I have a demo table with 100 rows. As you can see, it's quite large, and up here I created a simple control. It's a day of class pagination which gives this background an inside ordered list with an idea of numbers. And right now I just have these 3 lists items to show you what it looks like. But basically, the way we want this to work is we want to define a fixed number of rows to display on teach page, and then we wanna write a script that generates automatically the number of pages that we're gonna have. And then clicking each page number will take us to that specific page where we'll display the rows which corresponds to that specific page. So let's jump in JavaScript, and we're gonna use jQuery here so let's not forget to add that. So, let's start with this. So, on Dom ready. That's basically a shortcut. Before we start let's remove these list items because we will be generating these automatically from java script. Okay, so let's start by defining some variables and constants. First, how many rows do we want per page? Let's say 5. Then we'll target the rows. And we'll reference the table element that we have tbody tr. Then let's define a rows count, it basically means how many rows do we have. And here it's simply a matter of saying rows length. And then, let's do a page counts. How many pages will we have when we wanna display five rows per page? For this, we're gonna do math seal to get rid of the decimal points if we have any. And we'll just say rows count divided by Rows per page. And finally, let's target the numbers, we'll be generating numbers. That's just the ordered list that you saw in HTML, here. Cool, now, Let's see if we got these right. So let's see. Rose count. Yeah, so we have a hundred rows, and let's see how many pages. We have 20 pages. So if we want to play five rows per page on 100 rows, we have 20 pages. So our math checks out here. Cool, now, let's begin by generating the pagination. For that, I'm gonna use a for loop var i equals zero, I is smaller than the page count and then I plus plus. So we're just going through all of the pages. And for each one, we're gonna say numbers, numbers. We're gonna append a list item with an anchor tag inside it. So we're gonna say list item. And then a, h ref. Currently it goes nothing inside the list of an item we want to put the page number. So we're going to say plus we're going to do an eye plus one because we want our pages to to start with one not from zero, like the idea here. So i plus 1 plus, and let's close the a tag and let's close the list item tag. Okay, so right now, here, we have all the pages from one all the way to 20. Let's increase the rows per page number here, in which case, we're only going to have ten pages with ten rows on each page. Cool, now, let's mark the first page link is active because we always start with page one on page refresh. So mark the first page link as active. To do that, we'll simply a reference numbers list item. First child A, add class of active and this is a class that I defined and CSS. It basically adds a white background that changes the text color, and that's pretty much it. So now, let's go ahead and display the first set of rows. For that, we're gonna create a function that displays rows for a specific page. Let's call that function displayRows, and it takes an index, which is really the page number. Here, we wanna have a start index and an end index, and we're gonna display the rows between the start and the end indexes. So that's actually super easy to do. We're gonna say start = index * RowsPerPage. And then car and equals start plus rowsPerPage. So example. Let's say we want to display the rows for page one. We have 10 rows per page, okay? So we're gonna have the start index, is gonna be 1, times the rows per page, which is 10. So that adds up to 10. Bit this is actually not correct, because our pages or page numbers start with 1. But they should really start with zero in this case, so we're going to do index minus one. So back to our example, for page one the index one so the start will be one minus one, which is zero, times ten, which is zero. So the start, is at position zero. The end is at start which is zero plus 10. So we need to display the rows between zero and 10. For page two, the index here will be 2. So the start will be 2 minus 1 is 1 times rolls per page is 10 the end is 10 plus 10, which is 20. So we're displaying rows between 10 and 20. So that's exactly what we want. And once we have these indexes, we can simply hide all rows with this command, rows.hide(). And then, we're gonna show the proper rows for this page. We're gonna say rows Here we're going to use a JavaScript method called slice. We're gonna pass in the start and the end. So this will basically take all of those rows, that array of rows and it's gonna slice it using the interval between start and end, and once I have that, I can simply show them. So that's our function. It's very straightforward and it's gonna work like a charm. Now, we'll go back here and let's go ahead and display the first set of rows. So display the first set of rows. To do that we'll simply say, display rows. So we'll call the function that we just created and we're gonna pass in one, which is the index of my first page. So by doing that, we're now displaying rows from one to 10. If I were to pass in two, I would display the rows between 10 and 20, which is 11, 12, 13 and so on. Cool, so now, all that's left to do is handle the pagination click that you see here. So when I click on one of these links, it's going to show me the appropriate rows. For that, we're gonna say numbers will start and a on click function. Let's prevent default behavior of that link because this is. An anchor tag. Let's create a variable here. This is for performance really. It's just so that we don't call in this twice. We're just calling it once, and we're putting it, handle in this variable here. Now, let's remove the active class from the links. So we'll try to get numbers listed on a remote class active. And then, we're gonna add the active class to the current link, the one that we just clicked. So we'll say this, and class active. So let's see if that works. Great, do we have any JavaScript errors? No, we do not. All right, and finally, all that's left to do is to show the rows corresponding to the quick page ID, or index. So we'll say this play row we gonna call this function, this text. Now, let's see what we did here. Page two goes from 11 to 20, page three goes from 21 to 30, page seven, eight, nine, and ten. So it works beautifully. Let's also do a quick test here, let's change the rows per page to, I don't know, 17. In which case we only have six pages. But as you can see, they are all displayed correctly. Awesome, all right, so let's do a quick recap of what we've done here. I'm starting off by defining how many rows I want per page. Then I'm getting the number of existing rows and I'm generating how many pages I want by dividing how many rows I have to how many rows per page I want. Then, I go in and generate the navigation based on how many pages I'm gonna have by appending a list item and an anchor tag to my ordered list. And by the way, this can be in an unordered list, it doesn't really matter. Next, I'm marking the first page link as active, because I'm always starting A page one and I'm displaying the first set of rows. So I'm calling the display of rows function with an index of one which is the number of my page. In this function, I'm defining a start next and an end index which is basically the points. Where I wanna slice that array of rows. So I hide all the rows, and then, I show only that slice in between the start and the end points. Finally, when I click one of the navigational links, I'm removing the active classroom, all the links, and I'm adding it to the one that I've just clicked. And then, I'm calling the displays rows function, and I'm passing in the text of the link, which is the page number. That's all there is to it. Now, of course, you can improve this a lot. You can add a previous button here, a first button, and next and a last button. So you can add multiple controls to this. You can use some JavaScript animations. Maybe a fade in fade out, when you're switching pages here. You can do lots of things, but at it's core, this is the algorithm that you're going to use. Now, another very useful feature we can add to a table is sorting. So with this, we can sort the rows based on different criteria. Most of the time, this is alphabetical. So either you're sorting alphabetically, ascending or descending. But you can also sort numbers, you can sort date and because of this large number of data types. So we can have in our table creating the sorting algorithm from scratch would take a long time. So instead of doing that, I'm gonna show you a third party one you can use and it works beautifully. It's called table sort, and it basically does stuff like this. It's super easy to use, it's JavaScript only. So you don't depend on JavaScript or jQuery and it's super easy to download. Simply include tablesort.min.js. Include any other additional sort types you need like maybe number or date, and then, you simply have to use this script. So I have a demo table here, with a couple of rows. And I also loaded all the necessary files here on codenet. Now, I'm just gonna call this. Use the idea of my table, which is this one here and we're pretty much good to go. Now, we can click on these table headings to sort .Ascending or descending which is very, very cool. Now, there's an extra bit of CSS you can grab. And it's this one here we can find it. If you scroll down here, you can find this tablesort.css. And you can copy that code. It looks like this. You can copy it, paste it in your own CSS file and just customize it. The way want to, in my case, the only thing that I changed was this color here. So the color for the triangles, I changed it to white. But the rest, I just left it as it is and it works great. So that's a much simpler solution than just coding. This sorting algorithm by hand. So go ahead and check that out, it's called table sort. And you'll find the link to it in the lesson notes, and you will also find the link to a round up of 33 JavaScript solutions For sorting tables. So we'll find a lot more scripts there if you choose to use those. All right, so far we've learned where you should use tables, how to make them responsive, how to create pagination for them, and sorting. But just like any other elements in a web page, tables must be built with accessibility in mind. We'll explore that aspect a bit more in the next lesson.


