

- Overview
- Transcript
4.5 Slide and Fade
For your first transition from slide one to slide two, we'll animate the position and the opacity of the content.
1.Introduction
1.1Introduction00:42
1.2Frameworks for the Win06:05
2.Easy Parallax Scrolling With Parallax.js
2.1What Is Parallax Scrolling?04:56
2.2Setting Up the Site06:47
2.3Bootstrap Basics08:03
2.4Structuring the Header12:49
2.5Structuring the Body11:21
2.6Parallax Backgrounds08:27
3.Scroll Events With Wow.js
3.1Downloading Wow.js05:03
3.2The HTML09:27
3.3Simple Animations06:39
3.4More Animations13:06
4.Scrolling With Skrollr
4.1Downloading Skrollr05:31
4.2Data Attributes14:07
4.3Filling Out the Content11:25
4.4Styling the Slides04:38
4.5Slide and Fade10:05
4.6Narrow the Margins11:04
4.7Nested Animations07:26
4.8Animating the Shuttle05:38
5.Bonus Content: Creating Scrollable Navigation
5.1jQuery Click Events05:53
5.2Animated Scrolling With jQuery05:52
5.3Setting Up Your Scroll Positions13:49
5.4Detecting the Current Position11:00
5.5Manual Scrolling Issues06:15
6.Conclusion
6.1Conclusion01:39
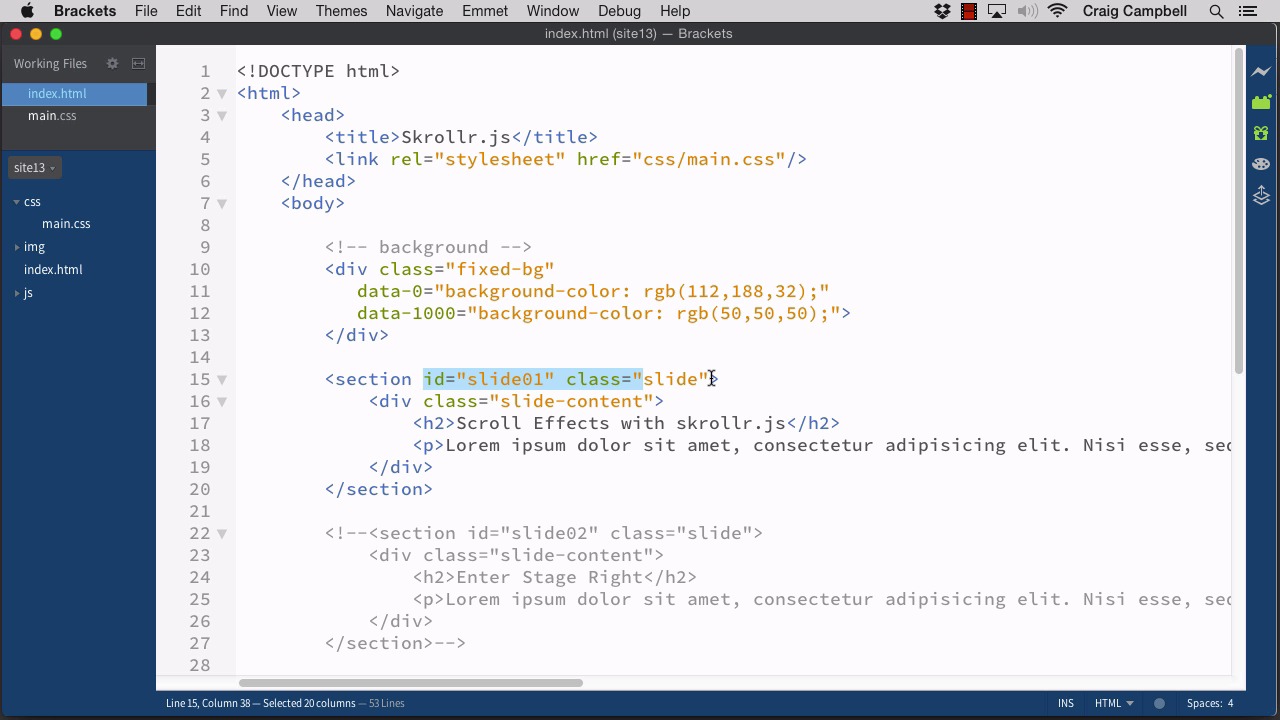
4.5 Slide and Fade
Hello, and welcome back to scroll events made easy. Now that we've got our slides styled, let's move on with our first animation. So our first animation is actually going to consist of two animations and I kind of even hesitate to call them animations because we're not just sitting here watching something animate. Instead we have to actively cause the animation, and the way we cause that animation is we have to keep scrolling the timeline. So the only reason we see the background animating from green to black is because we're moving the scroll bar up and down. If we ever stop scrolling obviously the animation is going to stop. But that's beside the point let's take a look at our first two animation. So I'm gonna jump into our code. Let's go into index.html and I've saved everything in the site, 13 folders so that's where all of our changes for this lesson will be saved. And for now I'm gonna grab all of the other slides. I'm gonna keep slides one and two on this stage because we're gonna animate those first. In fact, I might even go ahead and comment out slide two for now so we can see slide one by itself. So I'm gonna comment these out one by one and the reason I'm doing them one by one instead of commenting them all as a whole is because it will be easier to uncomment them one by one as we start animating things. So there we go, we've commented out everything except for slide one. We'll save that and refresh our page and there we go. We have our page like we want it at the very beginning. The only change I wanna make that I guess they overlooked before in our CSS file for our slides I wanna change the text color to white. So we'll save that, refresh, and there we go that's a little bit easier on the eyes. And now we can move on. So one thing that we need to keep in mind with this particular type of animation is that our scrollbar is no longer using it's default functionality. The browser itself is no longer moving our content up and down by default as we move the scrollbar up and down. So the intervals that we choose for our animation whether we're animating from zero pixels to 1,000 pixels, or zero pixels to just 100 pixels, whatever value we choose there is almost arbitrary. However, keep in mind that the distance between those two values, the distance between the beginning of your animation and the ending of the animation. When I'm talking about the distance, I'm talking about the distance that you're moving the scrollbar here, the difference between the start and end is going to make a big difference in how well your animation functions. If for example you come to your site and you start scrolling your scroll bar up and down and it feel like your animations are moving way too fast, then yeah one option is to just scroll slower. But another option is to just increase the distance between those keyframes. And because we're not relying on the browser to move our content up and down as we move our scroll bar, we're gonna be doing that ourselves, we can make those distances as long as we want to. So if we make the distance between our starting keyframe and our ending keyframe or our data 0 and our data whatever, the larger we make that distance, the smoother our animation will be, or the slower our animation will be as we move our scrollbar up and down. Now you can always use your scroll bar faster obviously, but I would encourage you to play with those numbers a little bit to get the kind of response that you want whenever you grab that scroll bar and start scrolling it. So let's create our first animation. For this particular page I have decided on an interval of 1000 pixels per slide. So moving from slide one to slide two, we're gonna be scrolling down 1000 pixels. Moving from slide two to slide three, we'll be scrolling down from 1000 to 2000, etcetera. So slide one is gonna be at a scroll position of zero, slide two at 1000. So for our first animation, we're gonna be animating slide one off of the stage and you can animate it off any direction you want. But for this first one, I'm just gonna animate it up. So it's gonna look initially like the scroll bar is doing its default thing but our second slide will animate on a little bit of a different way. So, we want our first slide to maybe take up half of that initial transition from slide one to slide two. So if we're transitioning from zero to a thousand, then half that would be 500. So I'm gonna make this first animation with slide one moving off. I'm gonna make that take 500 frames or 500 pixels excuse me, of scroll space. So, the way we do that Is we just apply the right data attributes. So for our first slide I'm gonna put our cursor just after that class and hit Enter to go down to the next line. And we're gonna set data-0=. And we're going to be moving this up, so I'm going to be changing the top property, and remember we're using CSS properties here, that's what we're animating. We're animating using CSS, but we're using JavaScript to trigger those CSS animations. So I'm gonna start off with a top property equal to 0%. That's where we are right now. The top of slide one is at 0% which means it's at the very top of the webpage or the viewable area. And then at the end of the animation I wanna move it up all the way off. So I'm gonna move it to a value of negative 100%. And since this particular animation is going to take place over the course of 500 pixels worth of scrolling, I'm gonna set this data attribute to data-500. And then we'll set that value to top: -100%. So again we're animating the top property of our slide and since this slide has a position of fixed applied to it in our CSS, we're able to do that. So we set out top property to zero by default and as we scroll down over the first 500 pixels of scrolling, we're gonna animate this all of the way off the top of the screen. So, lets see if that works, we'll save that, jump back into our browser and refresh. And now as we click and scroll we'll see that that animates off. And now we can move on to our second animation with slide two moving on. So our first one is kind of boring. Again, it just looks like the default scrolling mechanism of our browser. We scroll down or we pull the scroll bar down and the text moves up. Nothing surprising there. So with slide two, let's make it come in from the side. We're gonna animate it in from the right side of the screen. So if we have a slide that takes up the entire size of our browser, and we wanna push it off to the right edge of the screen, the way we're gonna do that here is we're gonna use the left positioning, or the left property in CSS. And we're gonna set the left property equal to a 100% by default and then as we animate it on we're gonna animate it down to 0% over the last half of this slide transition animation. So let's jump back into our code and let's uncomment this section here. And now that it's on the stage we can save it and refresh. And we can see that it's already there on top of our other slide but as we scroll that slide off we can see slide two right there in place. So now let's start it off to the side. So, just after our class here for our section element, and we'll go down to the next line, and here we're not starting at data zero anymore. We don't want this animation to start until halfway through that first animation. So, we don't want it to start until we get down to a value of 500 pixels until we've scrolled down 500 pixels. At that point, we're gonna start our animation. So our animation is gonna start with our left value, or our left CSS property set to a value of 100%. That's where we're gonna start and we're gonna end at value of 1,000. So that will be the end of that 1,000 pixel animation. And at that value we're gonna have our left position set to 0%. So again, we're just using the usual CSS property value pairs here, separated by a colon with a semicolon at the end. So over the course of the last half of that slight transition from 500 pixels to 1000 pixels, we're animating the left property from 100 % to 0, which should animate it from the right hand side of this stage. So, let's say that refresh our page, and now we see that slide02 is no longer interfering with slide01. And as we scroll down, we we can see slide01 animate off, and then slide02 animates on. Now, we can also add multiple properties to a single animation, and we can do that on slide two here. Let's say that we want it to fade in as it comes in so it starts at a left position of 100 but let's also set the opacity here to 0. And then for our second key frame here at data 1000, we'll set our opacity back to 1. So remember opacity is a value from 0 to 1. It can be anywhere between that, but zero is completely invisible, one is completely opaque. So let's save that, and refresh and now we can see as we scroll down, the first slide moves off, and then as the second slide moves on, it's also fading in. So it's still a little bit transparent as it comes on, but once it's fully animated on it's fully okay. And that takes care of our first couple of animations. Thank you for watching and I'll see you in the next lesson.


