


- Overview
- Transcript
2.6 A Simple Example of Animation Optimization
For this final lesson, let’s take a look at an inefficient animation made with CSS. We’ll take some measurements, and then we’ll fix it and measure again. Lastly, we’ll compare the two.
Related Links
1.Introduction
1.1Welcome to the Course01:31
2.Web Animation Performance
2.1An Introduction to Web Animation Performance04:46
2.2How to Achieve High-Performance Animations24:44
2.3How Browsers Work Behind the Scenes04:17
2.4How to Measure Animation Performance10:33
2.5CSS vs. JavaScript Animations06:42
2.6A Simple Example of Animation Optimization09:48
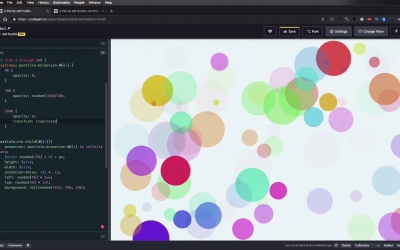
2.6 A Simple Example of Animation Optimization
For this lesson, we're gonna take a look at an inefficient or unoptimized animation made with CSS. Then we'll fix it. We'll take some measurements before and after and we'll compare the results. Now this animation is actually a play on an animation I made for a tutorial here, on touch plus about animating particle backgrounds. And obviously, I changed things quite a bit. And the animation that I use there in in the tutorial is actually optimized, but here, I actually changed a lot of the properties. And I added a couple of more particles. And I increased the size of the particles just to exaggerate the effect. So what you're seeing here is 100 deals with a class of particle that are animated using this Sass code. So basically, for each particle, I have a separate key frame and the key frame goes like this. I start from opacity zero at halfway, I do a random opacity. And at 100%, I bring the opacity down to 0. And I animate basically the left and top values. And I also animate the height and width. So if you're looking at animation worst practices, well, you'll find them right here. And also by default initially. I'm just setting the size to each particle left and top value in a random background. This is fine because you're executing this at the very start. And it's not an animated thing. But this right here, the stuff that I did here, it's very bad. And as you can see, my browser is already super lagging. So let's open this up. Let's open a live view. I'll open up the dev tools here in Chrome. And just for the fun of it, let's open up the FPS meter, and we can see that we're hovering around the whopping 16 FPS which is bad, very bad. Okay, so let's go to the performance, we're just gonna record like a small section of this and I'm not gonna throttle the CPU any further because I don't think it's gonna be necessary, it's already very bad. So let's record five seconds that should do the trick, okay? And we can see that we have a very low FPS. Very, very low. The load on the processor is actually not that bad. So actually, just to exaggerate things, let's do a 4x slow down or a 6x slow down. Let's repeat this. I'm trying to give you the worst case scenario. So you can see the difference small optimizations can make. So now, our FPS is even lower, and we actually have some red bars here on the top on certain sections. All right, so now, I'm gonna keep this opened and I'm gonna create a new pen here and I'm basically going to, or actually no. What I'm gonna do is, I'm just gonna optimize this one because I'm gonna keep this open as a reference. And that shouldn't change very much. So let's actually open up the FPS meter and see that we're hovering around what? 2, 3, 5. Let's see what kind of the maximum FPS will be. I saw 10, 11, Okay, so we're hovering around 10 FPS. All right, now, to fix this, I'm gonna do actually some very simple things. I'm gonna open up the CSS again and I'm gonna do the following at 100%, instead of this left, top, heighten width, I'm gonna delete those and I'm gonna use a transform property instead. So transform, I'm gonna do a translate 3D and inside, we're gonna do the following values. Random 90 times 1 view port width. So basically the same values that we had on the top left, we're gonna use them here. So that's for x, for y, just gonna copy this. And this is gonna be 90 times view port height. And we can also do a z. So it's gonna be random 90, or, let's say, random 100 here. Times 1 pixel. Okay, so that's the translate 3D. And also, instead of changing the width and the height, let's do a scale. And let's do random, 2. So the same thing, basically, instead of changing width and height, I'm just using scale here, okay? So now in here, let's see, we have animation. We're setting height and width, that's totally fine, animation delay. But instead of using the left and top, Okay, I'm gonna use a transform as well. So transform, and you know what? It's actually the same one that I have here, apart from scale, I don't want the scale here. And that should do it. Now, notice how much smoother this animation is, I mean, I can see it right away, it's so much smoother. So let's take some measurements, I'm gonna save this. And let's see this is the old one. No, actually, this actually reloaded. Okay, that's fine. So remember the old one we were getting like 11 FPS tops. Well right now, we're hovering at 60 FPS. How cool is that? Just by changing a couple of properties, we're getting this very fluid animation so lets us do another record again for five seconds. All right, and we can see already just how much better this is. We had a short spike here in the first second or so for some reason, but notice the FPS bar is really high up there. And notice also the resources on my CPU, how little it is being used, so we have a lot of idle space here. Now this performance might also be affected by the fact that I'm recording this, and I also have, this animation running in a different tab here, and I also have another browser opened, which runs it. So that's why we might get some FPS spikes in here, but if you look at the frames per second, we're averaging very good FPS and you can see it with the naked eye. It's very fluid, it stutters sometimes, but as I said, this might be a byproduct of me, recording this and my computer resources are kind of limited. And I'm also doing this on the six x slowdown on the throttling so if I take this off actually, let's do this for results, I forgot I had that turned on. Well now that's much better, see the CPU here, it's used very efficiently. That's pretty cool, our FPS is high and we have a very, very smooth animation. Alright, and that concludes this course and even though it was a bit more on the technical side than usual, I hope you understood what I was trying to say. And it helps you gain a better understanding of how animation works on the web and what it takes to create these high performance animations. I've included links to a bunch of resources in the lesson notes, just resources that I used to document for this particular course. So make sure to check those out if you wanna go into more detail on my particular topics. I tried to distill everything and just bring it all together in a very compact format in this course but there is just a lot more that you can learn about this topic. With that said, thank you very much for watching this course. I'm Adi Purdila and until next time. Take care.


