- Overview
- Transcript
3.12 Setting Up the Product Detail Page
As you prepare to create a page to display the details of individual products, in this lesson you will refactor the Shopping Controller in order to make your dummy data available in all of your Actions.
1.Introduction1 lesson, 02:19
1.1Introduction02:19
2.MVC Basics4 lessons, 15:13
2.1Introduction to ASP.NET and MVC03:48
2.2Views06:00
2.3Models02:17
2.4Controllers03:08
3.Designing Within MVC14 lessons, 1:58:58
3.1The Visual Studio Environment05:10
3.2Creating an MVC Project03:40
3.3Basic Pages06:47
3.4Viewing Your Work04:14
3.5Using Bootstrap08:44
3.6Linking Views08:03
3.7Using Layouts05:53
3.8Preparing for Dynamic Data09:14
3.9Creating Dummy Data09:04
3.10Displaying the Data10:15
3.11MVC ViewModels16:03
3.12Setting Up the Product Detail Page11:04
3.13Pulling in Data for the Product Detail Page09:41
3.14Wrapping Up the Product Detail Page11:06
4.Conclusion1 lesson, 01:11
4.1Conclusion01:11
3.12 Setting Up the Product Detail Page
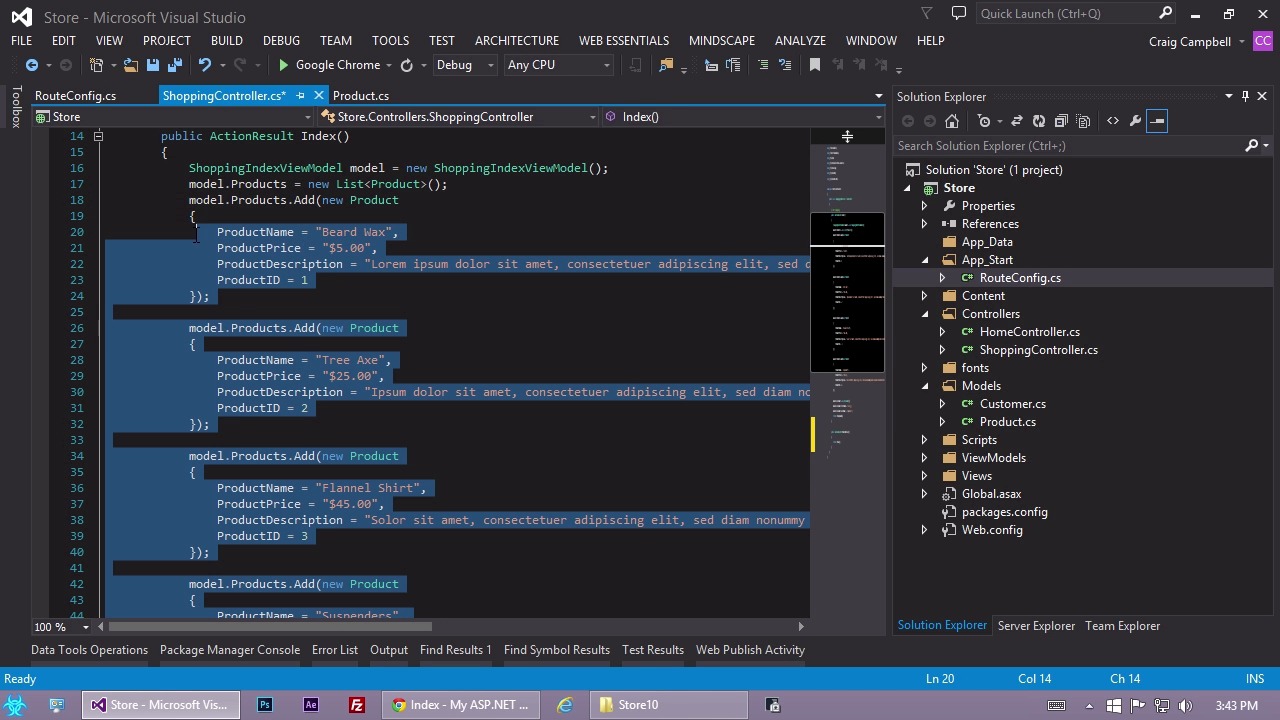
Hello, and welcome back to ASP.NET MVC for Designers. We've already created our product list page, where we have four different products that we can see on the page. But we're probably at some point going to need to create a product detail page, where we're looking at more detail on one particular product. For example, if I were to click to Learn More about the Tree Axe, then it should take us to a page where we have more information about just the Tree Axe itself. And again, my goal in this course is not to teach you design concepts, so we're not really going to design out a really nice Tree Axe page. Instead, I want to teach you how to use the MVC framework in your design process. And what we're gonna cover now is a little bit more complicated than what we've been doing so far. So far, we've created a list of products and then we're just displaying that entire list on the page. No matter what, if we come to the product list page, we're gonna see a list of all of our products. On our product detail page, on the other hand, we don't necessarily know what bit of information we're going to be looking at. We could be looking at the Beard Wax product, we could be looking at the Flannel Shirt product. So, we're going to create one page, but that page could potentially show a number of different products. And what we want to do is, we want to create a structure where we can enter in a URL, something like this where we have our shopping controller here, forward slash, and then the name of the action we're going to, which in our case is gonna be called Product Detail. And then another forward slash, and then a product ID that we can pass in. And then depending on what ID we pass in after this last forward slash, it's gonna show us a different product. So let's jump in to our ProjectFiles folder, I'm gonna make another copy of our project, so I'll just copy and paste the Store09 project, and rename it Store10, and then we'll open up Store10 inside Visual Studio. So, again, we've already got a couple things in place. We've got our model for our product here. And we have product name, price description and product ID. Now, so far, we haven't used our product ID for anything, but now we're going to use that product ID to determine which product we're going to view on the product detail page. As further review, let's take a look at our shopping controller in our controller's folder. So, we'll jump into ShoppingController.cs and we have our index action. In that index action we're creating a list of products here and then we're returning a view that has a list of those products as well as some customer information as well. But since we wanna create a new page now, a new product detail page, we need to create a new action. So, I'm gonna take this first action result and I'm gonna minimize it. You'll notice if we find the definition, that first line for that particular action, over to the left we see a little minus icon. And if we click on that you'll see that it collapses that entire method or that entire action. So, then I'm going to place my cursor after that action, and hit enter a couple of times and we'll get started creating a new one. So I'm gonna type public, and then Action with a capital A, result with a capital R, space, and then we're gonna call this particular page, ProductDetail. So we have ProductDetail, open and close parenthesis, and then an opening and closing curly bracket to outline our function. And then inside any action that we create we're going to return a view. So, that's the minimum bare essentials for creating an action that we want to turn into a view or a page in the web browser. However, as we mentioned before, with our ProductDetail page, we need a little bit more information because we don't necessarily know which page we're going to be looking at. So, we need to pass in an ID in the URL. Well, another great piece of magic within the MVC framework is that it automatically recognizes IDs that are sent into the URL. And if you want a little bit of a hint as to where this magic happens, if you open up your app start folder and double click on RouteConfig.cs, this is where that route is defined. So, as we can see here, we have this routes.MapRoute, and we're pointing to this particular URL here, where we enter any controller, forward slash, and an action. And that's as far as we've gotten so far in this course, but now we can also add an ID after that action. So, we can type in shopping/product detail/ and then whatever product ID we want to use. And based on that product ID, we can pull up the appropriate product information. So, let's jump back into our shopping controller and let's get started making that happen. Now, one issue that we're going to have is that we have this index action, and if we double-click on this ellipses inside the index action that will expand it out for us. One problem that we have is that we've created this list of products but right now that list of products is only available inside this index action. If we were to try to access those products in the different action we wouldn't be able to. So, what I want to do is, I want to take this whole product creation logic section here and I want to pull that out and stick it in another function, or another method, so that we can access it from multiple actions. So, everything from model.Products = new List(); all the way down to the last product that we added, I wanna take all of that and cut it. So, I've cut all of that out of our index action. And then down here near the bottom, underneath our product detail action, we'll go to the closing curly bracket for that and skip a couple lines. Now, we're gonna create another method that contains the creation of those products. Now, this particular method, if you're familiar with JavaScript, it's just like having another function here. Now, it's not gonna function like our actions. It's not gonna return a view. This is just a method that has some functionality in it. And we want this method to return a list of products for us, so that we can then stick those list of products inside the model for our index page and we can also do something with it in our product detail page. So, let's create a private function, which simply means that only this controller can access this function. And this function is going to return a list of products. So, I'm going to type list with a capital L and inside angle brackets we're going to type product, and then we're going to give this method a name. So, after list of product, we'll type space and let's call this method GetProducts. Open and closed parentheses, and then an opening and closing curly bracket to outline that method. Now, you'll notice by default that our method name is underlined with a squiggly red underline, and that's because we're not returning the values yet. This definition here tells us that this method is supposed to return a list of products, but we haven't returned that yet, so we get an error whenever we see that. But once we finish filling out this method that squiggly red line should go away. So, what I'm going to do now is I'm going to paste all of that code that we copied, where we were adding all of these products to a list of products. The only difference is we're not using a model anymore. Instead, we're gonna create a new variable here. So, when we create a variable in C# again. First of all, we type in the type or data type of that variable. And the data type for this is going to be a list of products. So we're gonna type List with a capital L, and then inside angle brackets, Product, singular with a capital P. And then we're gonna give it a name, this list of products is gonna be called Products. So, now we're going to run this add method for each product that we create on this list of products here, instead of adding it to model.products. So, I'm going to grab products, I'm going to double click on it and then hit control C to copy it. And then down here I'm going to highlight model.products and hit control V to paste. So instead of model.products.add, we simply have products with a lowercase p.add. So, we'll do the same thing for our other methods here. We'll just highlight model.products, and replace it with products. So, now we've added all of these products to that list of products. But, you'll see we're still getting the red squiggly, because we haven't returned that list of products yet, and the way we do that is very simple. After we add those four products, we simply skip a couple lines here and then type return and then the name of that list, which is products. And now that we're returning that list of products we can now access that anywhere on the page, or anywhere in this controller, simply by using this GetProducts method. So, for example in our index action you'll notice we no longer have anything assigned to model.products. We have model.customer, but we pulled everything out from model.products. So, now before we get to model.customer, I'm gonna type model.Products with a capital P and we're simply gonna set that equal to the GetProducts method that we just created. So, then we need to include open and closed parenthesis and a semi colon to end our statement. I'll zoom in a little bit so you can see that better. So, remember this GetProducts method we created is returning a list of products. And this products property on our product model, I'm sorry not our product model, but our shopping index view model. We have this products property here which is a list of type product. So, we're taking that list of products, and we're assigning it a value using that GetProducts method that we created. And that's possible because this GetProducts method here is returning a list of products. So, now that we've done that, let me zoom out just a little bit. Now that we've done that, both of our actions here, our index action and our product detail actions, can both have access to that list of products simply by calling on the method we just created. So, before we move forward I just want to run one quick test to make sure that our index page is still working and still displaying all of our products. So, I'm going to save that, then hit control F5 to test our page, and it loads up the home page. I'm gonna click on products and hopefully all of our products will still show up, and we see that they have. So, we know that our GetProducts method is working properly because everything still looks exactly the same as it did before. The only difference now is instead of creating our products in our index action, we're creating it in a separate method, and then calling it from within our index action. So, in the next video, we'll move forward and finish out this process of creating our product detail page. Thank you for watching and I'll see you then.