


- Overview
- Transcript
2.2 Animations
In this lesson you’ll learn how to create animations. Now, you might say: “Well, aren’t animations the same as transitions?” The answer, surprisingly, is: “No, they’re not the same.” Let’s examine the differences and how you can create animations with Motion UI.
2.2 Animations
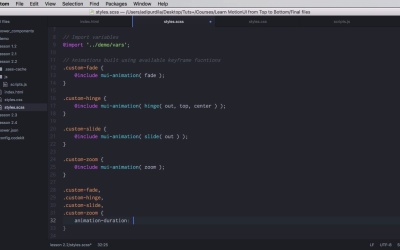
In this lesson, you'll learn how to use animations. And you might say well, hold on, aren't transitions animations? Aren't they one and the same? Well, they are similar. But they're not the same things. So, let's see the differences and how you can use animations. Animations are similar to transitions in the sense that you can choose which property you wanna change. You can specify timings or easings. You can specify delays, you can specify animation or transition duration, right? So, from that perspective, these two are pretty similar. Now, when it comes to differences, there are a few, but here are three of the most important ones that you need to remember. First of all, you cannot loop transitions, transitions just run once. While animations, by setting the iteration count property, can loop even indefinitely. Number two, triggering. A transition is usually triggered by the change of a CSS property. For example, when you hover an element you can trigger a transition, or whatever data it's either it's color, either it's font size, opacity, whatever it is. Animations on the other hand, don't really need a specific trigger. Once you define an animation, it will start playing automatically. Number three, a transition goes from point A to point B. There is nothing in between. Animations on the other hand, can go from point A to Point B, to point C, to point D, and so on until they reach their final point. So you can have any number of points in-between the start and the end point. And those points, those intermediary points, are called keyframes. And by using these keyframes you can define really complex animations. So, those are the three main differences. Now, let's turn our attention back to Motion UI. Now, in Motion UI there are seven available animations. Three of them are already built in. These are shake, spin with two versions, clockwise and counterclockwise, and wiggle. And you can actually see these files if you're including the Motion UI animations mixin. You can see them in your CSS file, scroll, scroll, right here. Okay, so we have the first one, shake, spin with clockwise and counterclockwise, and then wiggle, right? So, for these we have keyframes defined and we have an animation duration. Now, the other four animations fade, hinge, slide, and zoom, can be created by using the Sass mixins, and we'll have a look at those in just a little bit. But here, we have another very basic example. Instead of the transitions you saw in the previous lesson, we now have animation names here, and then, on the right side we have the object. Now, the cool thing about animations is that you don't actually need JavaScript to use them. So, if for example, you want to use the shake animation. All you have to do is go to your object here, and just add the class of shake. And that, yeah, will create a nice shake animation. And that's how easy it is. But, just for the sake of this demo, I'm gonna do a similar piece of code for these buttons so we can preview some more animations here. So, I'm gonna remove this one. I'm going to go to my scripts file here, and I'm gonna say, apply the animation to the object. We're gonna target the object. We're gonna remove all classes, to start with. And, we're gonna add the class of fx. So, now let's have a look. The first one is shake, it goes something like this. And at the same time, I'm going to show you the keyframes here, just so you can kind of get an understanding of how it works. So, as you can see, on each of these points we get a new translate value here. And in the points in between we get a negative value. So, it goes 7% forward, 7% backwards, and so on. So it changes its position every 5% of its animation duration. And that's how the the shake effect is being created. The next one is spin clockwise, and goes like this. This is pretty straightforward, at 0 it says rotate(-1). And 100% it's rotate(0), which is basically at the starting position. So, it goes from -1 to 0, which is this way here, so clockwise. Now, counterclockwise should go the other way around, right? So from right to left, like this. The problem is, if we're doing this, it goes clockwise. And I think this is a bug, I've actually posted an issue on GitHub. I think this is a small bug from Motion UI, because if we take a look at the keyframes and the animations here, you'll notice that clockwise and counterclockwise both use the same animation, which is spin clockwise one turn. And spin clockwise one turn is defined in both places here with different values. But in reality, a counterclockwise spin should go 0 to -1 turn. So, it goes from 0 here, -1 turn to the left, and it goes like this. As I said, probably a bug. But, we'll be creating our own custom animation later on, and you'll see this in action. And finally, there is the wiggle, and the wiggle looks something like this. Yeah? So, just a little shake there. The keyframes are actually quite simple for this, as well. We basically rotate to various degrees at various points in the animation. And, notice these points. These are all those intermediary points I was talking about in the intro. So, 40%, 50%, these are all key frames. All right, so these are the built-in animations. As I was saying earlier, Motion UI comes with four animations that can be created by using the Sass mixins. Now, here's how this works. We're gonna go to our Sass file here, we're gonna say, animations built using available keyframe functions. We're gonna say a custom fade. And you would go like this, include mui0-animation and you would pass in a so-called keyframe function. Now, the keyframe function will generate those keyframes that you saw here, these right here. And there are four of them. Fade, hinge, slide, and zoom. So, for a simple fade, you would do fade, right? And that will generate, scroll all the way down, custom-fade, animation-name. We have an animation name generated by Motion UI and then the keyframes. Now, these keyframe functions have certain parameters you can pass in. For example, on the fade function you have from and to. And I didn't include those so they just defaulted to 0 and 1. On hinge, you have others. You have the axis, you have perspective, turn-origin. Shake, you have the intensity. And this is what you can actually use to create custom animations. Even though these are built-in, they're included by default, there's nothing stopping you from including this keyframe function and creating your own shake animation. Then what else, for slide, this is not included. So we have state, direction, and amount. Spin, this is included, wiggle's included, and zoom. Well, this is just a scaling animation, it goes from point A to point B. So, let's create a few more here. We're gonna do a custom hinge, and we're gonna say hinge. And we can actually pass in parameters here, let's say we wanna do an out effect. Starting from top and the axis is center. Next, let's do a custom slide maybe. A little simple slide out, and then, let's do a custom zoom, like that. Now, if we're gonna apply these animation classes, they're not gonna work because they do not have a duration sets. So, what you'll need to do is, going here and set custom-fade, custom-hinge, custom-slide, custom-zoom, yep, and we're gonna set an animation duration. To, let's say, 3 seconds, just so we can distinguish them from the others. So, this actually created these styles right here. Custom-fade, custom-hinge, and so on. So now, our animations correspond to these buttons here. So let's see, custom-fade, there's a fade-in. Custom-hinge, this is an out-effect. Custom-slide, slide out and a custom-zoom. There we go. Now, what about creating custom animations? I told you about that counterclockwise. Well, let's see if we can create it really quick. We're gonna do the following. We're gonna go here, we're gonna say custom animations. And we're going to do this, custom-spin counter-clockwise, and we're gonna include mui-animation. We're gonna do spin, counter-clockwise. Actually this is without the s right there. So let's see what this is dishing out. So, custom-spin-ccw is gonna return the exact same animation that we saw over here on the top but this is not correct as we saw. So, if we're going to, let's create another section here. We'll just call this custom animations and we'll just say, custom-spi-ccw. And let's not forget to add it here so it can have an animation duration, like that. So, as I was saying, now if we activate this animation, it still goes clockwise but if we go back in the CSS this time and we change this to rotate(0) to (-1turn). You'll see that our animation is now going the correct way. So, probably a bug, no biggie. But, just so you know, this is how you can create a custom animation. You can also do combinations of multiple keyframe functions. So, you can have an animation that has a slide, a fade, a spin, and a zoom, for example. You cannot combine, actually, animations that don't have single start and end point. For example, wiggle. Let me actually just show you here, in the CSS. So, the wiggle doesn't have a single start and end point neither does shake. So, with these you cannot do combinations but with the others you can. So for example, you can create something like, let's call this custom-combination, right. And, custom-combination can go something like this, include mui animation, and you can put, for example slide, fade, spin, and zoom, like a really crazy animation. And then, add a button for it as well, so it can have a nice trigger. So now, you're gonna see four different transitions in a single animation. So, there we go. All right, so that was slide from the bottom, was fade, spin, and zoom. In started from very little to where it's at right now. Now, the modifier classes that I talked about in the previous lesson, can also be used on animations. So, you can use slow ,we can use fast, we can use short delay, long delay you can change the easing just by using the same classes. So for example, if I want to add fast. Let's say, I wanna add fast to the animation, right? Well, I would say something like this when I'm adding the effects there. We're gonna add the class of fast. Right? So now, here we go, we have the really fast animation, 250 milliseconds. We're gonna remove this entirely. By the way, you can also play an animation indefinitely, so you can put infinite here right? And that will just, let's do which one, let's do the spin. It will just keep on going on, and on, and on. And infinite is actually a class that you can find here. Let's see where is it? There we go, infinite, animation iteration count, it's set to infinite. Of course, you can change this to whatever you want. If you put it to 2, the animation will loop 2 times. All right, let's remove this here. Now, this mixin here, mui-animation will create the keyframes that you saw and which are these. But it will also create or assign the animation name to this class. There is another mixin you can use that's called mui keyframes and that will do something like this. Let's say, custom keyframes. You'll do something like include mui-keyframes. And you're going to pass in a name for the keyframe. In my case, it's gonna be custom-keyframe, and then a keyframe function. In my case, I'm just gonna do a simple slide. So, this will generate this bit right here, custom-keyframe. So, notice there is no class, there is no animation name set to that class, it's just the keyframes. And this allows you a little bit more control over the animations that you create. Finally, I wanna show you something called animation series. This will basically animate multiple items in a series, one after another. And there are a few parameters you can do. But first, we gotta add some more objects here. Yeah, so we have a second object and a third object, each one with a separate class. They look something like this. And we're gonna apply a different animation to each and every one of these. So, you start like this, you include the mui-series(). Now, this has an optional delay parameter. So if you put here like 5 seconds, this series is only gonna start 5 seconds after it's triggered. I'm gonna leave this blank for now, and you'll do this. You'll write the selectors for the object you wanna animate, in my case, I'm just gonna use the classes. And you're going to say this, include mui-queue and this accepts a few parameters. First one is the duration of the animation. Let's put like, 0.5 seconds. The second one is the delay to the next animation, let's put 0 for now, and the actual keyframe function. Let's put a fade out for our initial object, right. So, fade out. For the next two objects, object two an object three, we're gonna do a fade in. For object two and for object three, we're going to do a zoom, for example. Finally, we're going to need the trigger for this. And the trigger is going to be a button with an idea of animation series. This one, right here. Now, we're going to say something like this, animation series on click. Now, we gonna have a function. We're gonna do e.preventDefault, so the link doesn't do anything when we click it. And then, all we gotta do is target the parent of these elements. In our case, it's lesson content. And we're gonna add the class of is-animating, very, very simple. So now, when we go back here and we start our animation series, you'll see first the fade out and then a fade in and then a zoom. And of course, you can change the parameters for these, for example, you can put 1 second fade. Let's do a 2 second delay to the animation on the second object. We can change this to a slide, for example. We can make it slide over 3 seconds, yeah? So, let's see how that looks, fade out. A little bit of delay, fade in and slide it. So, that's how you create an animation series. That's it for animations. Now, a great thing about Motion UI is the fact that it's customizable, to what extent, you learn in the next lesson.


