Lessons: 20Length: 1.9 hours

Next lesson playing in 5 seconds

Cancel
  • Overview
  • Transcript

4.6 Day 6: @each and @while Directives

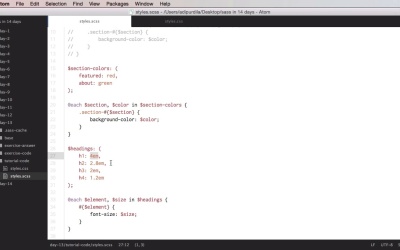
Welcome to Day 13. Today, you'll learn about the and each directives. These are similar to the four directive, in the sense that they can repeatedly output certain styles, but they do have different uses. So let's begin. Let's start with the each directive. Now, this one will run through a map or a list, and it can use multiple variables. So let's see a very simple example. We're gonna start with @each, we're gonna define a variable, let's call this $section in, and then we're going to have a list, featured, about, and contact. So what does this do exactly? Well, it will go through each one of these three elements, and the section will get the value of each elements. So on the first iteration, section will have the value of featured. On the second one, it will have the value of about. And a third one, it will have the value of contact. So with this, we can do a few things. For example, we can create and element with an ID of, and again, we have to use interpolation here, ($section)-section. And for example, I can set the background-image: url and you can say something like ('img/bg--#{$section}.jpg. And this will compile to featured-section, about-section, and contact-section. Each one with its own image as a background. So that's how you use each with lists. Now, you can also have more complex list. For example, you can do @each, let's say $section and $color. So two variables this time, in. Now, let's say we have a list of other lists. (Featured, red), and (about blue). While here, for example, we can do something like .section-($section). Background-color will set it to $color. So what this will do, is it will go through each one of these elements in this bigger list. So here we have a list of two elements. And each element is in turn a list of other two elements. So on the first iteration, $section will get this value, $color will get this value, and on the second iteration, section will get this value, color will get this value. And it compiles to section-featured. Background color red, and about background color blue. If I were to change this to green, I will also get the current Corresponding CSS results. I can also add another list item here if I want. Now, this bit might be, or might seem a bit too complicated. So what I can do is transform it into an each directive using a map. So I'm gonna comment this, and I'm gonna create a map here called section-colors. I'm gonna start with featured: red; and about: green, using commas here. And then, I can do this. @each $section, $color in $section-colors. And simply repeat this code here. And the result in CSS will be exactly the same. But this is much easier to read. Because you have all of the elements you need here. We can easily add more items to this map. And overall, it is much easier to scan. Let's see another example. Let's say that you have a map with the $headings and their font sizes. So you'll have $headings, and then h1. We're gonna use the actual selector name here as the key. Let's say 4em, h2: 2.8em, h3 as 2em, and h4 as 1.2em. So, what we can do with this is @each $element and $size in $headings, and we're gonna start with the $element, and we're gonna set its font-size to $size. So what does this do? Well, it goes through our map four times. On the first iteration, element gets the value of h1, size gets the value of 4em, and so on, it goes to the next one, and the next one, and every time, it prints out. The selector and the font size resulting in this bit. And that's how you use the each directive. Now, let's see about the while directive, and this one will repeatedly output the nested styles, until a certain statement evaluates to false. So for example, let's say that I want to print a certain selector nine times. Well, first, I gotta start with a counter. In our case, we're gonna do I, we're gonna set this to one, and then we're gonna say while I is smaller than ten. So this is the condition or the statement that will eventually be able to stop this. So while I is smaller that ten, I want to print out .item-#($i), and I want to say that the top is at 5em * $i. And also, very important, I must increment the $i. So I'm just gonna do $i:$i+1, and then this will compile to item1, 2, 3, all the way up to 9 with increasingly bigger top values. So how does this work? Well, first of all, the $i is 1. And we'll have this condition, is i smaller than 10? Yes it is. Then proceed. We're gonna print. Item 1. We're gonna do top 5em * $1. And we're gonna increment $i. So it's gonna be $i equals $i + 1, which is 2. Then, we go back to while, is two smaller than ten? Yes, proceed. And when we get to the last one which is 10, we're gonna get is 10 No. This will evaluate to false. So, the while will stop right there. Now, the important thing to note here is the increment of the $i because, if for example I don't do this, the @while will go on and on and on forever because i will always stay at one. So you have to avoid that, you have to make sure that somehow you increment that counter right there. Now, if you want to print 10 of these, we can do And that will essentially print from one to ten. As you can see here, another thing you can do with @while is you can increment this in larger steps. So, from $i-=$i + 1, you can do $i + 2 for example. That will get you item one, item three, five, seven, nine. You can also do $i + 5, in which case you only get item one and six. So, just by doing this you can achieve more complex looping than for example, for. The for directive. Now, as an exercise, let's do the following. Let's try to achieve the same outputs as this @each directive does, but using @while. So for that, we gotta start with a counter. And lets define one that's called $j. We'll initialize it with, 1 and we'll say @while $j is this is the length of our map here. We're gonna do this. Heading. We're gonna use interpolation, $j. And we'll set the font-size to map-get. The map is headings and the key will be h, again with the interpolation, j, and then let's not forget to increment $j. All right, so this will compile to h1, h2, h3, h4, each one with it's corresponding font-size. So we've achieved exactly the same CSS output by using while instead of each. Now personally, I think that each is better suited for this task, because it's designed to work specifically with lists and maps, but you can also achieve it with @while. Now for your exercise, we have a CSS file and your assignment is to write the SAS code that's responsible for generating this. The only conditions are you should use the least amount of SAS code possible and don't use maps. Good luck. And that's it for each and while. Now, moving on to day 14, the last one in this course. You'll learn about mixins. I'll see you there.

Back to the top