

- Overview
- Transcript
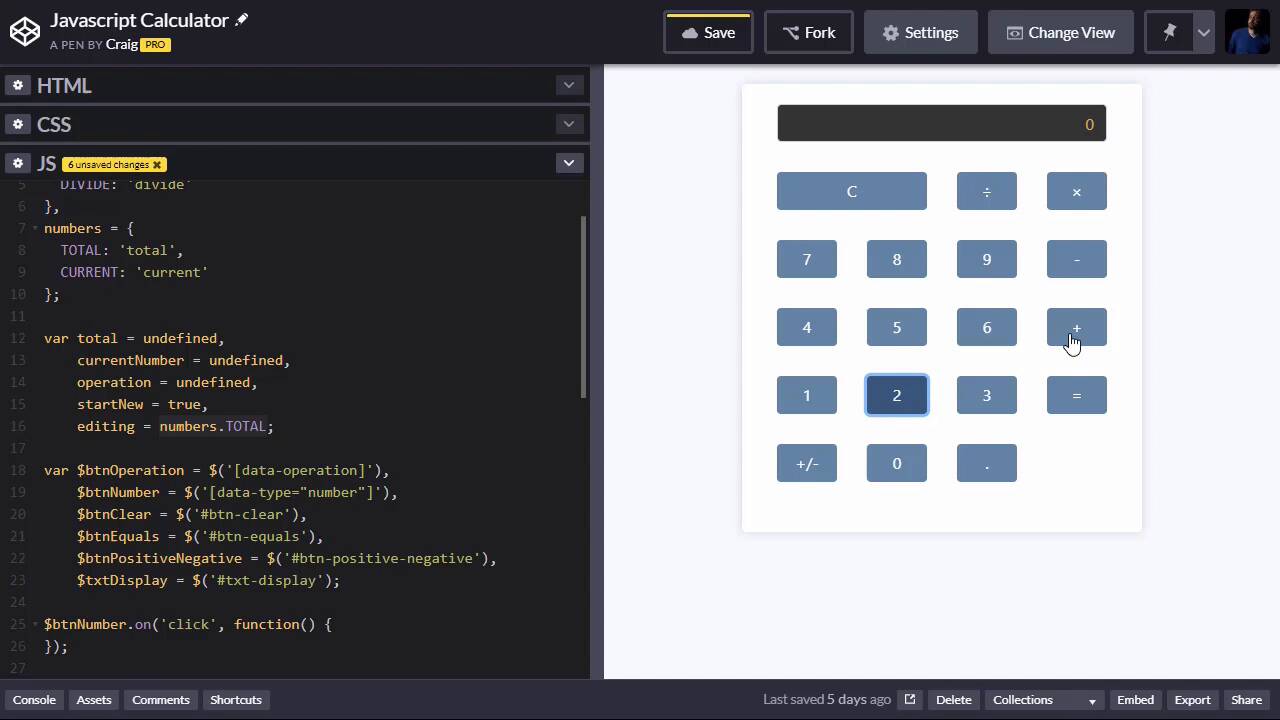
4.1 The Calculator Starter File
In this lesson, you will get started creating your own online calculator. I’ll walk you through the starter file and tell you what to expect.
Useful Resources
1.Introduction
1.13 JavaScript Projects for Beginners00:52
2.Project 1: Create a JavaScript Countdown Timer
2.1Creating a Countdown Timer04:18
2.2Coding the Countdown Timer03:54
2.3Calculating the Difference10:04
3.Project 2: Create a Scroll Animation
3.1Animate on Scroll19:02
4.Project 3: Create a JavaScript Calculator
4.1The Calculator Starter File09:20
4.2Calculating Totals07:16
4.3Programming the Number Buttons13:15
4.4Finishing the Calculator13:44
5.Conclusion
5.1Final Thoughts00:42
4.1 The Calculator Starter File
Hello, and welcome back. In this lesson, we're gonna get started creating a calculator that we're gonna create all the functionality for it using JavaScript and jQuery. Now, the calculator itself was built in simple HTML. We're just using some Bootstrap markup here to lay everything out. It's pretty straightforward layout, you can look through that to see how that is structured. One thing I will point out is that some of these items, let's stretch this out a little bit so we can read it a little better. Some of these items have specific classes or data attributes on it that we need to pay attention to. For example, the plus, minus, times and divided by buttons all have a attribute called data operation. And we're gonna be using that to determine what operations we're gonna be applying on our calculations. So the data operation for this one is set to divide, this one is set to multiply, etc., etc. We also have some items that say data-type="number". This is gonna represent all of our numbers and the decimal point. Everything else, we can kind of look at our JavaScript to see what we've got, cuz I've already created some variables here to point to all of our buttons. And this can give us a really quick overview of what we're looking at. So let's take a closer look at that. First of all, I'm gonna go and point out, you can find the URL for this particular CodePen in the course notes for this lesson. And this will be the CodePen we're starting from. And we've got a few variables defined, we've got some operations here, which define ADD, SUBTRACT, MULTIPLY, DIVIDE. And you'll notice these ultimately end up being strings, but we access those strings by typing something like operations.ADD. And this will be the same thing as just typing in the word ADD as a string. The reason I set it up like this is because if we accidentally misspelled add, let's say we put three Ds instead of two, then it would actually throw an error for us. Whereas if we just mistyped it as a string and did three Ds that way, it wouldn't throw any errors and it might be harder to debug. So setting it up like this just makes it a little bit easier to maintain the code and debug it if we need to. Same thing with numbers, for the numbers, we're keeping track of two different numbers. Because at any point in time we're entering in a new number while we're also keeping track of the current total. So we have the total sitting there in the background and then the current numbers, whatever number we're currently typing in. There's one exception, is when we first start typing, let's say that our window initially loads and we start punching in the numbers for our first number. At that point, we're editing the total and not the current number. Because whatever we enter there is going to be the current running total until we add something to it or multiply something by it, etc., etc. So this will help us keep track of what number we're currently editing, whether we're editing the total number or the current number. And we'll see more about that as we move forward. Then we have a few variables here to keep track of our numbers. So this is the total. Right now, all of these are set to undefined because we don't have a total or a current number yet. So these will store the actual values that we're punching in. This up here is simply meant to keep track of which number we're currently editing. So the actual numbers are gonna be stored in these variables. So we have our total, our current number, which is whatever number we're currently typing in, and then we have our operation. So if we clicked on the minus sign, then the operation is gonna be set to operations.SUBTRACT or just SUBTRACT as a string. We also have this startNew variable, which we'll get into a little bit later on. But this determines whether we are, when I click the 7 here, it determines whether we're starting a new number or whether we're appending this to the end of the number we're currently editing. So if startNew is set to true, then when we click any number here, it's simply going to replace everything in the input field up here at the top. But if startNew is set to false, then when we hit a key on the calculator here, it's going to append that number to the end of the existing number. And then we have this editing variable, which is where we're keeping track of which number we're currently editing. And right now, it's set to numbers.TOTAL. Because remember, as I mentioned, when we first start punching in numbers when our page first loads, that number is going to be the total. But as soon as we hit plus and then start entering in another number, that next number is going to be numbers.current. So this helps us to keep track of that. And we'll see why it's important to keep track of that later on. But then we have all of our number, all of our variables here, excuse me. And you'll notice all of these start with a $ sign because they're all pointing to jQuery objects. And so the btnOperation variable is pointing to all objects that have a data attribute of data-operation. Now remember, that's gonna be our plus, minus, times, and divided by, it's gonna be those four numbers, or those four buttons, excuse me. And when we click on one of those, that will store in this operation variable which operation we're currently trying to work out. Then we have btnNumber, which stores or which references any item that has a data-type attribute set equal to number. And that's gonna be the number 0 through 9 and this decimal point. This does not include the plus, minus, that's gonna be its own little creature. But all of these, again, 0 through 9 plus the decimal point, those are all set to a data-type of number. btnClear is simply the item within ID if btn-clear, which is our C button up here at the top left. That will clear all of our numbers, our total, our current number, and our operation if there is one. The btnEquals sign is gonna be the equals sign down here at the bottom right, that's going to perform the calculation. We're also going to perform the calculation if we hit one of these operations for a second time. And what I mean by that is if we hit for 4 plus 5, the first time we hit the plus there, it's not actually performing an operation. It's not performing an operation until we hit plus again after hitting 5, or one of the other operations buttons, or when we hit equal. So we're gonna perform calculations not only when we hit equals, but also when we hit some of these other operations. Then we have our btnPositiveNegative, which is our plus, minus button down here. That's going to basically just multiply our current number by negative 1. And then we have our txtDisplay, which is our input field that has our text in it up at the top. So then you'll notice below that we have a few click events that we've already created the skeletons for. There's no functionality for these yet, but this will handle all of our buttons. So we have btnNumber, which handles all of our numbers, btnOperation, which handles plus, minus, times, divided by, btnClear, which is the button on the top left, PositiveNegative, Equals. And then we have this extra function at the end which is going to take whatever numbers we have stored and whatever operations we have stored. And it's going to perform whatever operation is in the queue. So in the next lesson, we'll get started programming everything. But before we do that, let me go ahead and just run through, very, very basically, what we're gonna be doing. Initially, we're gonna be punching in some numbers here. Let's say we want the number 10, we'll type 1, 0. And as we type that, we're basically updating this input field with those digits. And we're also keeping track of that in this current number variable, which is really gonna be a string. It's not gonna be a number, it's gonna be a string. And then later on, when we perform the operations to perform our calculations, at that point, we'll temporarily convert them to numbers. Perform the calculation, and then convert them back to a string as we put them in the input field. So again, let's say we wanted to do 10 plus 2 equals. So we'll type in the number 10, and then we'll hit plus. At that point, we've got the number 10 stored in the total field. And when we click on plus, then we have plus stored in the operations field. And then we'll hit 2, 2 will be the current number, which we're going to add on to that total. So at the point that I hit 2, we've now got three things stored. We've got our first number, which is our total, the number 10, we've got the operation stored, which is plus. And then we've got our second number or our current number stored, which is 2. Now, this can obviously be multiple digits as well, but let's just call it 2 for now, and then we'll hit equals. Whether we hit equals or another operation sign, at this point we're going to perform a calculation. We're gonna run this calcTotal method based on everything we've entered in so far. So again, we'll get started on all that in the next lesson. Thank you for watching, and I'll see you then.


