


- Overview
- Transcript
3.2 Customizing Components With Sass
1.Introduction
1.1Welcome to the Course01:43
2.Getting Started With UIkit
2.1What Is UIkit?02:36
2.2Installing UIkit06:29
2.3Building With Default Components18:49
3.Customizing UIkit
3.1Installing UIkit With Sass Sources05:00
3.2Customizing Components With Sass13:47
3.2 Customizing Components With Sass
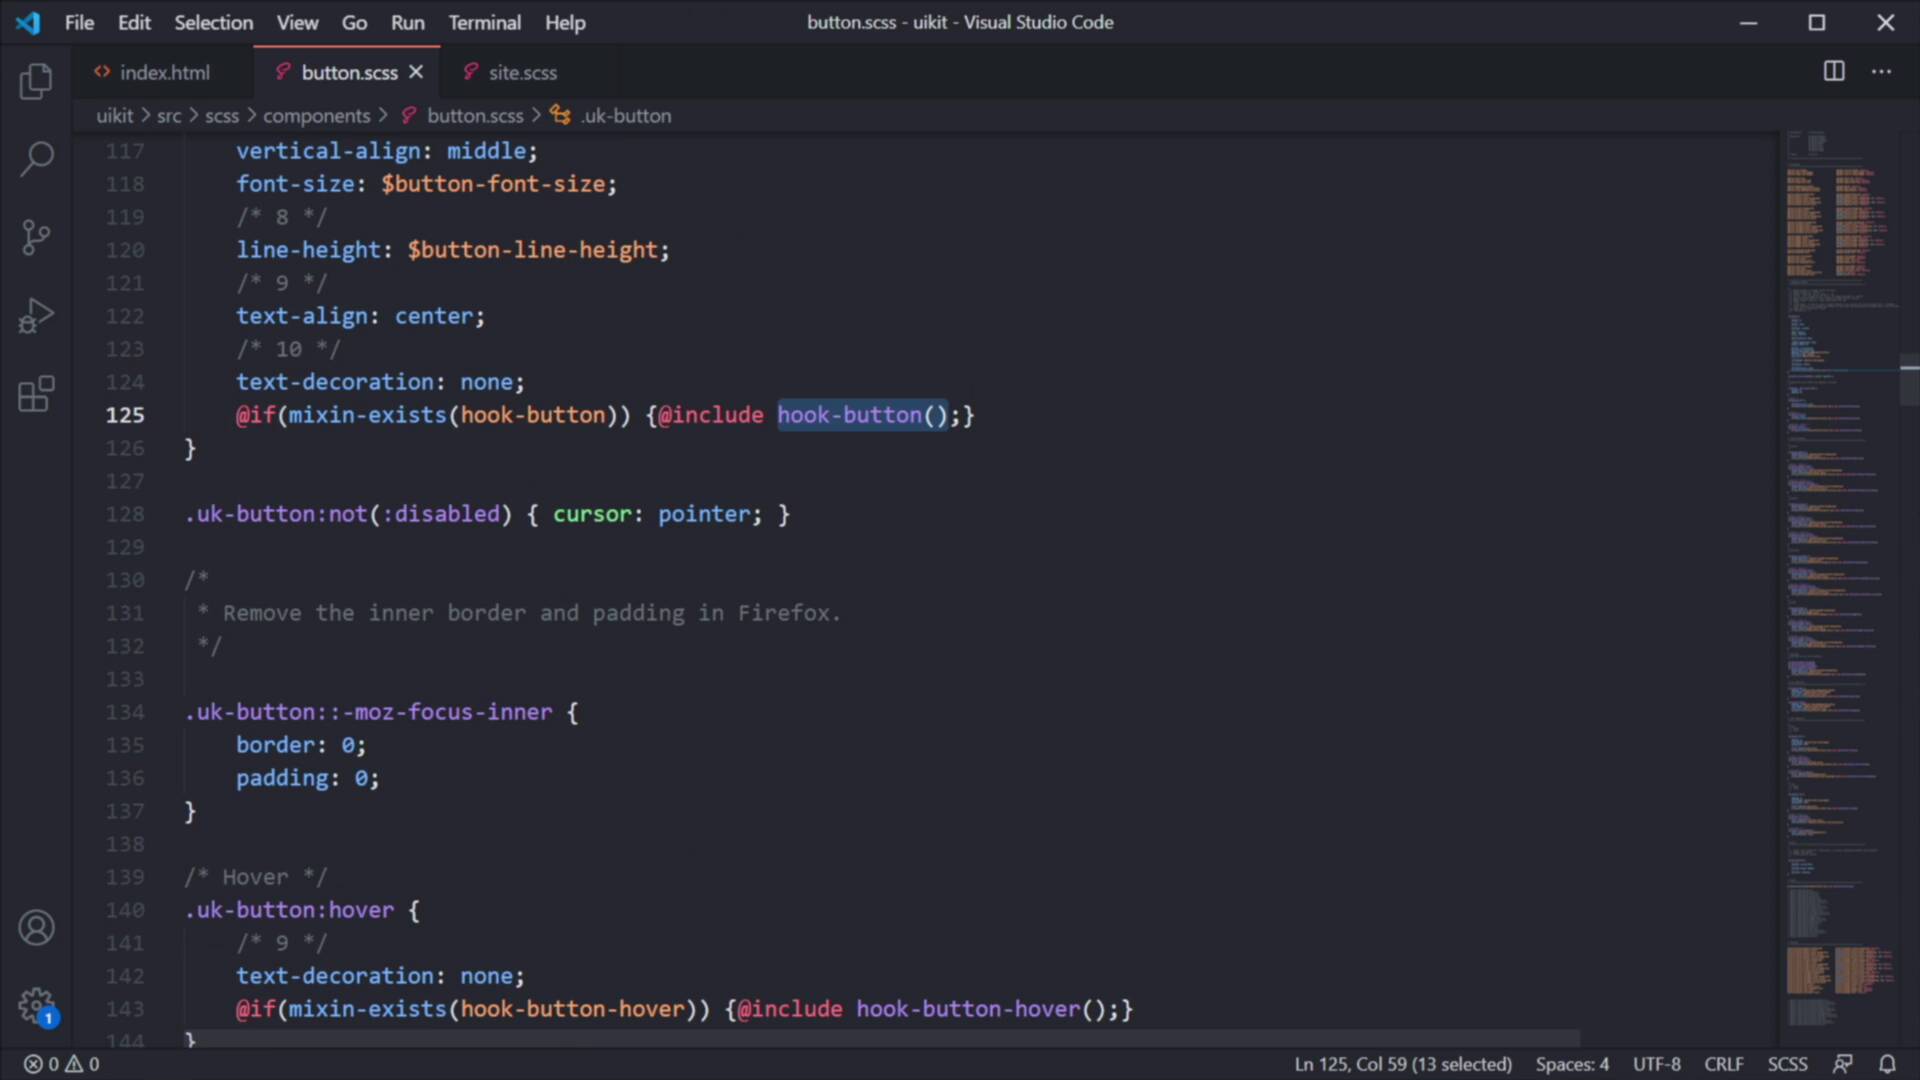
Welcome back to the course, in this lesson we're gonna do some light customization to the page that we build previously, so we can understand how to do this in your own projects, let's begin. Now before we start writing any code, you will need to be able to compile your sass or less code into CSS. And there are a lot of ways you can do that, you can use the command line or you can use a dedicated app. Depending on your operating system, you have a couple of different options, but what I would recommend is you get Prepros. This is free, you can download a free unlimited trial, but obviously, if we're gonna use this on a daily basis, I do recommend you buy it for $29 and support its creator. But what's nice about it is that it works on, Windows, Mac, and Linux, and you can use it to compile pretty much everything you can see here babel, coffee script, sass, less, jade, and so on. So, it's a pretty cool app, I highly recommend you get it. Now, once you do I have mine set up here, as you can see, I'm still using the trial version. What you can do is browse and select your working directory, mine is called uikit. And next, in my root folder here, I'm gonna create a new file, I'm gonna call it style dot or actually, let's call it site.sass, and let's go ahead and save that. And as you can see, the Prepros app just created .css file for it, and every time I make a change here, for example, body, color red, this is just an example, right? The app, if we look at the logs is automatically compiling the site.scss to site css, and my CSS file looks like this. Now, we're gonna need this because we're gonna be applying some changes to the default CSS of the framework, and we're gonna do that using this file right here, site.scss. This is the method I recommend if you're gonna do a small number of changes. But if you're gonna do a larger number of changes, what I recommend is you go to src, under scss, under theme, you'll basically find all of the partial and full SCSS files from the framework. And I recommend you make your changes or you place your changes in these files and then load them in your project. But that's a bit more advanced, we're not gonna cover it in this course, instead, we're gonna be using this file, a single file to overwrite and add some additional styling to our page. So with that said, here is the structure that you want to use, first, you will define your custom variables. Next, you will import the default variables, and all the available makes sense, you do that by using @import and you import these two files. Please note that, if you installed the source falls in a folder that's different from uikit, you will need to specify the correct path here. Next, you would need your custom mixin overwrites, and I'm gonna show you what that's all about in just a little bit, and finally, you're gonna import uikit. So basically, the custom changes that you're gonna make are gonna be in here and in here. Here, you're gonna define the custom variables where the variable overwrites. And here you're gonna define the custom mixin overwrites, which are also called hooks. Now, in order for our website to display the customize style, we need to go back to our index html. And instead of loading the default css file from the cdn, we're gonna load site.css, or the css file that we just created. And if we take a look at our page now, refresh, you'll see that it looks exactly the same as before, and that's because we're loading the default styles from the framework. So let's go ahead and customize these. First, I'm gonna create one of my own variables, and it's gonna be called custom accent. And that's gonna be equal to this value, as you can see it's kinda a brownish colour. Now, I'm gonna show you how to change the font family for your entire page. For that, we need access to a variable called global font family, and we're gonna change that to Poppins and a fallback to sans serif, that's a Google font. So, let's go ahead and load it right here in our page, I'm gonna place it right here. And now, you'll see that when we refresh our page, the font will be different. And I'm not gonna go through the entire customization of this page, instead, I'm gonna customize this button right now. And then I'm gonna walk you through all the other customizations I did, because I don't want this course to be too long. So, to customize the button, what you need to do is open up buttons.scss, from the components file. And here, you will see all the variables that are being used, older values, and also the css that's being applied to this button. And here we can see something interesting, if mixin exists hook button, then include hook button. Remember I told you about hooks? This is how you add custom css to a specific declaration, so for example, I'm using a button primary, right? So, if I search for primary, you can see that the hook is called hook button primary. So let's copy that, let's go to our site css, and in here, I'm going to say mixin hook button primary. And then I can say, okay, I want a border, I wanna add a border to my button. So, I'm gonna say border 1pixel solid, and I'm gonna use the custom accent variable that I use previously. So now, you will see that our button has a border, this didn't replace existing styles it simply added to the existing style in this scss file. Basically this line here, got replaced with the contents of my mixin, it's really that simple. So now for the buttons to be able to customize it properly, I'm gonna be doing some variable overwrites here. I'm gonna say button primary background, and I'm gonna set that to transparent. And we're just gonna jump back and forth here so you can see the difference. I'm gonna change the button primary color to custom accent, Like that. I'm gonna change the primary hover background to custom accent, all right? So now when I hover on it. I have a different background, I'm gonna change its line height. So button, primary, line, height, I'm gonna set that to 28 pixels, and I'm also gonna set a padding, so button padding horizontal 64 pixels. Just like that. And this variable gets applied to all of the buttons, not just the primary. And then in my hook here, I'm gonna set the font weight to 700 which is bold, and that changes the font weight of the button text. I'm also gonna set a font size of 18 pixels, I'm gonna remove the text transform, because right now it is uppercase and I don't want that. And finally, I'm gonna set its height to a predefined height that's residing in the form height variable, and we're gonna be changing the form height variable in just a little bit. Okay, so that's how you can basically customize a component. First, you see what variables can be changed, and you change their value. And then for whatever style you want to add to a specific component, you just find its hook. You write the mixin like this, and you paste in the code that you wanna add to that component, of course, you can write any other css in here, this is just like a css file. And now, let me write the rest of the css to customize the rest of the page, and I'm gonna quickly walk you through those changes. All right, so now this is the before styling and refresh, this is the after styling. So notice I worked a little bit on the typography, and also on how this form looks like, and I also changed the background color. Here's how I did that, it all started with changing a bunch of variables here. I changed the global muted background which I'm using for the body, right? On the body, if you remember, I use the class of uk-background muted, and that one is using this variable to set the color. I changed the global color this is for the text or the emphasis, this is for the headings, the global muted color itself I changed that to the text color minus a few degrees of capacity. I changed the global margin, then I just added new font sizes and line heights for the h6 and h1 that I'm using, so these two. And I changed the overall font height which applies to the inputs, and also the padding horizontal, which also applies to the input, so the level of padding that you get inside an input. And then it was time to just target the correct hooks, for example, on the h6 I added my own font weight and letter spacing, on the h1 I added my own letter spacing. On the form, I just got rid of the borders and that applies to the form inputs, and then on the hook for the button which you saw previously. So with just a little bit of code, just some overwrites on the variables and a few custom styles, we got from the default styling of the framework to a much better one that's more in line with our brand. All right, and with that it's time to wrap up th is course. I didn't go in to a lot of detail about the customization or every single component of the framework, because the purpose of this course is to get you acquainted with uikit. If you wanna dig a little deeper, the official documentation is always available for you to check out. And you can also keep an eye on Tuts+ because we might be covering this framework in more detail in future courses and tutorials. With that said, thank you very much for watching, I'm Adi Purdila with Envato Tuts+ and until next time, take care.


