
 Lessons: 13Length: 1.3 hours
- Overview
- Transcript
2.9 Adding the “Footer One” Entry and Template
In this lesson we’ll add the entry required for our “Footer One” panel and create the template used to display it.
1.Introduction
1.1Building Landing Pages With Craft CMS00:51
2.Building Landing Pages With Craft CMS
2.1Setting Up the Template Essentials09:36
2.2Setting Up for the “Hero” Panel Entry08:52
2.3Adding the “Hero” Panel Entry and Template10:27
2.4Setting Up for the “Features” Panel Entries03:53
2.5Adding the “Features” Entries and Template08:57
2.6Setting Up for the “Pricing” Panel Entries05:18
2.7Adding the “Pricing” Entries and Template13:33
2.8Setting Up for the “Footer One” Panel Entry01:27
2.9Adding the “Footer One” Entry and Template03:53
2.10Setting Up for the “Footer Two” Panel Entry03:56
2.11Adding the “Footer Two” Entry and Template05:52
3.Conclusion
3.1Wrapping Up01:43
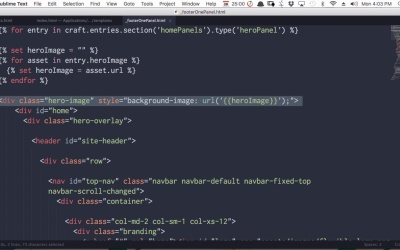
2.9 Adding the “Footer One” Entry and Template
Hey, welcome back to building landing pages with Craft CMS. In the last lesson, we set up the backend for our Footer One panel here. In this lesson, we're gonna create the entry and the template to go along with it. So we're gonna just go ahead and copy this title right away, so we've got that ready. We're gonna make a new entry. So head up here and choose Home Panels. We'll choose the entry type we just created, Footer One. And now start filling in our fields. There's our title, our description. For the button text, we're just gonna use, Get a Quote like we did with the button in the Hero Panel. And we'll just use a hash as a placeholder button URL. We'll inspect this to see what image we should be using here. We want pencil.jpg. So we'll add that in. Pencil. We'll Select and now that is all done. And because the layout of the Footer One panel is quite similar to the Hero Panel, instead of creating a template from scratch, what we're gonna do is duplicate the Hero Panel. And then we're gonna rename it to FooterOnePanel. And then we'll open that up for editing. And we'll set the syntax to Craft-Twig. And the reason that we just duplicated the Hero Panel template is because the for loops that we made are almost identical. However, the HTML is fairly different. So go ahead and highlight all the HTML in this template and delete it. Then jump into your original static HTML template, copy the section with the ID quote. And paste that where your old HTML was. Now, all we need to do is go through and make the static content here, dynamic. We're already fetching our heroImage with this code. So we're gonna grab that and we're gonna replace this fixed image with that dynamic image. We'll add in our entry title. We'll add our description inside this paragraph tag. We'll add our button URL. And finally, we'll add our button text. So that's replaced all the static material with dynamic material. Now the only thing that we need to change is up here. We're still querying the heroPanel entry type, we just need to replace that with footerOne. And now that's it. That's a really quick one for our Footer One Panel. Now, I can go into our index template, and just load up our new template. Just change this to footerOne. And let's see what we've got on the front end now. All right, so there we go, that's perfect. It's an exact match for our original. So now we're coming up to the very last panel in our layout, and that is the Footer Two section, right at the bottom. So it would be the same thing one more time, setting up the backend in the next lesson. And then setting up the entry and template in the lesson after that. So, I'll see you there.


