
 Lessons: 13Length: 1.3 hours
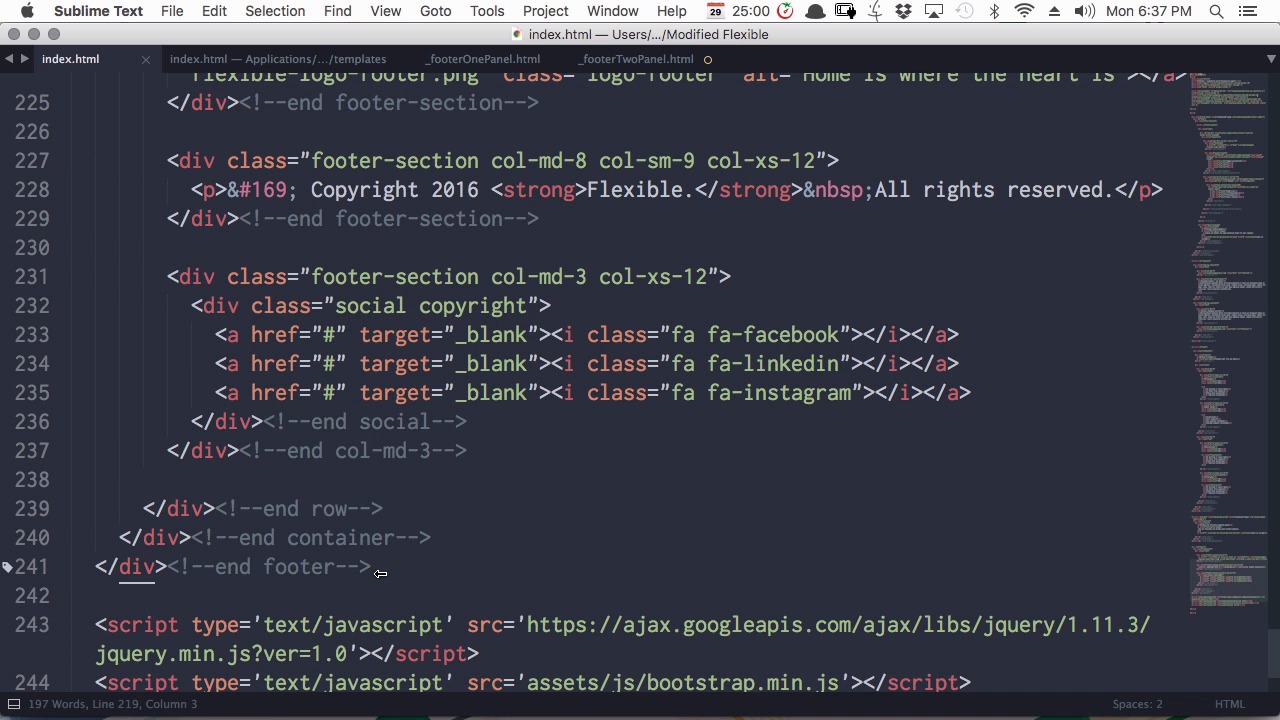
- Overview
- Transcript
2.11 Adding the “Footer Two” Entry and Template
To wrap up our site creation process, in this lesson we’ll create an entry to add content to our “Footer Two” panel, and then create the template to display it.
1.Introduction
1.1Building Landing Pages With Craft CMS00:51
2.Building Landing Pages With Craft CMS
2.1Setting Up the Template Essentials09:36
2.2Setting Up for the “Hero” Panel Entry08:52
2.3Adding the “Hero” Panel Entry and Template10:27
2.4Setting Up for the “Features” Panel Entries03:53
2.5Adding the “Features” Entries and Template08:57
2.6Setting Up for the “Pricing” Panel Entries05:18
2.7Adding the “Pricing” Entries and Template13:33
2.8Setting Up for the “Footer One” Panel Entry01:27
2.9Adding the “Footer One” Entry and Template03:53
2.10Setting Up for the “Footer Two” Panel Entry03:56
2.11Adding the “Footer Two” Entry and Template05:52
3.Conclusion
3.1Wrapping Up01:43
2.11 Adding the “Footer Two” Entry and Template
Welcome to the last lesson for a building landing pages with Craft CMS. We just set up the entry type for our Footer Two panel. Now we're ready to set up the entry for it. So we're just gonna copy this copyright message here. So we have that good to go. Now we're gonna create another new entry, a new Home Panels entry. We'll select the Footer Two type that we just created. This title isn't gonna be displayed anywhere. It's just to be able to tell this entry apart from the others. So we'll just call it Footer Two. And then we'll paste in our copyright message, and now we can start adding social icons. So we'll hit this button, check this box and now all we have to do is enter an icon that we wanna use and a URL. So here's this useful little message that we added in telling us where the cheat sheet is. And down here we'll be able to find any social icon that we need. Generally speaking all you'll need to do is put fa- and then the name of the social media icon that you want. So let's start with Twitter. So we'll put fa-Twitter as the icon. And then, We've just put in the main Twitter domain, but the person will be able to put their profile address in here. Now we'll add a second one. Let's add Facebook, fa-facebook. And then a person will be able to put their Facebook URL in here as well. And with this matrix they'll be able to add as many social icons as they want so that's super flexible and super helpful. So we'll just tick that box for that one and now we'll save. So now that we have our entry in, let's code up our template. So we'll go into our templates folder one last time, create a new template named _footerTwoPanel. And open it up for editing. For our query, we're just gonna get things in a bit quicker by copying from our footerOne panel. And we'll just change that to footerTwo. We'll add in endfor at the bottom. Change the Syntax to Craft Twig, make it a bit more readable. Then we're gonna go into our original static HTML template, and we're gonna copy all the HTML from this div with the ID footer, all the way down to the comment that reads end footer. And we're gonna paste that inside our for loop. Now we only need to change two things here, that copyright message and our social icons. So the text based copyright message is here. So we'll just cut out static content and replace that with entry.copyrightMessage. Now, down here, what we want is this line. This is what creates a social icon. We want this line to repeat for each social icon that a person added in that matrix field. So we're gonna set up another for loop. We'll say for icon in, and we're gonna iterate through our social icons field. So entry.socialIcons and then we'll end the for loop after this first a element here. Now we just delete these extras, they're not needed. So now the information for each icon is stored inside this placeholder named Icon. So for the URL we'll say icon.socialMediaUrl. And then for the class over here, we'll just replace that with Icon.fontAwesomeIcon. So those are just coming from from the handle names that we gave to each of those nested fields inside our social icon block. That's now our footerTwoPanel finished. So all we need to do is load it into our index template. So that in footerTwoPanel, and now let's see what we've got on the front end. And there we go. And so there's our copyright message on the left here and over on the right there is the Twitter icon we set up, connecting to the link we entered and the Facebook icon. So that's it. Now your whole landing page is completely built. We've got all of our panels in, we've got our hero panel, our features panel, our pricing panel and both of our footers. And that wraps up our course. I hope you'll join me in the next and final video. We're just gonna have a quick recap of what you've learned since the beginning of this course. And then I'm gonna try to point you in the right direction for the things you might like to learn next when you're working with Craft CMS. So I'll see you in the final video.


