
 Lessons: 13Length: 1.3 hours
- Overview
- Transcript
2.6 Setting Up for the “Pricing” Panel Entries
In this lesson we’ll create the fields and entry type required for our site’s “Pricing” panel, once again leveraging the same essential workflow as with our other panels.
1.Introduction
1.1Building Landing Pages With Craft CMS00:51
2.Building Landing Pages With Craft CMS
2.1Setting Up the Template Essentials09:36
2.2Setting Up for the “Hero” Panel Entry08:52
2.3Adding the “Hero” Panel Entry and Template10:27
2.4Setting Up for the “Features” Panel Entries03:53
2.5Adding the “Features” Entries and Template08:57
2.6Setting Up for the “Pricing” Panel Entries05:18
2.7Adding the “Pricing” Entries and Template13:33
2.8Setting Up for the “Footer One” Panel Entry01:27
2.9Adding the “Footer One” Entry and Template03:53
2.10Setting Up for the “Footer Two” Panel Entry03:56
2.11Adding the “Footer Two” Entry and Template05:52
3.Conclusion
3.1Wrapping Up01:43
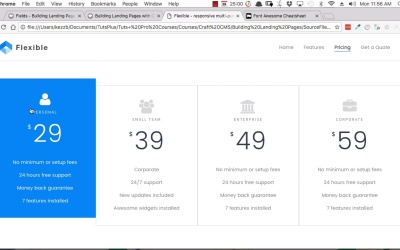
2.6 Setting Up for the “Pricing” Panel Entries
Hey, welcome back to building landing pages with Craft CMS. So far we have created the hero panel that you see in screen here. We've created the features panel and now we're gonna set up the pricing panel. So it will be the same process once again. We figure out what custom fields we need, then we'll create a custom entry type. And then in the next lesson we'll set up the entry in the template. So looking at our pricing panels here. There are common elements to each one of these pricing panels. We're gonna have a different entry for each of these four. And the entry type is going to need an icon here. These are coming from FontAwesome. So what we can do is just let people put in the name of the icon that they want to use and then we can have that pulled in from FontAwesome. We've got the title of the pricing level here. And we'll just use the normal title field for that. We have a currency sign,we're going to make that editable, so that a dollar symbol or pounds symbol or whatever else is needed can be inserted there. We have a price. Which we'll need to have inserted as a number and then we have a list of features and for this, we're gonna use a rich text field and we have people insert that as a bullet list. So that this bullet list can then be converted via CSS that's already in the template design into the type of list that you see on the screen here. So let's set up those fields that we just listed that we're going to need. Go to Settings > Fields. You can make a new group called Pricing Panel. And we'll start by setting up a field for the FontAwesome icon. So we'll name this FontAwesome icon. And in this case, we will actually include some installation instructions. Because in order to choose icons. We're gonna need users to go to the cheat sheet for font awesome. And here they'll find all the little codes that they can use to designate the icon that they wanna have show up. So, in the instructions field, we'll just say choose from [SOUND] and we'll add in that URL. So this only needs to be plain text and we'll fill in a place of the text here, we're just gonna pick a generic looking icon. So let's say, we just go with this down arrow here, and that will add some placeholder text into that field so that when a user looks at it they get an idea for what kind of it text that's supposed to be filling in that field. So then we'll go ahead and save that. And then next up in this layout, we've already got the icon. The title is just gonna come from the default title field, so then we've got the currency symbol. So another new field. Name it currency. And leave that as Plain Text. Don't really need instructions here, I don't think. It would be fairly self-evident. And then we'll fill in just a dollar sign for our placeholder text. After that we need the price itself which is gonna be a number, so we'll set a new field, name it price and then for the field type we're gonna change this over to number and we'll save that one too. Now under our price we're gonna need our feature list and this needs to be an unordered list and we're gonna need users to manually create an unordered list to populate this section. So to do that we're gonna use a rich text field and we'll just include some instructions. So another new field. We'll name this one Feature List. We'll change the field type to Rich Text and then in the instructions we'll just add a little note that says please add a bullet list of features. And we scroll down a little bit further to get rid of some of these. We don't want any images added into this, we just want a bullet list, so we'll set it there on no asset sources available, no image transforms. And that's it, nothing else needs to be changed. And now we've got all the fields that we need for our pricing entry types. And to set that up. We go into settings, sections, and now we're gonna get edit our entry types. And will create a new one. We're gonna call this one pricing. We wanna keep the title field showing, so leave this checked. Now we need a new tab to hold all the fields we just created. Rename that to pricing. Then we're gonna add the fields in the same order that we see things in the layout here. So first up, we'll have our icon, drag and drop icon in currency price and feature list. And we'll save that up in that is good to go. Now, in our next lesson we're going to add entries for each one of these, and they'll code up out template in the pricing panel will be all done so see in the next lesson.


