


- Overview
- Transcript
2.1 A Quick Animation Demo and Overview
We’ll need to cover a little background theory to give you a solid grasp on CSS animation, but to help give that theory context, let’s first create a quick animation demo using Webflow.
Related Links
2.1 A Quick Animation Demo and Overview
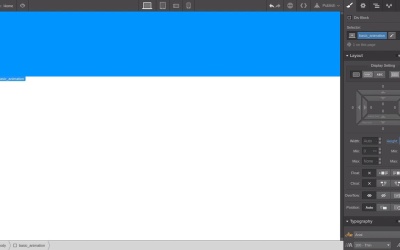
Hey welcome to the first lesson in a visual guide to CSS animation, as we go through the course we're gonna have to cover a little bit of theory, but I wanna make sure that you have some context of that theory before we get into it. So the first thing that we're gonna do, is set up a really simple animation, and just touch on some of the most key points, and we are gonna be working with Webflow throughout this course. You don't need the paid version in order to do everything that we're gonna be gonna through. With the free version you can use one site, and that's gonna be all you need in order to follow along with the course. So before you get started, just head to webflow.com, grab yourself a free account, and then when you login you should see this page here. Then you just wanna hit this blue New Website button. That'll let you create a new website. Just give it a name, anything you want. CSS Animation is fine. And that's gonna take you into the canvas that you're gonna be working with. So now let's make a quick basic basic animation. You don't have to understand everything that's going on here just follow along and I'll step you through it. So, the first thing we're gonna do is add a Div block. So, hit this plus sign up the top here, you got a Div block and just drag it on to the canvas. Now we're gonna need to give it a cluster name, so that we can associate the styling that we're gonna do the CSS with this Div block that we just added in. So in this tab over on the right with the paintbrush symbol, we are gonna click in this selected box so you can create a new class. And then we're gonna add in basic_animation. Now I've got a class name in place to ready to start adding in some styling, will stop by just giving this box a little color make it easier to see. So scroll down to the background section. Hit this little color drop here, and then just fill in with any color you like blue the default is just fine. Now we're gonna give it some highlights, so in the layout box here go to the hide box and fill in 200. Now we have an element and we're ready to apply an animation to it and that leads us into the three aspects of the kind of animations that we're gonna be doing this course. There's three things you need if you wanna create an animation. The first thing you need is an element in a certain default state. The second thing you need is that same element in a different state. So it has at least one property that's been modified. Then on some kind of trigger You need to initiate a transition in between those two states, and that's how you create an animation. So now let's create our alternative state. So, we have the two states that we can transition in between to make an animation. Up here on the top right hit this states drop down list, and from there you going to select hover. And then down here in the height field we're gonna change the height of element from 200 to 500. And then just go back up to the states drop down list and reselect none. So now you're back to editing this element in its just default state. Now we have two states. One with this element is 200 pixels high, and another where it's 500 pixels high. So all we need to do is, add a transition in between those two states. So just double check to make sure that you're in the nun state, in the little drop down at the top. Then scroll down to the transitions and transform section in the side bar. Down here you can see that we have this transition section. As the name suggests this is where you add transitions. So hit this little clock icon and then you see a big drop down list appear. There's a lot of different options in here. But don't be overwhelmed by all of those, because all you actually have to do is find in this list. The properties that you know have changed in between the default state and the modified state. In this case, we've changed the hot, so we just had to find hot in this list and select it. Now we have all three things, we have a default and modified state in our transition, and you recall that our modified state, we added that to the harvest date. So in this case it actually means that we have a built in trigger to set off the animation between the two states. So all we need to do is just hit escape to deselect everything, and now if we hover over our element, you will see its size animating form 200 pixels to 500 pixels and then back again when you no longer hovering over the element. So that's a quick overview of how you create CSS animations using transitions. So that should give you a bit of context for what we're gonna go through in the next lesson, which is some of the essentials behind 3D animation as a general concept. We're gonna look at what the X and Y axis are in 3D animation, and how coordinates on those axes play a role in your CSS animations. So I'll see you in the next lesson.


