
 Lessons: 9Length: 52 minutes
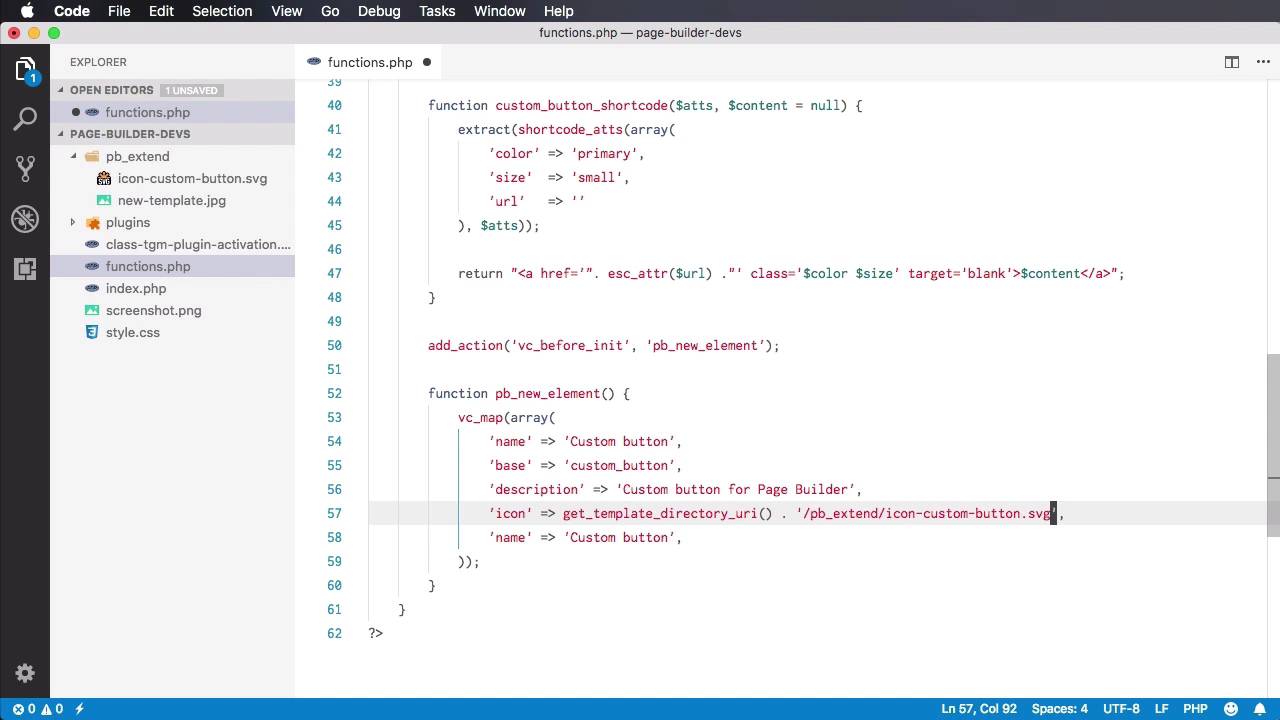
- Overview
- Transcript
2.3 Adding a New Element
In this lesson you’ll learn how to add custom elements to WPBakery Page Builder. It’s relatively simple to do, so let’s begin.
1.Introduction
1.1Welcome to the Course00:53
2.Working With WPBakery Page Builder as a Theme Developer
2.1Licensing03:04
2.2Loading WPBakery Page Builder With TGM Plugin Activation10:29
2.3Adding a New Element17:58
2.4Removing Existing Elements03:33
2.5Adding Parameters to Elements04:21
2.6Removing Existing Parameters From Elements03:38
2.7Adding Default Templates04:11
2.8Smaller Tweaks and Settings04:18
2.3 Adding a New Element
Welcome to the third lesson of this course where you learn how to add custom elements to the Page Builder plugin. It's relatively simple, so let's begin. Now the first thing we're gonna do is do a check to see if the plugin is indeed loaded. If it's not loaded we cannot proceed because it will essentially crash your WordPress installation. So a simple way to do that is to say if {function exists{'vc_map'}} { then we proceed. So vc_map is a Page Builder function, and if the plug in was installed and activated correctly, then this function is available. If it wasn't installed, then this function is not available. So there's no point in continuing if we don't have a working or an activated plugin. So let's add a custom element. We'll start by defining new shortcode. We're doing this because essentially, every Page Builder element is a shortcode. So to add a new element, we need to add a new shortcode, we're gonna say, oops, add_shortcode(). Let's create a simple shortcode, for example a custom button. And we also have to specify the function that is responsible for outputting to the frontend. So we're gonna say custom_button_shortcode, but you can name this function in any way you want. So let's create that, custom_button_shortcode. It receives an atts parameter, or attributes, and the content which we're gonna initialize as null. If you've created shortcodes in WordPress before, then this shouldn't really be a problem. All right, so what we're gonna do is specify a couple of parameters for the button. We're gonna give it a color, a size, and a URL. And also the content will represent the actual text that will be displayed inside the button. Let's do an extract function to make all of these properties available as individual variables. So I'm gonna say extract(shortcode_atts(array(. So we're gonna have the following attributes, color. Let's give it a default value of primary. And we'll also have a size with a default value, let's say, of small, oops, and also a URL with a default value of blank. So these are our default values. Now if you're still not familiar with creating shortcodes, let me explain this a little bit. This function right here will basically merge an array of default values with the attributes that we're receiving when we write the short code in the backend. So if, for example, in the back end, I write the short code like this, custom_button, and I go ahead and specify color =, I don't know, secondary, and size = large. What this is gonna do is, it's gonna pass in color secondary and size large in the atts or attributes array to this function. And then the short code atts function will take the attributes that I passed here. And it's gonna compare them with the default attributes that I have here. So if for example, I wouldn't specify, let's say, size. The function will use the default value, but since I'm specifying a color, this secondary value will override this primary value. The URL, since it's not specified here, will be taken from the default values which is currently none. This value right here, Click me, is the content, so that's essentially how short codes work. Now once we extract those values, and essentially extract, what it does is it creates variables called color, size, and URL. And I'm doing that because I want to write simpler code right here. We're gonna return. This will basically create the output for the shortcode or the stuff that's gonna be displayed on the front end. So I wanna display an a href =, and we're gonna pass in the URL but we also have to sanitize it first. So we're gonna say a href, we're going to say escape. Or let's do escape attribute, or attr, and we'll pass in the url. And then for the class, we'll give it color and size. And we'll also set a target to blank, and then inside we'll paste in the content. All right, so let's test our new shortcode and see if it's working. So I'm gonna go back to my backend. Currently, we're not using Page Builder. So for text, I'm just gonna say custom_button, let's say go to envato. And I'm gonna specify the url right here as envato.com. Let's give it a size, let's say, large, and let's give it a color or no, without the color. All right, so let's hit Update, and let's take a look at our page. And there we go, we now have a link that says Go To Envato. If we inspect it, you will see that it has the classes of primary, which is the default value of the color attribute we set in the shortcode definition. Large, which is the value of the other size attribute. We specified the href correctly, and the content of the shortcode is Go to Envato which is the button text. I currently don't have any styling for it, but that's beyond the point of this exercise, so the shortcode works. Now, let's go ahead and add that shortcode as a new element in the backend editor. So the new element will simply appear here when we click + it's gonna show up on this list. So how do we do that? Well, first thing we have to do is say add action(), we need to tap into one of the plug-ins functions. And that function is called vc before init. So before it initializes, we're gonna execute our own function which is called pb_new_element. Again, you can call this whatever you want. So I'm gonna create this function, function pb_new_element. And inside, we're gonna use the vc_map function. So the vc_map function receives an array of values that describe this new element that you want to create. So there are a couple of options available for the particular element. In our case we're gonna use just a few. We're gonna start with a name, right? The name is gonna be Custom button, and this will be displayed in the backend, in this list right here, just like you can see Accordion and Pageable Container here, Custom button will be the name of our new element. Then, the base, this is the name of our shortcode. In our case, it's Custom button. Then you can also add a description, which will also appear here. In this case, it's vertical tabbed content. So we're gonna say description, and say Custom button for Page Builder. Then you can also specify an icon. And for the icon I created a simple icon that says icon-custom-button.svg. It's a 32 by 32 icon, so let's link to that. We'll say get_template_directory_uri() /, it's under pb_extend/icon-custom-button.svg. You can put whatever kind of image you want. In here, I preferred svg. Next you can assign a class that will be displayed in the backend. In my case, I don't want a class here so I'm just gonna leave this empty. What else? You can specify a category. Now this is important because it can select one of these categories, Content, Social, Structure, WordPress Widgets, or Deprecated. But if you want a new category, you can create one by simply entering its name here. In my case, I'm gonna say Custom elements, and that's gonna create a new tab here that's called Custom Elements. But if, for example, you would want it under content, you would simply set, Content in here. I'm gonna keep custom elements. And then we have probably the most important attribute which is params. Now params allows you to define the fields that are gonna be displayed here. So for example, if I were to add, let's say, a separator, you'd have all of these attributes, right, color, alignment, style, border width, and so on. Well, all of these are being added in this params attribute, which is actually a multidimensional array. So for each item in this array, we'll have a new field right here in the backend. So what do we need? Well, we actually need, let me delete this separator, we need as many fields as we have in the shortcode, right? We need a field for the color, one for size, one for the URL, and also one for content. So we'll have four fields in total. Let's start with the first one, which is for the content. So this will be an associate of array. We'll start with this. What type of field do you want? And there are a bunch of types. You can choose text fields, text areas with WYSIWYG editors. You can choose color pickers. There are a bunch of them. You'll find a link in the lesson notes to the documentation for the inner API, where you'll find a full list from the Page Builder developers with all of the fill types you can use. In our case, we're gonna keep it simple and this will simply be a text field. So let's clean this up a little bit, so type textfield. Next we can specify a holder. In our case, it's gonna be a div. Next, you can specify a class. Again, I'm gonna leave this empty for now. Next, a heading, this is essentially the label of the field, let's say, Button text. Then, param_name, this is important, param_name refers to the name of the parameter that you set in the shortcode. Now because we're actually targeting the content, you can say content. And it will refer to the content right here. Next you can specify default value. Let say, for example, Click me, and you can enter a description, let's say, for example, The button text. And that's it, right? Now if we take look back, let's do a refresh, And we press on the + button, you can see the new category, Custom elements. We have our Custom button, the title, the description, the icon. So when we click this, yeah, we have, the only setting that we created this far which is the button text that says, Click me, and the description. So if we're gonna save the changes and hit Update, You'll see that our page now has two links. Let's quickly take a look if this is displayed correctly. It is because we haven't set an href just yet. All right, let's go ahead and create the other fields. So I'm simply gonna duplicate this array three times, so we have four fields in total. Let's not forget about the commas here, cuz this is an array after all. Okay, the next field will be for the color, so we're gonna use a dropdown here. A dropdown, div class, this is the same. The heading, it's gonna say Color class, param_name is gonna be color. Again, it needs to be exactly the same as this value right here, the value. For the value, since this is a dropdown, we can provide an array of values. So let's say we have to choose from primary, secondary, and tertiary. And then for the description, we'll simply say The color class. That's field number two. Field number three is for the size class. And again, we're gonna use a dropdown, so dropdown div, Size class, the param_name will be size for the values. We're also gonna provide an array. Let's choose from small and large. And the description will simply say The size class. And finally, our fourth field will be about the URL. So we're gonna use a textfield, div, no class, Button link, the param_name will be url. The default value will be none and for the description, Button link. Of course, you would probably use better descriptions when you're doing this in a real project. All right, so let's go ahead and take a look now. We'll do a refresh. And now if we, We go to Edit, you will see that we have all the fields we need. We have the Button text, we have the Color class, we can choose the different classes. And we also have the link here. So once we save the changes, hit Update. That will update our shortcode with the new information. So that's how it can add a new element to the Page Builder. Let's do a quick recap of how you do that. First, you need a shortcode, right? If you already have a list of short codes, great, use those, if you don't, go ahead and create them. Once you have your short codes, you hook into the vc.before.init function, and you basically call the vc.map function, and you provide an array which describes the new element. You give it a name, you specify which shortcode you want to use. Optionally, you give it a description and an icon, set its category and then you need to set its fields. And these fields should mirror the fields from your shortcode. And for each field you specify its type having parameter name, this is the most important because without it, it's not gonna save the value properly. Give it a default value of description, and you're all set. It's really, really simple. So why would you create new elements? Well, of course, to customize, to tailor basically the Page Builder to your own theme. Another way to do that is to get rid of some of the existing elements. Let's say that you don't use or you don't want any of these pre-built Page Builder elements in your installation, right? Well, how can you get rid of them? We'll learn how to do that in the next lesson.


