
 Lessons: 9Length: 52 minutes
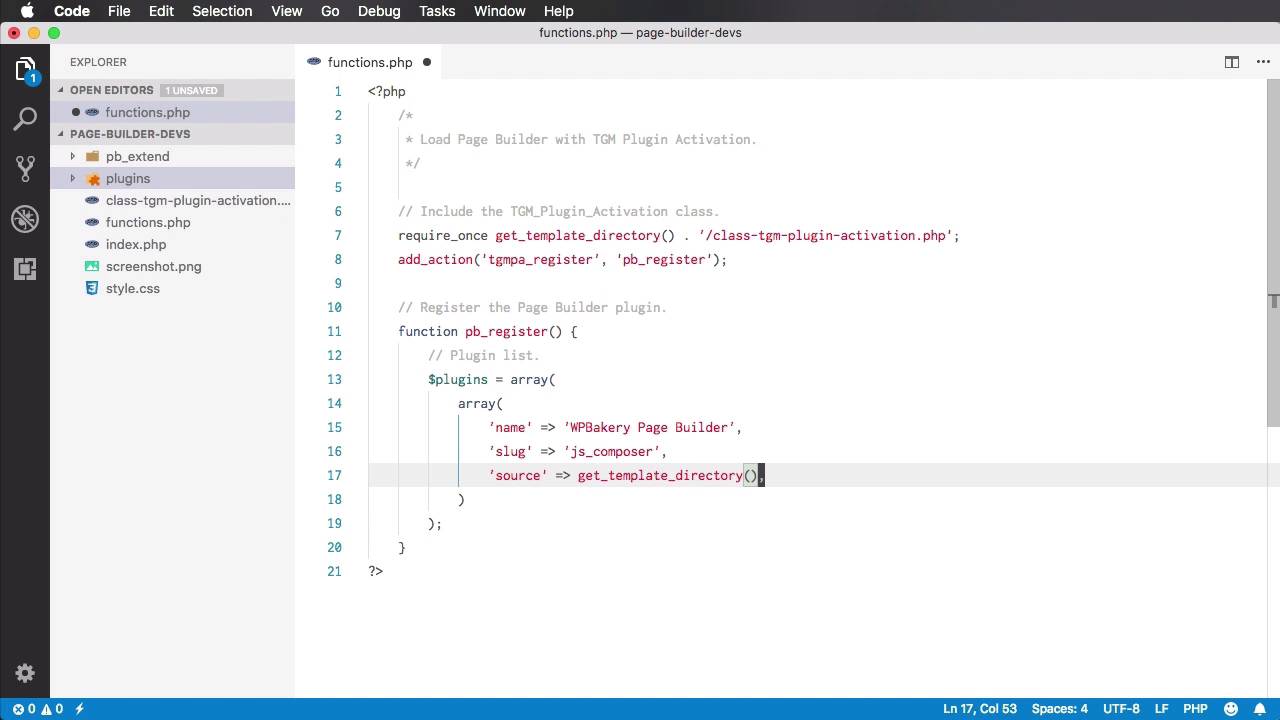
- Overview
- Transcript
2.2 Loading WPBakery Page Builder With TGM Plugin Activation
Welcome to the second lesson of this course, where you’ll learn how to bundle the WPBakery Page Builder plugin with your WordPress theme.
1.Introduction
1.1Welcome to the Course00:53
2.Working With WPBakery Page Builder as a Theme Developer
2.1Licensing03:04
2.2Loading WPBakery Page Builder With TGM Plugin Activation10:29
2.3Adding a New Element17:58
2.4Removing Existing Elements03:33
2.5Adding Parameters to Elements04:21
2.6Removing Existing Parameters From Elements03:38
2.7Adding Default Templates04:11
2.8Smaller Tweaks and Settings04:18
2.2 Loading WPBakery Page Builder With TGM Plugin Activation
Welcome to the second lesson of this course where we learn how to bundle the Page Builder plugin with your WordPress theme. And we're going to do that with the help of a script called TGM Plugin Activation. It's a free script, you can get it at tgmpluginactivation.com. Simply go to Download, and this gives you a nice generator, you would enter your text, a function prefix and a name and then hit Generate. Additionally you can select what you're gonna use it for, in our case we are gonna use if as a theme as being sold on theme forest. So once you do that, you'll end up with a zip that looks something like this, and the only file you need from here is this one, class-tgm-plugin-activation.php. Now I have a local word press environment set up here. I'm using Mac, I'm using Mac OS. I'm gonna go over the installation as I was saying in the beginning of the video or in the beginning of the course. This is not necessarily a beginner's course. So I assume you already know how to work with WordPress. And you do have a WordPress installation up and running. So what I did in my local WordPress installation is I created a new folder inside the themes folder. Essentially I created a new theme. But feel free to work on your existing theme. That's not really a problem. So in my theme folder, I have a functions.php, an index.php, the plug in activation class that I just downloaded, a style.css, and a screenshot. I also have a folder for plugins and a PB extend, which just contains two images. You'll see where we're using those in just a little bit. So if I go back to my local WordPress installation under themes, you'll see that we now have a Page Builder for developers. That's the name of the theme. It shows up right here. We haven't activated that just yet, but we'll do it in a second. Now let me show you what I have in the background here. I have a black functions PHP, an index PHP that just loads the head, the footer, and does the PHP loop. And the style CSS just contains information about the blank theme. So let's start by loading Page Builder into our theme using this TGM plugin activation. I'm gonna go to functions PHP. We're gonna open up php tag, and I'm gonna start by including the TGM_Plugin_Activation class. To do that, I'm gonna say require_once. We're basically loading this file right here. So require once. We can say get template directory. This will give us a class or a path our theme folder. And then we'll just say /class-tgm-plugin-activation.php, which is the name of the file. And then we're gonna say add_action('tgmpa_register') which is a function from the plugin-activation. And we're gonna hook in one of our functions. I'm gonna call it pb_register for page builder, right? So whenever this is run we're also loading our pb register functions. So, let do that, we'll say function pb_register, in the first thing we have to do is create the plug in list. So create a multi dimensional array here, we'll call plugins but you call it whatever you want. So we're gonna have one array and then inside each array entry is another array depending on how many plugins you have you'd have as many arrays. In our case we have one plug in, so we'll create one array. First there's gonna be name. We'll give it a name, we'll call it WPBakery Page Builder. Then slug, this is kind of an ID. We'll call it js.composer. And then the source. Where can we find the plug-in files. Well the plug-in files are right here in this plug-in's folder. But you can put it in whatever folder you want. After purchasing, the Page Builder plug-in, you down downloaded and you extract this JS composer zip file. This is the actual plug in, this is what will be installed in WordPress. So I've put it in this plug ins folder. So I'm going to link to that by saying get Template directory slash plugins slash js.composer dot zip. Then we also have the option to specify whether or not this is a required plugin So we're gonna say required, and the value will be true. If we set required to false, then the theme will simply recommend we install the plugin, it will not make it mandatory. But since we're bundling the plugin, since we have a lot of layouts, that we're gonna build with the plugin then we gonna ask our users to install the plugin. And finally, we can specify a minimum version of the plugin. In my case I'm just gonna say version 5. All right, so that's it for the plugins array. Now, we also have to specify some settings. So right here, Settings list. I'm gonna create another array called config. And inside, this is just a simple KeyValuePair array, so I'm gonna say id. Yeah? What's the id? We're gonna say WPBakery Page Builder. Just a simple string to properly identify the plugin installation. And is_automatic, I'm gonna set it to false. Now, is_automatic, this parameter basically allows. The WordPress installation to proceed to the plugin installation after to activate it, right? So when you activate the theme, WordPress will tell you. Look there's a plugin that you need to install, in our case the Page Builder, right? So you proceed to the installation, but first it activates that plugin. And then you have to first install the plugin, but then you have to activate it manually. If you set is automatic to true, then WordPress will automatically activate the plugin after the installation. In my case I prefer to set it to false. But it's a personal preference. So now that we have the plugin list and the settings list all we have to do is called tgmpa and we're going to pass in plugins and we're going to pass in config. This will basically load those plugins and allow us to install them once we activate the theme. And I just realized that these or this code here actually belongs inside the function not outside it. There we go, so they need to be called inside the function. All right so, let's give this a shot, let's see if it works. So if we go to Plugins you'll see that I do not have the Page Builder plug in install are activated. Let's go back to appearance themes and as soon as we activate our new theme, we get a notice. This theme requires the following plug in WPBakery Page Builder. So we can either dismiss the notice or we can begin installing the plug in so let's do that. Takes us to the Install Required Plugins page, we'll hit install, we'll hit return here and then we'll hit activate. And the plugin is now activated, you can see it right here and you now have access to it if you go to a page for example. Now you can activate either the backend or the frontend editor. So that's how you can load or bundle a plugin with your WordPress theme using this TGS plugin activation class. It's a really simple method and as I was saying it's required way of doing that by the ThemeForest review team. Now, we activated this plugin. So, what else can we do to customize this Page Builder plugin for our WordPress theme. Well, the Page Builder comes with a bunch of pre-build elements, right? And you can use those. You can do all sorts of things. You can modify them. You can add new elements. You can modify their parameters. All of this is possible thanks to one inner API written by the Page Builder team to let developers get a more, let's call it intimate access to the plug in files. So we're gonna take these one step at a time. And in the next lesson we're going to learn how to add our own custom element to Page Builder. That's coming up next.


