


- Overview
- Transcript
3.6 Libraries
Foundation uses two libraries: Motion UI and Panini. I've already covered Motion UI in a course called “Essential CSS Libraries for Web Designers” (linked below). So in this final lesson of the course we'll have a look at the Panini library, which allows you to create pages with reusable components. Let's begin.
Related Links
1.Introduction
1.1Welcome00:19
1.2What Is Foundation?08:09
1.3What's Changed Since Version 5?02:44
2.Working With Foundation
2.1Using Yeti Launch10:32
2.2Customizing Foundation03:51
3.Foundation's Awesome Components
3.1The Grid20:09
3.2The Navigation09:06
3.3The Containers13:05
3.4The Orbit Slider03:42
3.5Plugins13:24
3.6Libraries09:17
4.Conclusion
4.1Final words00:48
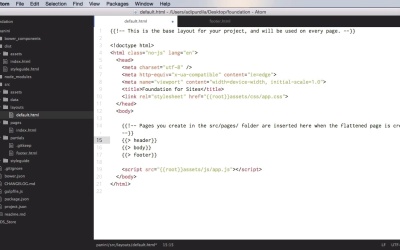
3.6 Libraries
Foundation uses two libraries, Motion UI and Panini. Now, I've already covered Motion UI in a course called Essential CSS Libraries for Web Designers. You can find a link down below. Essentially, Motion UI is a SASS transition and animation library. Now in this lesson we're going to have a little look at the other one, Panini, which is a library that allows you to create pages with reusable components. Let's begin. Now to show you how Panini works I'm going to use Yeti Launch, because it's going to make things much easier when compiling the final files and I'm gonna show you what I mean by that in just a little bit. So let's go ahead and create a new project here. I'm gonna call this panini. Foundation for sites, I'm gonna use the Zurb template, and I'm gonna create one. All right, so the project was created. It was launched using my localhost:8000 here. So this is actually connected via browser sync. So whenever I make a change in my files, this will reload automatically. So let me just show you what kind of structure we have here. So inside the src folder, this is what we're interested in. This is the source folder. Yeti Launch takes everything from this folder and uses the gulpfile tasks to create the dist folder, or the distribution files. So that this folder, as you can see, has fewer files and folders, than the source. Because it takes SASS, it compiles, it creates the CSS here, it takes the images, it compresses them, it takes the HTML files or partials and it creates the final HTML files. So if we go to layouts here, we have default.html. Now this is Handlebars. Handlebars is a templating language, and this is the way it's written. So this is actually a template for all the pages. In here, this is a comment, and this basically tells include the index.html contents in here. So, that is actually taken from pages. You can see here we have an index.html, and here we only have the markup responsible for this page. Yeah, we don't have any body or head tags, all of those are in the default.html. So this is like a parent page and in here, we're inserting partial pages. In our case, instead of body, we're inserting the contents of index.html. And this is the beauty of it. This is what Panini does. It compiles these files and creates the final index.html files in the distribution folder. So as you can see, this has the content that can be found in the default.html as well as the one that can be found in the index.html from our source folder. So let me show you a quick example just so you can understand this better. Let's go into partials and let's say that in all of our pages we have a header and a footer, and they're exactly the same. Well, I can go in here and I can create a footer call, and I can go into partials and I can make a footer.html file. And I can say this is the footer, right. And I can save this. And what this will do is if we take a look in Yeti Launch, this was compiled, the browsers are reloading. And if we take a look here, we now see the footer. We can also add a header to this. So simply copy this, paste it here, header. And this will actually search for a header.html file in our partials folder. So we'll do header.html. This is a header. We're gonna save this again, we're gonna see if Yeti recompiled this. If not, simply do Stop and run it again. Okay, and now we have the header, the footer and the main content. And the cool thing is, whatever we change in our index.html here, Foundations for Sites. If we put an exclamation mark there and we go back, the page has been updated. If we want to delete something from it, for example, delete this whole thing, it has been deleted. So this happens in real time. It's really easy to work like this. So those were the partial files. In Handlebars you can also work with something called page variables. And there are a few page variables, default ones or built-in ones that you can use. For example, page is one of them. So, for example, I can go into my header. And this a header, and I can say something like You are here. And I can say page. And if we refresh this, or actually we need to recompile this. For some reason this doesn't happen automatically when I make a change in some files. But anyway, there you go, you are here. Index, this is the name of the page. Another variable, you can already see in the default template here, and that is root. And that is used basically to get the root of the project, you can see it here. And you can see it also here. Now if you want, you can also add your own custom data. For example, on this index.html page, and again, this is using Handlebars syntax. I can do something like pagetitle: and I can say Hello! And what I can do now is I can replace this title with {{pagetitle}}. And that's going to change to Hello! So that's how you create a custom variable. Now it can also do conditional statements. So for example if you want to display something in the header only if you're on the index page. For example, if you just want to display this only on the index, you can do something like this. {{#ifpage 'index'}}, so if the current page is index, then you would do this. And you would close ifpage. So right now if I were on a different page than index, this would not be displayed. Another very cool feature is the ability to convert markdown into HTML. So for example, I can do this. {{#markdown}}, and of course, I'm also going to close this, and whatever I write in markdown here can be converted into HTML. So let's do a heading one. Hello everyone. I'll just do a heading three. This is a Tuts+ course. Maybe let's do an anchor tag. Tutsplus.com. Tutsplus, right? So, upon compiling, of course we need to stop this and run it again. There we go. So if we take a look at the HTML here, you're gonna see h1, h3, plus an anchor tag that takes us to Tuts+. So this is very, very handy if you just want to write HTML really fast, you can do this using Markdown or using the Handlebars templating language. All in all, a great feature. That's it for the Panini library, and in fact for this course. Please join me in the next lesson for the conclusion.


