


- Overview
- Transcript
2.1 Using Yeti Launch
Foundation 6 came with lots of new features, one of which was an accompanying desktop app called Yeti Launch. This allows you to quickly create Foundation-based projects right from your desktop, without needing to use the command line. Let's check it out.
Related Links
1.Introduction
1.1Welcome00:19
1.2What Is Foundation?08:09
1.3What's Changed Since Version 5?02:44
2.Working With Foundation
2.1Using Yeti Launch10:32
2.2Customizing Foundation03:51
3.Foundation's Awesome Components
3.1The Grid20:09
3.2The Navigation09:06
3.3The Containers13:05
3.4The Orbit Slider03:42
3.5Plugins13:24
3.6Libraries09:17
4.Conclusion
4.1Final words00:48
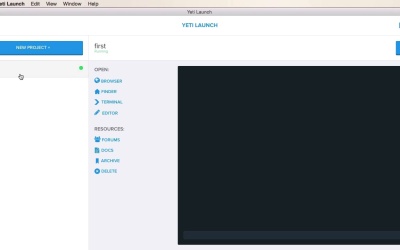
2.1 Using Yeti Launch
Foundation 6 came with lots of new features, one of which is an accompanying desktop app called Yeti Launch. Now, this allows you to quickly create projects right from your desktop, without having to use the command line. So let's check it out. This is the new Yeti Launch app. It's currently available just for Mac, but a Windows version is coming soon. So, as you can see this is a very straight forward UI. You have on the left side a side bar where you can create a new project, and here you're gonna have the list of your currently created projects. And then on the right side you have help and settings. So, settings allows you to select your project folder. I have mine set on a folder called Foundation on desktop. And then a login option for Notable. Now, Notable or Notable Code is a service by Zurb that allows you to host your site live and then you can share it, you can get feedback. You, your team, can annotate the live site and then get feedback. Now, we're not going to cover this aspect. Instead, we're going to go ahead and create a new project. So, for the first project, let's just say here, first. And you have a couple of different options here: Foundation for sites, apps, or emails. We're only focusing on the sites aspect for this course, so we're going to choose this. And then we have two different templates. We have the basic template which is the standard SAS Foundation project, or you have the Zurb template which uses the Zurb development stack. This one will basically compile your SAS into CSS just like that basic template actually, but the difference between these two is that the Zurb template will give you templating with Handlebars. It's gonna give you more options, like UglifyJS, UN CSS, which removes unused CSS, and image compression. So, it's a bit more advanced than the basic template, but for this lesson, let's go ahead and choose the basic template and see what it does. So, we're going to create our first project here. It gives you a nice log on the right side. It gives you these nice notifications here, letting you know about the progress. And then you have your first project in the sidebar here. It's currently selected. You can stop it if you want. The green light indicates that it is running. And then you have some different options. You can open it in a browser, finder, terminal. You can open it in an editor. You also have the option to delete it. And then you have access to a few links here. Now, if we open this in a browser, it looks like this. It's just a demo page, basically. Let's actually open this in my code editor here. You can see the structure of this basic package. So, you have a bower_components folder, so this is created with bower. You can use that to update or install new packages. You'll get, or you're downloading foundation-sites then motion-ui. And then of course foundation-sites comes with a few dependencies of its own like jQuery and whatinput. Then you have the CSS, which is compiled from the SCSS here. So you have a few settings. That you can uncomment here, and just play around with them, make them your own, customize them. And then you have the app.scss, which is the foundation of it all. So this will basically compile into the app.css. As you can see here, it's loading all of these files and all of these styles. And if you want, if you create a project using Yeti and you don't want certain components, well you just remove them from here. So for example if you don't want motion-ui, you just comment this. If we go back you can see that Yeti Launch actually compiled sass. You can see that's watching all sass files for changes, so notice the timestamp here. If I do another compile. You can see I did another one here. So by using this Yeti Launch and a code editor, you can basically use Foundation right away, and compile sass. Or if you're using the Zerb development stack, you can do a whole lot more. More. All right, well how would this work actually, and how do you use Yeti Launch to start working on a project? Well, the first steps, we already saw here. You create your project and then you have this predefined folder structure. Now, you already have the index.html where you're loading the app CSS. Basically, the CSS that contains all the styles relevant to Foundation. And then you just start writing your HTML. So, for example, if I wanted to start with, I don't know, let's actually go back to the Foundation kitchen sink here. Let's grab some controls here. Maybe some forms, right? So I'm going to toggle the code here, and I'm just going to copy all of these. So I'm going to hit the copy button. And I'm going to go back to my editor. And for some reason the paste doesn't work. So maybe it's just one of those small bugs. So let's go ahead and copy this by hand and paste it in. Let's try that, and there you have it. You now have some forms, working forms, and that was really, really easy. Now, if you're wondering how this is possible, how does Yeti Launch just do all of these things without you having to install anything or use the command line. Well, it uses Gulp, basically, and Gulp is a task runner. And you can see here, the task, it basically takes the SCCS file, it compiles it, and it outputs into the CSS folder. And then it also does a watch on the SCSS files so whenever it makes a change it will compile that SAS file into CSS. Now we're not gonna go over Gulp here, it's not the purpose of this course, but this is the way that everything works in the background. Now if we take a look at a more complex project. Let's go ahead and create one that uses Zurb template. So let's do zurb-template here. I'm gonna create this new project. All right, and now it created. Now this was a bigger project, so it took longer to create it, but it is running. So, let's jump into the code editor, and see what we've got here. So inside zurb-template we can see a structure that's similar to what we had before, bower_components, same thing. The difference is we now have a dist folder, and the dist folder contains our index HTML. Previously, it was in the route of our project folder here. Now it's in the dist folder. We have a few assets here, like SCSS, CSS images, JavaScript, so it's organized a bit differently. And the gulpfile.js is a bit different as well, because with the Zerb-type project you can do a whole lot more. For example, you can you browser sync, which will basically sync the page you're viewing across multiple browsers. You can use Panini which Is a library for a templating. Now there's a lot more automation going on here than what we had on the basic project. So when you're running Gulp on this, or whenever you compile this project in Yeti Launch, Gulp will copy files to various folders. It will compile templates into finished html files. It will compile Sass into CSS, of course. It will actually compress CSS using minifycss. It will combine all of the JavaScript into a single file, and after all the tasks are done, it will build the dist folder which contains the html and the CSS and all that stuff. And then it will start a server with LiveReload. So all in all, this second project type, using the Zerb development stack, is more complex. It gives you more options and it can really speed up your development workflow, and by setting up a working environment for you. So, instead of you having to install Gulp and using the command line, now writing the tasks and all that stuff, Yeti Launch does that for you. So it's a very good app. If you're just starting with Foundation, I highly recommend you use this. And, in fact, we are going to use this later in the course when we're gonna have a look at some of the Foundation components. That was a new app, a very nice alternative to using the command line or to downloading the project files or the Foundation files manually from their website. Now another new and worth mentioning feature is the ability to download a customized package of Foundation. We'll have a look at that next.


