


- Overview
- Transcript
3.3 About and Contact Page
In this final lesson, we’ll customize the about and contact pages we created earlier, and by doing that, we’ll complete our online store. Let’s begin.
1.Introduction
1.1Welcome to the Course00:57
2.Building the Store
2.1A Bit of Planning03:36
2.2Creating the Store01:54
2.3Creating Collections05:45
2.4Adding Products to Our Shopify Store13:03
2.5Adding Pages03:52
2.6Installing a New Shopify Theme04:07
3.Customizing the Store
3.1Homepage18:11
3.2Collection and Product Page03:49
3.3About and Contact Page05:18
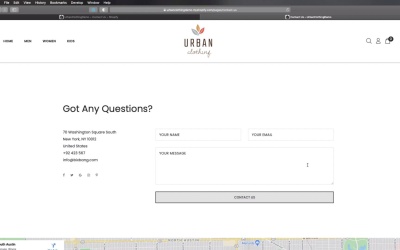
3.3 About and Contact Page
Welcome back to the course, in this final lesson, we'll customize the About Us and Contact Us pages. And by doing that, we'll complete our online store. So let's begin. Now, just like in the previous lesson, I went ahead and made all the necessary changes to the About and Contact Us pages, and I'm just gonna walk you through what I did. So maybe you can get some inspiration for your own project. So starting with the About Us page. If you remember from a previous lesson, it was just a blank page with just the header or footer, and the content that we entered there. But because I chose a template, and I'll show you that in just a little bit, our About page sorry, looks something like this, and we have some testimonials added here. And also the the footer and the newsletter is exactly the same. So, jumping back into the back end under the theme customizer. If we open up About Us, you'll see that in terms of content, we're starting with a section banner, which is this one here basically, where we added a background image. We change the text here, to match the one that we had in the the project briefing, the description, and we also changed the the address here. I also added this extra images. Now, in terms of the testimonials, we have this testimonials page widget, and each testimonial is a review block here, and you can add these as many of these as you want. You simply add an image here, and add the description, and the author right here. It's really that simple. And if we go back to the back end here, and we go to pages, you'll see that About Us is using page.about. We actually have a different template here that we could use, but I chose to go with page.about, and actually did the same with Contact Us. I chose contact three, as a template. So by doing that, our contact page looks something like this. It's very simple, just contact information here, contact form, a map, and the rest is exactly the same as in the other pages. So now if we go back to our online store, let me actually show you the content inside the customizer, it basically have this structure. Now if you're gonna use the same templates as I did, you're gonna notice that yours might be a little bit different. You're gonna have some additional sections in here. And that's because I actually changed the code for some of these templates. You see a template comes with pre-defined blocks, or widgets, and you cannot delete them from here. Instead, what you need to do is go to theme actions, edit code, and then you will need to find the template that you need to edit. In our case, it's contact three, and whatever section you don't want you can simply delete it from here, and hit save. And that's going to remove that section completely from the template. And with that, our online store is now complete, at least from a design and product point of view, which is what we covered in this course. Of course before going live, you do need to go through the settings, and set up the payments and the shipping details, and all that good stuff, but that's beyond the point of this course. Now, hopefully this experience gave you a good idea of what it's like to build an online store with Shopify. And as you saw, we were able to do this in under one hour because we had all of the assets ready to go with the images or the product images, the product description, the product information, all that good stuff. We had it ready to go and we just had to copy and paste in the Shopify admin. So even when you're building a real store with lots, and lots of products, if you're gonna organize yourself like this, it's gonna be much, much easier for you. With that said, thank you very much for watching this course. I'm Ardi Purdila, and until next time, take care.


