


- Overview
- Transcript
3.5 How to Add and Edit Theme Languages
In this lesson, you’ll learn how to add and edit theme languages in Shopify. This is very useful because not every store will use English as the main language. So let’s get to it.
1.Introduction
1.1Welcome to the Course01:57
2.How to Set Up a Shopify Store
2.1Planning the Store06:53
2.2How to Sign Up and Create an Online Store06:40
2.3How to Set Up Shopify04:51
2.4How to Add Products in Shopify09:37
2.5How to Add and Manage Shopify Collections06:12
3.Customizing Your Shopify Store
3.1How to Apply a Custom Theme07:30
3.2How to Edit a Shopify Theme10:39
3.3How to Add New Pages and Blog Posts04:29
3.4How to Set Up the Navigation03:50
3.5How to Add and Edit Theme Languages04:15
3.6How to Add a Custom Domain02:30
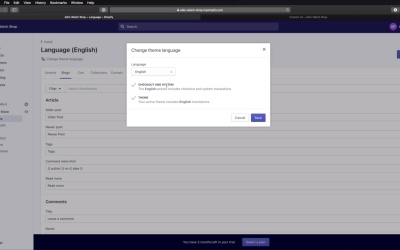
3.5 How to Add and Edit Theme Languages
Welcome back to the course. In this lesson you'll learn how to add and edit theme languages. This is very useful because not every store will use English as the main language. So let's get to it. To access theme languages, you would need to go to your online store here, themes and then go to the current theme, actions and then edit languages. Right here it opens up our English language. And the way theme languages work in Shopify basically is you get every single bit of text that is displayed on your website and it's brought in into this interface. So for example, here is the title of the 404 page. And here is the a login form submit text for the password page and so on. So they're nicely organized into categories here. And if you wanna change something, like let's say for example, that we're visiting the page, right? That has breadcrumbs. Let's see, does Contact have breadcrumbs? It does. So, under breadcrumbs, you see that the Home link has the text set to Home. But if I'm gonna change this to My Home for example, okay? And I hit Save, it says translations updated, and if I refresh this, this text gets updated as well. So you can do that for every single page, every single element on your website. It's all here. Now what if you wanna use a different language? Well, you hit this link change theme language. And as you can see, English is supported in both the checkout and the system and in the theme. But if I'm gonna choose Dutch for example, it tells me that my theme does not contain Dutch translations. What about Bulgarian? It does not. What about Italian? Doesn't exist either. What about Romanian, right? This is my language. So I don't have any Romanian translations, but I can hit Save either way, and I can translate it myself, okay? It tells me this language is incomplete and 200 plus translations are missing. But I can go on each one of these sections, and I can translate it myself. So on this 404 for example, I can say 404, and I can type in the Romanian translation of this text or here. This is the Romanian translation of this text. And I can do the same for the rest, on the breadcrumbs for example. This will roughly translate to this. So I can go ahead and save. You will see that if I refresh my front end, now I will get the translated version. And wherever you see translation missing, well that's where you know you have to enter that translation. It's really that simple. All right, and that's how you can add and edit theme languages. Now, by default your new store will be hosted on a Spotify subdomain, but you always have the option of moving it to your own domain which is actually recommended. I'll show you how to do that in the next lesson. See you there.


