


- Overview
- Transcript
2.4 How to Add Products in Shopify
In this lesson, we’ll be adding some products to our Shopify store, and I’ll show you two ways to go about it. Let’s begin.
Related Links
1.Introduction
1.1Welcome to the Course01:57
2.How to Set Up a Shopify Store
2.1Planning the Store06:53
2.2How to Sign Up and Create an Online Store06:40
2.3How to Set Up Shopify04:51
2.4How to Add Products in Shopify09:37
2.5How to Add and Manage Shopify Collections06:12
3.Customizing Your Shopify Store
3.1How to Apply a Custom Theme07:30
3.2How to Edit a Shopify Theme10:39
3.3How to Add New Pages and Blog Posts04:29
3.4How to Set Up the Navigation03:50
3.5How to Add and Edit Theme Languages04:15
3.6How to Add a Custom Domain02:30
2.4 How to Add Products in Shopify
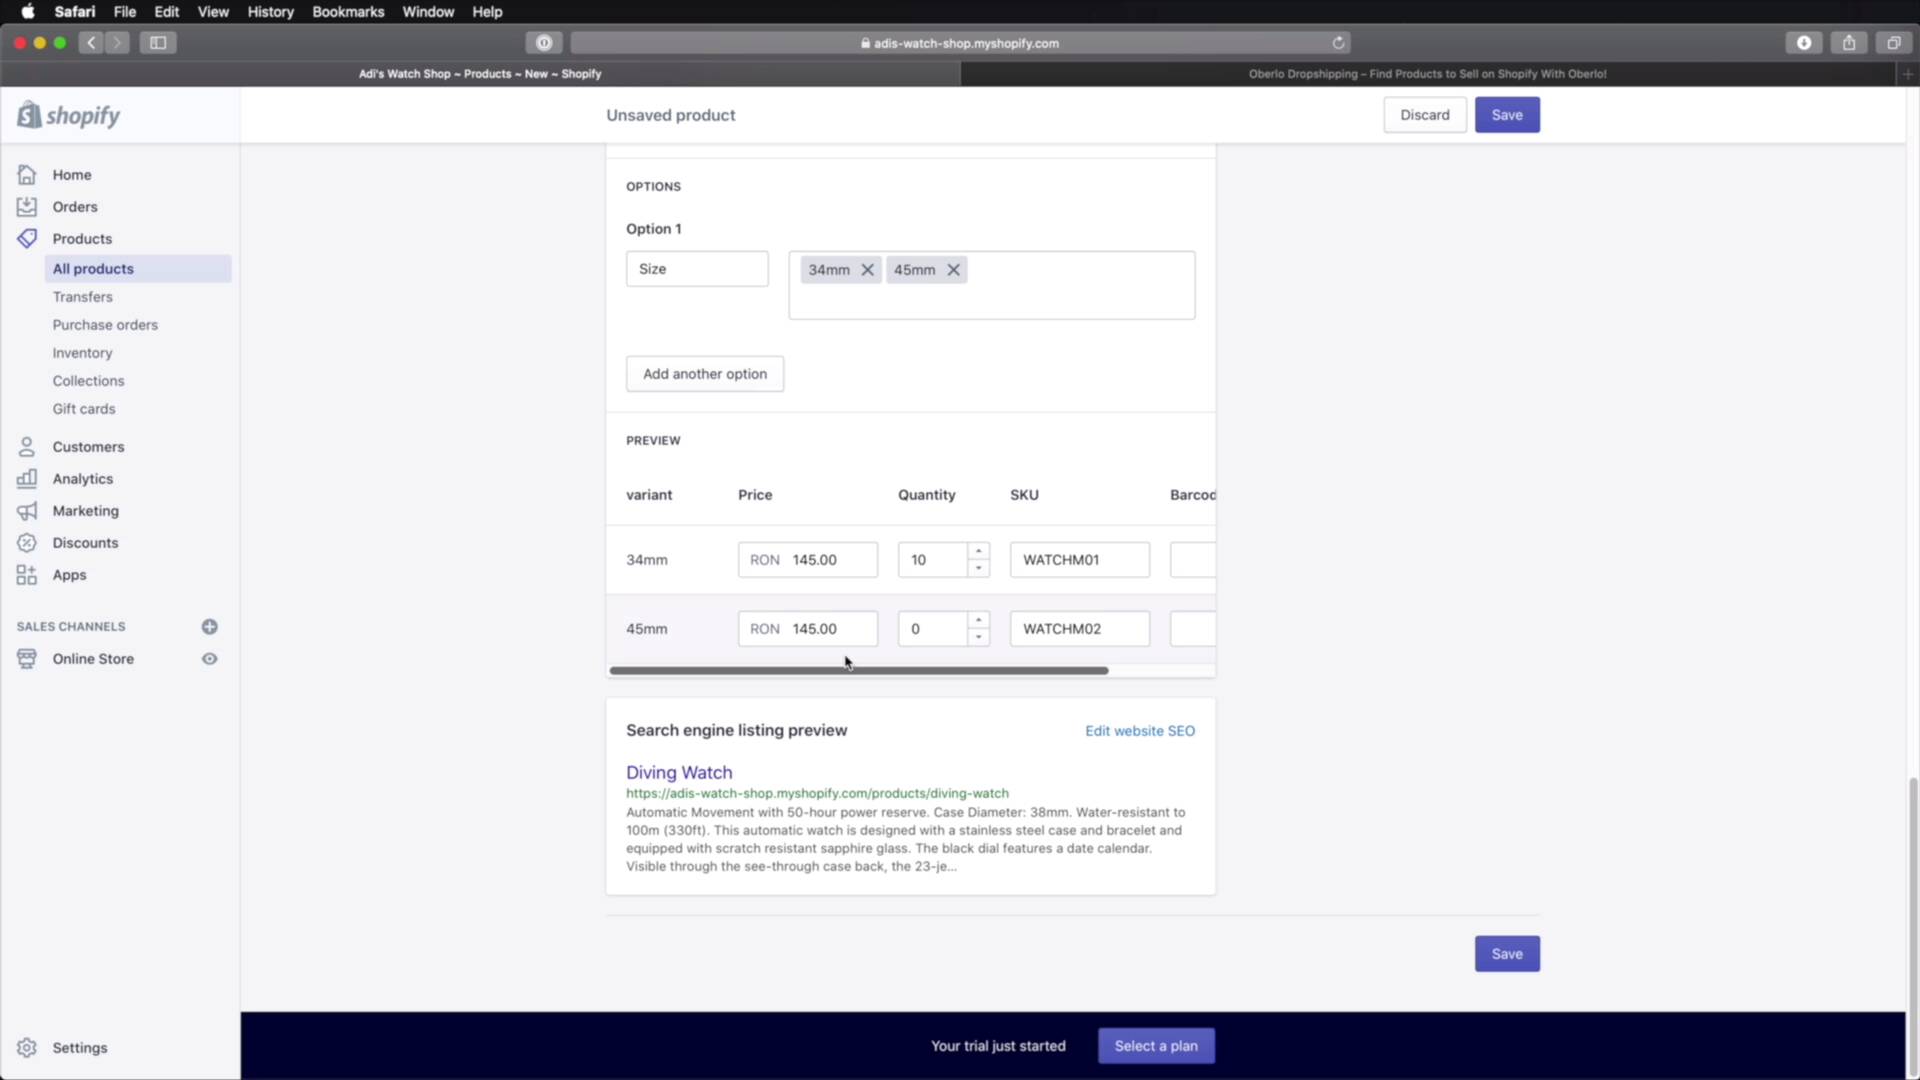
Welcome back to the course. In this lesson, we'll be adding some products to our store. And I'll show you two ways you can do that. Let's begin. Now there are two ways you can add products in your Shopify store manually and with third party apps. Let's cover manually first. In your back end, you would go to Products. And here, you will obviously see a list if you have any products added. In our case, we're starting with a blank store so we don't have any kind of products. So let's go ahead and add one by clicking this button. We need to give it a title. So for this demo I'm gonna be using some of the 3D watches that I got from Envato elements. And we're gonna be adding this one, Diving Watch. So you would write the title of your product here. You would be giving it a description. And for this I'm just going to paste a random description for a wristwatch that I got off the Internet. Obviously, you would add a proper description here for your products. And then for Media, I'm gonna either click this button to add an image or I can simply click and drag. And let me actually close this. One quick note here while this is uploading, these images are untouched. So the way I got them from Envato elements is the way I'm uploading them here. And notice they are pretty big in size. So what I recommend before you do the step is you resize your images. If you're using Mac OS, it's actually very simple. Just open this with the preview app, you'll go to Tools > Adjust size. Currently you can see that the size is 2048 and at a very high resolution. But you can resize this to a custom size or you can make it fit within a certain amount of pixels. And then it's gonna result in 62.5% less image size. So you go from 5.8 megabytes to 2.6 megabytes. So it's a much, much smaller size. And you can go even lower than this. There are a lot of online resources for optimizing these images. But once you do that, you would go ahead and upload that media right here. And you can add multiple images, you're not limited to just one of them. Now for pricing, you would set your price in your selected currency. And then in this field, you can enter the original price in case you wanna do a discount. So if I'm gonna enter 190 here and 145 here, this will be the discounted price, this will be the original price. And then inventory information. So here you can use skews or stop keeping units or bar codes to keep track of your inventory. So for this particular watch, the skew could be I don't know something like watch For men 01 or something like that. And here we can specify the quantity that you have available, let's say 10. Okay, this is a physical product. So you would ship it, how much does it weigh? Maybe, I don't know, 100 grams. Then you will specify the country of origin. And then this really depends on your product. There is a HS or Harmonized System code for the different types of products you can ship abroad. So you would search that code for those products and you would enter it here. And now if this product has multiple options like different sizes or colors, you would check this box and you will specify the option here, right? So for example size, let's say we have a 34 millimeter, we have a 45 millimeter, let's say those are two sizes that I have available. And then you can also specify different prices for these. And then once you do this, you hit Save. And you now have one product added. If you go back to products, you will see the list is now populated. It tells you the inventory and also the the vendor here. So now if you open up your online store and you go to catalog, You'll see your product right here, with the discounted price. It also has a tag of sale. And if you open it, you're gonna see the two options that we set, and also the description. Pretty cool, and you can hover over the image to see a bigger version. So that's the manual way of adding a product into your Shopify store. I mentioned there is another way which is using the third party app. So let me show you that right now. This manual approach works best when you have or when you're selling your own products. But when you wanna sell other people's products, that's when you can use a third party app like Oberlo. So to find it, you would go to Apps and Oberlo is actually the first one here. Drop shipping app, you click that. And this gonna open up the Shopify App Store. You hit Add app, you were basically installing this app. So hit this button. So now this takes us to a step by step wizard that allows us to connect our shop with Oberlo. So first step is done. Then step number two, let's add products. So we'll click this bit and we're gonna search for watch. And here you can find a list of all the products that match your search criteria, which is watch in our case, that are sold by people all around the world. So what you do is you find the products that you wanna add to your shop, you hover over them, you hit Add to import list. So let's get this, let's get this, maybe this, this, maybe this, and this. I think for now that's all right. So once you do that you would go to Import list right here, and you will find all the products that you imported. And notice by importing a product you get its title, all the images, the seller, the description, everything, basically. So what you do is you select the products that you wanna import, and you hit Import all to store. Hit yes, and now all of your products are imported into your Shopify store. So then you would go back here. And if you would do a refresh under products, actually, you'll see that besides your diving watch, the one that we added previously, we now have all the products that we imported with Oberlo. So let's open one of these. You can see the title, you can always change this to whatever you want right here. You can change the description. Here you can see all the photos that were imported alongside. And you can see all the variants right here. And you can change the prices. You can change the quantity. It even imported the skews. So once you're done with the changes, or if you would make any changes, you would hit Save. And then if you go back to your catalog on the front end, you would see all your products here. That's pretty cool, right? Very useful when you're selling other people's products, as I was saying. But if you're selling your own products, then you're probably better off just manually adding them to the store. All right, we now have some products in our store, but they're not organized. One way we can do that is with collections. And we'll learn more about those in the next lesson. See you there.


