
 Lessons: 11Length: 1.3 hours
- Overview
- Transcript
2.1 Adding Settings and Controls for Image Upload
In this lesson, you'll learn how to add settings and controls to your Customizer code to enable image upload and radio buttons for positioning.
Related Links
1.Introduction
1.1Introduction00:48
1.2Creating a File for Customizer Code and Setting Up Sections08:04
2.Header Design
2.1Adding Settings and Controls for Image Upload11:29
2.2Displaying Images in the Theme08:51
3.Customizing Layout
3.1Adding Controls for Layout06:23
3.2Adding Classes to Your Page for Layout Styling06:38
3.3Styling the Layout CSS Classes06:53
4.Customizing the Color Scheme
4.1Creating a Control and Settings for Color Schemes04:10
4.2Organizing the CSS11:57
4.3Adding Color Styles to the Theme Stylesheet10:14
5.Conclusion
5.1Conclusion02:55
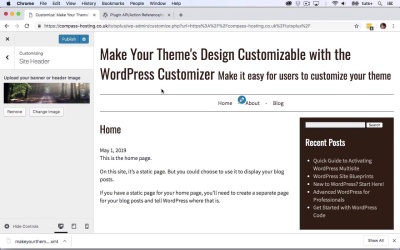
2.1 Adding Settings and Controls for Image Upload
Hello, and welcome back to this Tuts+ course on the WordPress customizer. In this part of the course we're going to start creating some controls and settings. And those are going to be in our site header section that we already created. So let's go over to the code, so here's our customizer file. We've already got our sections set up, although they're not visible because there's nothing in them. So now we're going to add a function to create an image upload. And this again is hooked to this customize_register hook. So I'm gonna copy and paste that, and then replace that second parameter with the name of this function. So in order to create a control, you first create a setting, which is what WordPress will use to save anything that's added via the control to the database. And then you create a control, which uses the customizer API to create an interface that people can use in the customizer. So for our setting, we have one parameter and that is a unique ID for that setting and we'll be using that later on. Now it's really important that this is unique, so you should always use a prefix. I'm using tutsplus as my prefix, and you might want to use the name of your theme. But it's important this is unique, because you'll be later using this to access the database and use those settings to display things. And to make tweaks to the design. So that's my setting and now I need to add a control. Now this has a few parameters. The first one relates to the fact I'm using an existing class that's part of the customizer API. So let's just put a semi colon there. So this is a new instance of that class. And this has a few parameters as well, the first one is the wp_customize object. The second is an ID for this particular control. And then we have an array of arguments, so my first argument in the array is the label. My second argument is the section within which this control will sit. And that will be this section here, tutsplus_header. And then I also need to include the setting. And that's this tutsplus_banner_upload. And in order to avoid any confusion between the fact I've got two things called tutsplus_banner_upload, I'm gonna put this one, call this one tutsplus_banner_upload_control. So I can see that that's the control and that's the setting. So that is my control and my setting for the banner up mode. Now, let's go to the side and see what that looks like and I've got an error on line 45, let's take a look. So I've got, that should be a comma because it's within an array. So here we have site header, and there's an option to upload banner image. So I'm gonna select an image, I've got this image here that I've already uploaded to my site and I'll choose that. Now right now that isn't displayed. And that's fine, because we haven't added the code to the theme to do that. Before we do that, I want to add another control to the customizer where the user can define where banner will sit. So will it be above the header or below it? So let's go back to the customizer code. So, still within this function, I'm gonna add another setting and another control, and I'm going to copy this code here. The setting, and then just edit it. So now I need to add the control. And I'm adding comments as I go along because there's quite a lot of code here. And it helps to keep track of what each bit of it is doing, particularly if you haven't worked with the customizer before. So again, we have an array, now this is slightly different. Because what I've done here is my first parameter is the unique ID for this control and then I have an array of arguments. I'm not using an existing class, this WP customize image control. Because I'm using radio buttons instead, the customizer has some controls where you use a new instance of a class and some where you don't. And to be honest, the only way to know is to check on the Codex. So if you go to the Codex page on customize register, and then you click on add control here, it will tell you which ones you need to do what with. So you can see here we've got some classes and also there are examples of how you can setup things like radio buttons here. So let's add the arguments to that array. So for this section, I need to copy this again. So there I've got my label, my section and my settings, just as I did earlier on. And then I've also got a type, because I'm not using a class I need to define this. And the type is radio because I'm going to be adding some radio buttons. And if I'm adding radio buttons I need to add choices. Now, for my array of choices, I need to add the ID for that choice so what we saved to the database. So how that will be saved to the WP options table and then I need to add a label. So on the left hand side, I have the label that will be saved to the options table, so that's the label in the database. And then on the right-hand side, I have what's gonna be seen on the screen. And you could make these identical if you wanted to. So those are my settings and controls for the position. And I'll save that and then go back to my site to see what it looks like. So before I can refresh my page, I need to publish that image. So that's saved and then I'll go back, refresh again, because the customizer is all one page in WordPress. It's JavaScript that is generating what looks like different pages within it. So whenever you change one screen within the customizer you'll need to refresh and you'll be taken back to the main customize screen. So if you want to save any changes you make, you have to do that before you refresh. So here we are, I've got my uploading banner or header image, and I've got my banner position. So those settings and controls are ready to go. The next thing to do, is to actually show the image in the theme. And to show it in the right place and that's what we'll be doing in the next part of the course. See you next time and thanks for watching.


