
 Lessons: 11Length: 1.3 hours
- Overview
- Transcript
5.1 Conclusion
Congratulations on completing this course. Let's recap what's been covered in the course and what you've learned.
Related Links
1.Introduction
1.1Introduction00:48
1.2Creating a File for Customizer Code and Setting Up Sections08:04
2.Header Design
2.1Adding Settings and Controls for Image Upload11:29
2.2Displaying Images in the Theme08:51
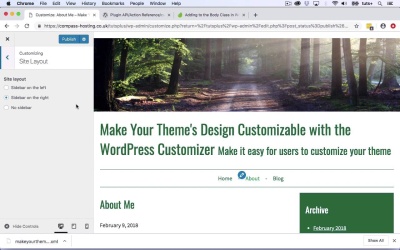
3.Customizing Layout
3.1Adding Controls for Layout06:23
3.2Adding Classes to Your Page for Layout Styling06:38
3.3Styling the Layout CSS Classes06:53
4.Customizing the Color Scheme
4.1Creating a Control and Settings for Color Schemes04:10
4.2Organizing the CSS11:57
4.3Adding Color Styles to the Theme Stylesheet10:14
5.Conclusion
5.1Conclusion02:55
5.1 Conclusion
Hello, and welcome back to this Tuts+ course on the WordPress Customizer. In this course, you've learned how to add the Customizer to your theme, and how to make it possible for you just to add modifications to their site using the Customizer. So we started by adding a site header, and we added a spot in the site where people could upload an image by using a setting in control in the Customizer. And we also gave them the option to choose the position of that banner and we did that by using this customized register action and by using the API for the WordPress Customizer. So in our code, we worked for an existing theme. We added an include file called customizer which we called via the functions file. And to start with, we added sections for all of our controls. We then added controls for the header. So we used a new instance of the Customize_Image_Control class for image upload. And we added a setting and control for the banner position. And for that we used radio buttons. We then edited the header file in the theme to add a couple of action hooks. One above the header and one below the header. And dependent on the position that had been chosen, we put the image either above or below the header. So we then moved on to adding a site layout option. So we gave our users the option of having the sidebar on the left, on the right or of having no sidebar. And again, looking in the code, we added a setting and a control for this, again using radio buttons. And then based on what was selected, we added a class to the body element of the site, and we did this using the body class filter. So using that class, we were then able in our style sheet to target what the site looked like. So dependent on what had been selected on that class within the body, we have the content or a sidebar floating left or right, or the content 100% and the sidebar not displaying at all in our style sheet. And then finally, we moved on to creating a color scheme. So we gave users four options for a color scheme and again we used the body class to add a class to the body element which we would then target using CSS. So here, we have radio buttons again. And again, using get theme mode and getting that setting that's been selected here, we added class to the body element. Within our style sheet set up for color schemes relating to each of those options, brown, blue, green, or mono. And we added color styling for each of those, so that when a user selected one of the color schemes, it will show up in the site, as you can see here. So that's how you use the customizer to give people the option to customize design elements of your theme. I hope you find this course useful, thanks for watching.


