


- Overview
- Transcript
3.5 Demo and Quick Notes on Additional Themes
To create additional themes, we can follow the same steps we covered in the last section. In this lesson, I’ll show you a third example of a recolored theme, and we'll go through an additional stage you’ll need to undertake for your new themes from here on.
1.Introduction
1.1Welcome to the Course00:37
2.Create the Main Design
2.1Set Up the Layout and Backgrounds20:54
2.2Add the Site Title and Menu06:42
2.3Add the Top Section Text and Button08:58
2.4Create Feature Icon and Text07:06
2.5Duplicate Features and Add the Final Button04:40
3.Create Additional Themes
3.1Create Document Styles11:03
3.2Recolor Backgrounds04:37
3.3Recolor the Title and Solid Button03:41
3.4Recolor the Icons and Hollow Button02:33
3.5Demo and Quick Notes on Additional Themes06:27
4.Conclusion
4.1Wrapping Up04:11
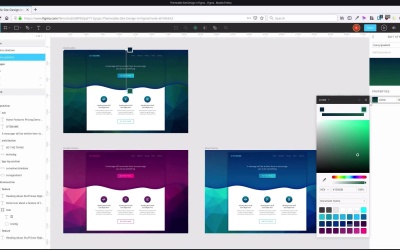
3.5 Demo and Quick Notes on Additional Themes
Hey, welcome back to Create a Themeable Site Design in Figma. In the last lesson, we finished creating our blue theme for our design. When you're creating a third theme or any theme after that, there's gonna be a couple of extra steps that you need to take. So let me show you what I'm talking about. So here we've got our blue theme that we just created. But if I go through now and change any of these styles, then obviously, I'm gonna lose all of the coloring that I put into this theme. So what I have to do is grab the frame that we named themeable, duplicate it, drag it down out of the way, down here with our purple theme that we created earlier. Give it a new name so we can identify it, blue theme. And now what I need to do is go through and disconnect all of the elements in this theme from the list of local styles that we have. We wanna make sure that when we update these styles, everything in here doesn't change. So we'll have to go into each one of these elements, work through the entire list and just disconnect all the styles. So you can see we have a style here, and then you can see there's this little icon that looks like a disconnecting chain link. We hit that and it's gonna disconnect that element from the document style. So we just need to go through and do that for all of the styles that we are using in this theme. So I'm just gonna speed this up a little bit, because otherwise, it's gonna be a bit of a boring process for you to watch. Okay, so when that's done, then you're ready to start making a third theme. Now when you go up into your themeable layout and you start modifying the styles for this, it shouldn't affect any of the things that you have going on in here, in your blue theme. But when you do start adding in the colors for your third theme and any subsequent themes, keep it zoomed out like it is here. And just really quickly get some colors in so that you can make sure that nothing in here has been forgotten. That you haven't accidentally left anything connected because you don't want to lose any of the changes that you made here. So for example, find m in the themeable, let me just drag this up to the top frame here, and I go through and start modifying the gradient. Actually, let me first turn off the third background and then turn on the fifth. This would be the color for a green theme version, I'll stay zoomed out, go in and edit the colors. And just really quickly just grab some sample colors from the background. So, I'm getting something in there and I'm watching this gradient here to make sure it doesn't change. So just any color at all, it can be pretty rough, Just so that you can get in basic colors. Now if you see there, one of these colors in here is turning green as we've made that change. So that means that there's something in there that's still connected. So I'm gonna hold down Ctrl and click here and there we go, we can see that this curvy shadows is still connected to the shape. So I'm gonna undo to get that back to blue and then I'm gonna disconnect that shape. Now I'm good to go back in and start grabbing quickly some colors that I can use in the green version. And this time, we see that nothing's changing in here as I'm changing the colors up here. With the first theme, we duplicated it before we created the styles. That's why we didn't have to worry about it the first time. But after that, the process is gonna be that when you finish creating your theme, like this blue one, you duplicate what you've done in another frame and then you disconnect all the styles. Then you're free to go ahead and start adding in different styles to your themeable frame. So you're always gonna do your styling in this themeable frame, and then when you're done, duplicate it out, give it a name, and turn it into a static set of colors. You've already gone through the process of recoloring this design into a new theme. So you don't need to go through it again for the green theme. So here is a green theme that I prepared earlier. Let me just hide this for the moment. Just to show you another version of this design with a whole different set of colors in a third theme. So I just sent through the exact same process, just used color picking and sampling and just modifying the color around a little bit until everything worked in together. And now you can do that as many times as you like to create as many different themes as you like, different color schemes of that same original design. So we've got our green theme, our blue theme, and our original purple theme. And that is the entire process, so we've got all three of our different color schemes here and our different theme versions of our site. And using the styles that you set up, you can create as many different themes as you want to from here on in. So, this is a great way to help turn your designs into multiple different versions in the future. And of course, you can use these principles to create all kinds of different ways to reuse existing assets inside your themes.. We just have one more video left in the course, where we're gonna quickly recap everything that we've learned. So I hope you'll join me in the final video, I'll see you there.


