

- Overview
- Transcript
4.2 A Note on Slide Positioning
Due to the way our slides will be animating, the positioning of our slides will be one of the more complicated pieces of our code. In this lesson, I’ll explain how the slides will be positioned as we animate from one to the next.
1.Introduction
1.1Introduction00:44
1.2GSAP Refresher09:09
2.Project 1: Animated Preloader
2.1The Starter File07:48
2.2Creating a Timeline11:48
2.3Bouncing Circles13:08
2.4Animating the Shadows04:12
2.5Loading Images10:50
2.6Preloading Multiple Images08:48
2.7Animating the Preloader Off12:55
2.8Revealing the Main Content05:28
3.Project 2: SVG Animated Logo
3.1Examining the Logo03:44
3.2Setting Up the Styles04:29
3.3Randomizing Position and Opacity07:29
3.4Animating the Dots06:38
3.5Animating Paths With jQuery DrawSVG06:28
3.6Finishing Touches03:01
4.Project 3: GSAP Image Slider
4.1Getting Started05:21
4.2A Note on Slide Positioning04:59
4.3Setting Up Some Variables08:56
4.4Placing the Slides05:08
4.5On Deck12:24
4.6Setting Up the Animation Array09:53
4.7Setting Up the Animations11:36
4.8Creating the Button Events08:37
5.Conclusion
5.1Final Thoughts00:46
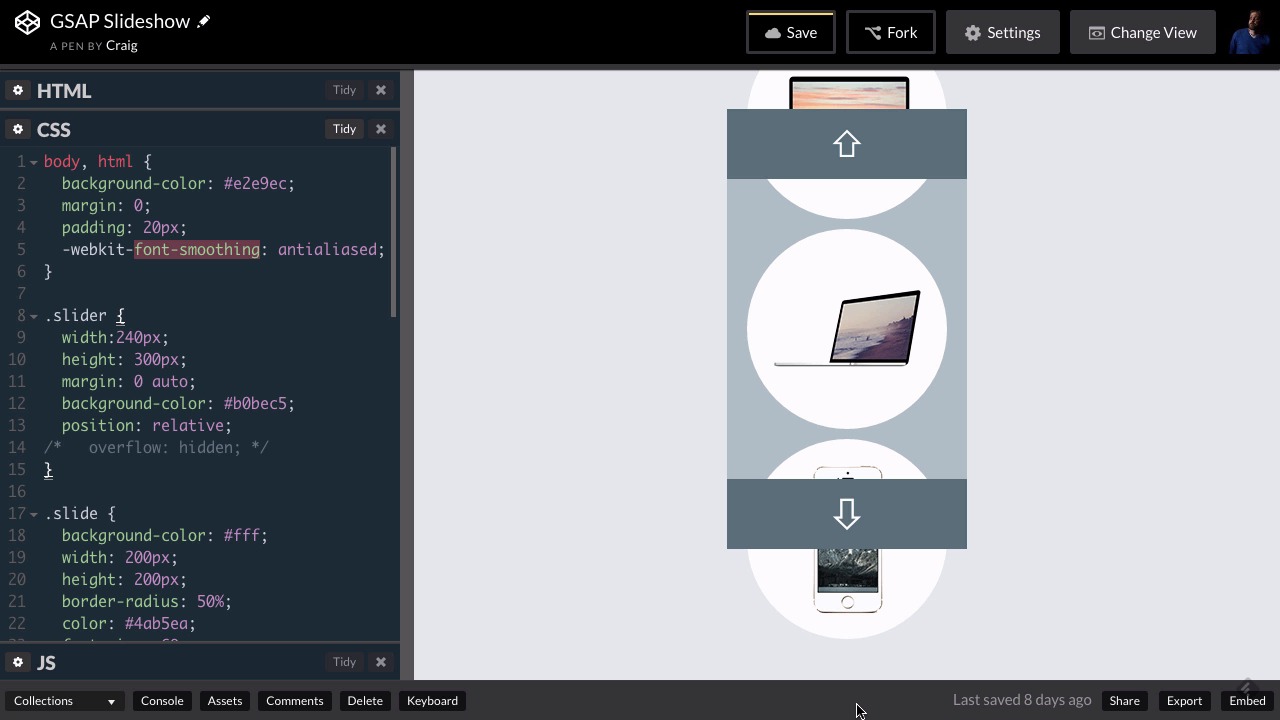
4.2 A Note on Slide Positioning
In this lesson I'm going to explain to you what's probably going to end up being the most complicated part of this particular project, and that's gonna be the placement of our slides. And so I've temporarily turned off this particular property for our slider and I am using the finished project here where everything is animating right now. But I've temporarily, excuse me, turned off this overflow, hidden for our slider so that we can see the slides outside of the slider itself. Now when we turn that back on, we won't be able to see anything outside of this rectangular box. But for now, this kinda gives us a good idea of how we're gonna be animating these things. So as you move forward through the rest of this project, it might be a good idea to just keep this particular lesson opened up in a separate browser window in case we need to go back to it. Because the concepts that we're discussing in this lesson are going to inform what we're gonna do in our JavaScript once we start animating and placing our items where they need to be placed. Now for the most part, this seems simple enough. We have the lower half of our previous slide up here at the top. We have our active slide in the middle, and then we have our next slide just below it. And so I wanna think of up as the previous direction and down as the next direction. So if I hit down, the next slide moves up into the active slide position as the active slide moves up into the previous slide position and the previous slide moves off the edge of the browser window. But that's not all, we also have this other slide down here that's way off the edge of the stage. We have it animating into the next position. So we have four different circles or slides that are animating every time we click a button. So in our JavaScript we're gonna have to keep track of which slide is the active slide, which slide is the previous slide, which is the next slide, as well as which is the, what I like to call the on-deck slide. The slide that hasn't actually moved into view yet but is about to, and that slide is gonna be in a different position depending on which button we click. If we click the Next button then it's the slide that's down here below the slider that's going to move into position. That's gonna be the on-deck slide. However, if I hit the up arrow, the on-deck slide is the one that's up here above the edge of the browser window that we can't even see. That's the one that's gonna be animating down into the previous position. So again, there are gonna be four slides animating every time we click on one of these buttons. But there are five total positions we need to keep track of. We need to keep track of the active position as well as the previous and next positions. But in addition to the three obvious positions, we also have two different positions that the on-deck slide could start off in. It could start off down here at the bottom, or it could start off up top. So again, those are the four different slides and five different positions that we need to keep track of as we're animating our slides in JavaScript. So again, I want to encourage you to keep this particular video handy as a reference in case things do get a little too complicated and you need to come back and review what we're doing with these four different slides and five different positions. And so one last thing I wanna point out is the naming convention we're gonna give to these five different positions. And you'll see that we're gonna stick them in this nice little object here. But I wanna point out the names of these positions. We have the active position which is the current slide in the middle. We have the previous and next, the previous one is up top. The next one is down at the bottom, but we can still see part of both of those. And then we have two positions called up and down. So these are the two possible positions for our on-deck slide. If our on-deck slide is gonna become the previous slide and it's gonna come in from the top, then it's gonna start off in the up position. And again, that up position is too far up for us to see here. And then we have the down position which is gonna be down here in this position here. Now keep in mind there are eight slides in this slide show and we don't really care where the other four slides are. Now we're animating four slides at a time so that means there's four slides that aren't animating. We don't really care where those slides are for the time being as long as they're not showing up inside our slider. So right now, they're all tucked away either under here or up top in the up position. But again, we don't really care where they are until we're ready to start animating them in. And let's move on to the next lesson. Thank you for watching.


