

- Overview
- Transcript
2.5 Loading Images
In this lesson, you will learn how to use jQuery to load an image and then create a response once that image has finished loading.
Related Links
1.Introduction
1.1Introduction00:44
1.2GSAP Refresher09:09
2.Project 1: Animated Preloader
2.1The Starter File07:48
2.2Creating a Timeline11:48
2.3Bouncing Circles13:08
2.4Animating the Shadows04:12
2.5Loading Images10:50
2.6Preloading Multiple Images08:48
2.7Animating the Preloader Off12:55
2.8Revealing the Main Content05:28
3.Project 2: SVG Animated Logo
3.1Examining the Logo03:44
3.2Setting Up the Styles04:29
3.3Randomizing Position and Opacity07:29
3.4Animating the Dots06:38
3.5Animating Paths With jQuery DrawSVG06:28
3.6Finishing Touches03:01
4.Project 3: GSAP Image Slider
4.1Getting Started05:21
4.2A Note on Slide Positioning04:59
4.3Setting Up Some Variables08:56
4.4Placing the Slides05:08
4.5On Deck12:24
4.6Setting Up the Animation Array09:53
4.7Setting Up the Animations11:36
4.8Creating the Button Events08:37
5.Conclusion
5.1Final Thoughts00:46
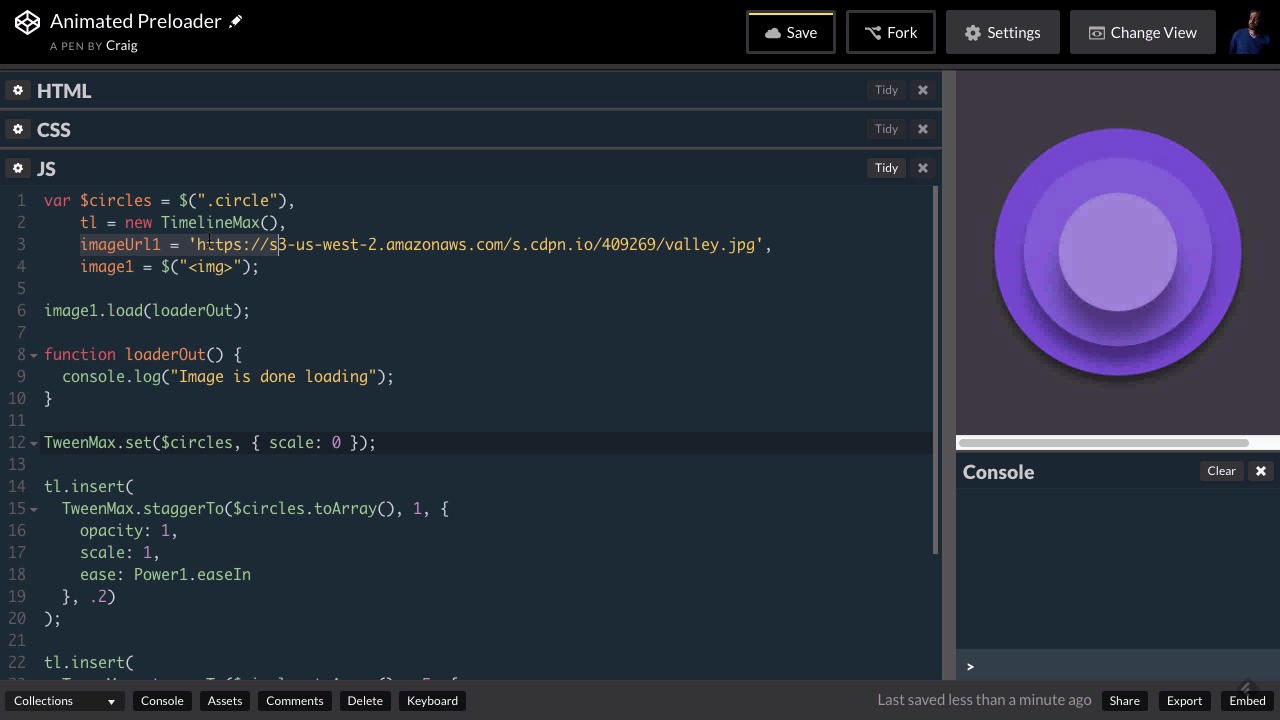
2.5 Loading Images
Hello and welcome back. In this lesson, we're going to talk about how to preload an image. We've created our animation that's going to run until our image is done loading but we haven't talked about how to load that image yet. Right now, we just have the image in our CSS and we can see that in our image container class right here, we have this background image here. [SOUND] So I'm going to start off by forking our code pen here, our starting pen. You can find the URL for it in the course notes. So once you open that up, we can click on fork to create our own copy and then once we have our own copy. I'm going to highlight this URL and copy it Cmd + C or Ctrl + C if you're using a PC. And then we'll take this line here and we'll comment that line out. So we no longer need that particular line of CSS. We still need the background position in size because those will be important once our image finally does load. But we're no longer gonna load this background image this way in our CSS file. Instead, we're gonna load it in jQuery or in JavaScript. So the way we're gonna do this is in jQuery we're gonna create an empty image element, an HTML image element and we're not going to put that image element on our web page. Instead we're just going to load it in jQuery apply an image to it and then once the image we've applied to it is done loading then we're going to cause something to happen so. This particular image tag is never actually gonna show up on the web page but we're gonna use it to load image URL that we'll need. So let's jump back into our JavaScript and let's get started. So I've already copied our image URL, so we're just gonna come up to the very top where we have our variable declarations here. And I'm gonna type comma, go to the next line, and I'm going to create a new variable called image URL. And I'm gonna set it equal to that URL we just copied. Then as I mentioned a moment ago we're gonna create an empty image element using jQuery. So we're gonna store this in a variable as well, so in this same group of variable declarations I'm gonna hit a comma after our image URL and go down to the next line. And then, I'm gonna create our new image tag and let's just call this image one. And I'm gonna call this imageURL1 as well and you'll see why later on but for now we're just gonna give them numbers. And I'm gonna set image1 equal to a new image element and the way that looks in jQuery is just like this. We have the usual jQuery selector with a dollar sign and parentheses inside the parentheses and inside quotation marks we have just an empty image element. So what we're going to do is we're gonna add a source attribute to that image element and once we add that source attribute to it, at that point the image itself will start loading. Even if we're not displaying it on the page, that image will start loading. And so what I wanna do is I want to create a load event a listener on this image element that's going to be triggered whenever that image is finished loading. So the way we do that is we just point to our image one element and then call on the dot load method. And then inside that load method we're going to create a function and you could put whatever code you want inside this function. But that's what we're going to do here. Now, I actually don't want to put an anonymous function in here, like this. This is usually how you would run a load event. But eventually we're gonna end up running this function over and over again. So instead of putting it inside the Load event, I'm just going to create that function separately and give it a name. And this function is the one that's going to be triggered when our content is finished loading. And when that content finishes loading we want to animate our preloader off and animate the web page on. So let's call this function loader out, open and close parentheses, open and close curly brackets. And then, in our load method instead of putting the function inside here, we're just gonna point to loaderOut. And when you do it this way you don't need to use the parentheses if you're putting this function name inside this load event listener. We don't need the parentheses there next to it. So what this is saying is that when something has finished loading into this particular element, this image element that we've created, when that loading is complete. Then it's gonna run this loaderOut function which we're gonna create down here. So for now, let's keep this loaderOut function really simple by putting a console log here. So we'll type console.log and then inside parenthesis and inside quotation marks we can just type in something like image is done loading. And then a semi-colon at the end of that statement. And in code pen and you've got this nice little console button down here where we can see things pop up on the console. And so once this loader out function is triggered, we should see that message show up in that console. If you're using Chrome, you can also see that console by going to your web developer tools and doing it that way. But we're gonna use the built-in code pen consul for now. So we've created our image. It does not have a URL applied to it. We've stored the URL in a variable up here but again this variable is just a string of characters as far as JavaScript is concerned. It doesn't know that this isn't a URL for an image it's just a string. It's not gonna know that it's an image until we apply that variable as a property or as a value on the source attribute for our image here. And again, the order that we do this in is very important. We need to create this load event before we add that attribute to the image, otherwise this isn't gonna work. So after we've created this load event, we can skip a couple of lines and then add our attribute to the image. We don't have to do it after the creation of this method here. This method will be called as soon as this load event is triggered. But we do need it to occur after this load event. So what we're gonna do is,we're going to point to image one. And we're gonna use jQuery to add an attribute to it the way we do that in jQuery's we typed .attr and then inside the parenthesis it's expecting two parameters. It's expecting the attribute name and then the attribute value. The attribute name is going to be src for source. That's the attribute you would use on an HTML image tag and then the value we want to give to it. So after the closing quotation mark there comma space and then again inside quotation marks, we would type in the image URL which might be something like image dot JPEG. But in our case we have it stored in a variable called Image URL one. And then put a semicolon at the end of your statement. So now we can see in our console over here, our message has popped up, image is downloading. And you'll notice that popped up really, really quickly. If we come over here and right click and reload that frame, you'll notice that it pops up very, very fast. And that's because this image is already cached on our browser. We've been loading it over and over again in our CSS, and now we've already loaded it a couple of times here, in our JavaScript. So, anytime we refresh the page. Since that image is cache, it's going to load really quickly. So if we don't want it to be cache, what we can do is we can throw a random number on the end of our image URL here. And we can see it in action if we just come to the end of that URL and type question mark and then just put 1,2,3 or something like that at the end of the URL. And now you'll see that it takes a couple seconds and it's hard to tell because we've got a lot in this consoles. Let's clear the console and do it again with a different numbers. So let's change this 1, 2, 3 to 3, 2, 1. And when the page reloads you'll notice that it takes a little bit longer for that console to get triggered. The problem is that if we reload the browser now, it's going to already have cache to this URL with a '321' at the end. So it's gonna load really quickly again. So we wanna put a random number at the end of that. And I'm gonna pick a random number between zero and 10,000. I'm gonna create a function for that. We'll create a function called getRandomNum. And then inside that function, I'm gonna run MATH.random. Notice that math is uppercase, random is all lowercase, and then we're going to multiply that by 10,000. So the way math dot random works is it gives us a random number between zero and one. So it's gonna be zero point something, something, something. And then if we multiply that by 10,000 then it will give us a random number between zero In 10000. But if we want it to be a whole number or an integer, we need to round it off, and we can do that using the Math.round or Math.floor. Math.floor will always around it down. So we could do Math.floor and then inside the parentheses, we'll do our Math.random() * 10000. That way we'll get an integer, a whole number every time. And then at the beginning, we're just gonna type return space, and then Math.floor, etc, etc. So anytime we call this getRandomNum method, it's going to return a random number between zero and 1000. So then we can come up here before we create our image URL We can create another variable here called random one and set it equal to the name of that function we created get random num. So now it's going to get a different random number every time we load this page. And then, we can just at penned this random number onto the end of our URL. So instead of question mark three two one, we'll say question mark, close our quotation marks and then plus random one. So it's going to be a different random number every time. Let's go ahead and clear the console. And right-click and reload that frame. And every time we reload it will see that it will take a couple of seconds for that. Reload or therefore for that image to finish reloading because every time it's reloading it's doing it with a different random number at the end of the URL. So that's how you load an image the next step with this is to simply change the functionality of our loader out method so that instead of doing a console log, it will finish our animation and it will animate the loader out, it will animate the rest of the page on. So we'll get started with that in the next lesson. Let's make sure we save our work and then we'll move on. Thank you for watching.


