

- Overview
- Transcript
2.3 Bouncing Circles
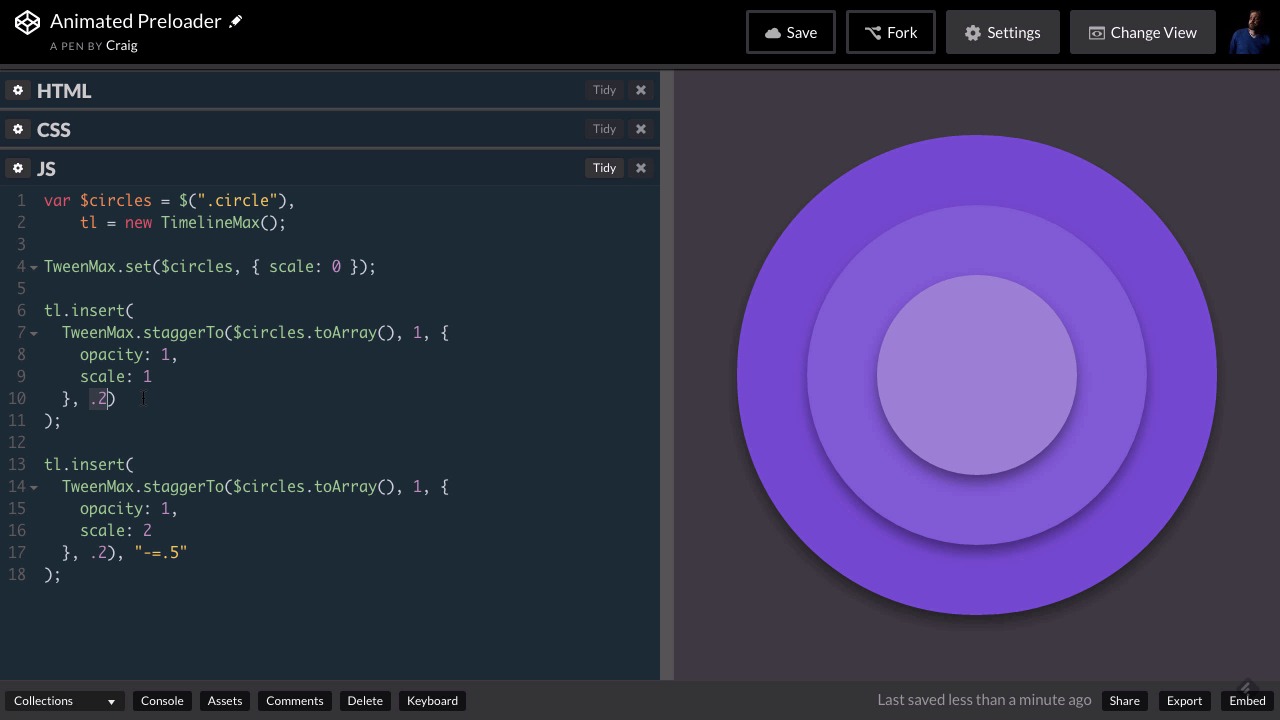
Let’s add another animation to our timeline. This new animation will comprise circles bouncing against the background of the website.
Related Links
1.Introduction
1.1Introduction00:44
1.2GSAP Refresher09:09
2.Project 1: Animated Preloader
2.1The Starter File07:48
2.2Creating a Timeline11:48
2.3Bouncing Circles13:08
2.4Animating the Shadows04:12
2.5Loading Images10:50
2.6Preloading Multiple Images08:48
2.7Animating the Preloader Off12:55
2.8Revealing the Main Content05:28
3.Project 2: SVG Animated Logo
3.1Examining the Logo03:44
3.2Setting Up the Styles04:29
3.3Randomizing Position and Opacity07:29
3.4Animating the Dots06:38
3.5Animating Paths With jQuery DrawSVG06:28
3.6Finishing Touches03:01
4.Project 3: GSAP Image Slider
4.1Getting Started05:21
4.2A Note on Slide Positioning04:59
4.3Setting Up Some Variables08:56
4.4Placing the Slides05:08
4.5On Deck12:24
4.6Setting Up the Animation Array09:53
4.7Setting Up the Animations11:36
4.8Creating the Button Events08:37
5.Conclusion
5.1Final Thoughts00:46
2.3 Bouncing Circles
Hello and welcome back. In this lesson, we're going to pick up where we left off and we're going to continue our animation of these three circles. Now initially, in our last lesson we created an animation and stuck it in a timeline of these three circles animating into the browser window and it's a staggered animation. So the larger circle animated first and then the middle one and then the small one. And one thing I should point out is that the order of these items is very important in our HTML. So if you remember, we're animating this circles variable and then we're turning that circles variable into an array. And the order of the items in that array determines the order that the animations are going to happen in. So If we have the largest circle first in that array, then the largest circle will animate out first which is what we want, which is what's currently happening. But if you go into your HTML you can see here where our divs are that have that class of circle applied to them. And if we were to change the order of these divs, then it would change the order that our circles animate in. So you want to make sure that that when you put your items in an array to be used in a stagger animation, you want to make sure that you Put those items in the array in the order that you want that animation to occur. So having said that, you can find the starting pen for this particular lesson in your course notes. And if you followed along in your last lesson, you might not need to open up the starting pen here because we're just starting where we left off at the end of the last lesson. But if you are using this particular new pen as a starting point then again, you can find that link in your course notes and then, once you open that up, just click on fork, and that will start a new copy for you. So, with our new copy, we're gonna create a second animation of our three circles bouncing up and down on the stage. And what they're gonna be doing is, just increasing in size and then decreasing back to the size that we see here. And that sounds kinda boring, but we're gonna make it look like these items are bouncing. And we're really going to sell that effect, by animating the properties of the drop shadow behind these circles as well as the size of the circles of themselves. So this new tween we're gonna create is actually gonna be a looping tween. They're just gonna bounce over and over again until our content on our page has loaded, and so we need to create a looping animation and add that looping animation to our timeline. And remember we add an item to our timeline, an animation to our timeline using this tl.insert method. And remember tl is just the variable name we gave to our new TimelineMax object that we created up here. So now we're gonna create another insert statement, and it's still going to be staggered because we want these to keep animating with the large one first and then the medium one and then the small one. So we're gonna continue staggering these animations. So our next insert statement is gonna be very similar to our first one. So let's just copy this first insert statement here and skip a couple of lines and paste it. And we're not gonna see this animation happen twice as you might guess because if we have to insert statements, they're not going to occur one after the other. Instead they're both going to occur at the same time. If we want them to occur at different points, then there's another parameter we need to put inside the parenthesis for this insert method. The first parameter is basically just this animation that we created. Everything from tween max all the way to this closing parenthesis here, after the staggered delay. And then after this first closing parenthesis here, we can type a comma and a space. And inside quotation marks, I'm gonna type +=0. What this will do is it will put our new animation at the end of our first animation. And still, it's not gonna do anything right now. If we reload the frame, we'll see that our animation only happens once because we're just using the same values here so far that we had up here. So it really is technically animating but it's got nowhere to go. It’s animating from a value of 1 to a value of 1. And so this +=0 here tells us that we want this particular animation to occur at the end of the timeline. And right now, the end of the timeline is the end of this particular tween. So now since we have this plus zero here, well first let's get rid of the plus 0, and let's see what happens if I change the scale here to 2. And then let's watch our animation and we'll see that it immediately grows to a value of two. It’s much larger than it was before. And the reason that happens again is because both of these tweens are happening at the same time. We don't want that. So, instead, we're gonna go after the closing parenthesis here, type comma space and then inside quotation marks, + equals 0. And that should put our animation at the end of our first animation and we saw that happen here. We saw a slight delay before it continued animating up to a scale of 2. And we can reload the frame and watch it again. We see the first animation stop there and then it animates again to that larger size. Now there are a couple of ways that we can write out this particular value here. This plus equals notation here tells TweenMax that we want to put this particular animation at a position relative to the end of the timeline. So since this says plus equals zero or if it said minus equals zero, it would just place it at the very end of the timeline. But if we were to change this to a value of one and then watch our animation again, there's actually a full one second delay before that animation happens. If you want that animation to occur before the end of our other animation, this other animation happens over the course of about 1.6 seconds. So let's say we wanted it to happen before the end. We could say instead minus equals and then let's say 0.5. So our second animation will actually start animating half a second before our other animations are finished, or half a half a second before the end of the current timeline. So again, that's one way we can enter values here. We could also just enter a whole number. So, for our first staggered animation for example we've got three items animating. Each of those animations takes one second and they're staggered by 0.2. So the first one is gonna happen right away. The second one is going to start animating at 0.2 seconds. The third one's going to start animating at 0.4 seconds. So if the third one starts animating at 0.4 it will be over at 1.4 seconds. So if we wanted to, we could take away everything including the quotation marks and just type 1.4 here. And then, this animation will happen 1.4 seconds into the timeline. And right now, it just so happens that 1.4 seconds is exactly where our first Animation ends. So again, there's a couple of ways you can do that if you wanna specify how far into the timeline you want to create this particular animation. You would just type a number like we did here, or if you wanted to append it to the end of the timeline, however, long that timeline may be, again we would use the plus equals, I put too many quotation marks there. We would use the plus equals or minus equals notation like so. So this will put it right at the end of the timeline, but this isn't the animation I want. First of all I'm not worried about the opacity anymore.So we can just get rid of that particular property. We’re not gonna animate the opacity. It’s already faded in. We don't have to worry about it any more. As for the scale, I want to animate it just a little bit larger than it currently is. I don't want it to go all the way up to 2, instead I'm gonna set it to a value of 1.2. So it'll get a little bit bigger but not too much bigger. And then I want this animation to repeat over and over again and go back and forth from its starting location to its ending location and then back to the starting location. And there is value in TweenMax called Yoyo which allows us to go back and forth between the starting and ending key frames. So first of all we need to set the repeat. So I'm gonna type comma, go to the next line and we're going to set our repeat to a value of- 1 which just means that it's going to repeat infinitely over and over again. So right now we see that it expands out and then jumps back to the starting position and expands out again. Excuse me. And that's not what we want. Again we want it to yoyo. So the way we get that to happen is there's actually a property called yoyo, and we're gonna set it equal to true. And now when we do that, after a first Animation finishes we see our second Animation and we see that Yo-Yo effect happening now. It's growing out and then coming back in, and that's a really nice effect. So the last thing I want to do to make this look a little bit better and a little more realistic aside from the box shadow, will get to the box shadow in the next lesson. But as far as the animation itself goes, let's reoad that and take a close look at the first animation which seems to stop at a certain point and then the next animation starts. And the reason that seems to happen It's because by default there is a slight easing applied to our animations. It eases in and out of these animations by default. Which means that at the very end of the animation, at the very end of this first animation here, it slows down towards the end and then once it's done slowing down and comes to a stop, then our second animation starts animating. So, we don't want this first animation to slow down. We want it to look like one continuous animation. So, we want this first animation to ease in, so it starts off slow and then speeds up towards the end. So, by the time it gets to the end, it's already moving pretty fast. And then for our second animation, we're going to ease out so it's going to start off fast and then end up slow. And by creating that ease in and then ease out it will make it look like one continuous animation. So let's do that. Let's go back to our first animation here and after our scale, we'll hit comma go to the next line and point to ease and then we're going to apply what's called a Power1.easeIn. There are a few different easing equations that you can spend some time looking at on the GreenSock website for more information. But you can go from Power1 up through Power4 and that's gonna ease in and what that means again is that it's going to start off slowly and speed up towards the end of the animation. And then for our second animation, we're gonna do the opposite. We're gonna create another ease effect here. Here we're gonna do Power1.easeOut. You'll notice the second word there, the out, has a capital O in it, and we still see a little bit of a problem with our animation. And in order to understand that problem, let's go ahead and watch it again. Let's reload it. You’ll notice there's still a little bit of a pause after the first animation finishes and then second animation start. And in order to understand that we need to understand how the staggerTo works. The end of this staggerTo animation, or the end of the timeline as it rests by the time this staggerTo animation is over, is the end of the third circle that's animating. The end of this middle circle. So the first circle is actually finished animating before we get to the end of this timeline, because the larger circle here animates first and then the medium one and then the small one. So we really want to start this second animation as soon as that first circle is done animating. And if you go in and do the math, you can figure out that, that first circle is done animating .4 seconds, before our last circle is done animating. So down here for our second tween, we don't want to start at the end of the timeline. We want to start 0.4 seconds before the end of the timeline. So instead of plus equals 0 we're going to say minus equals 0.4. And let's see if that fixes our issue. And it looks like it does. So, let's reload that again and we see our initial animation come out and then it does slow down a little bit towards the end. The first animation comes in really fast as it approaches the end of the animation and this second one doesn't have as far to grow. It’s just going from 1 to 1.2. And so it looks like it suddenly slows down. So, the best way to speed it up is simply to speed up the animation itself. So, let's cut that in half and set it to 0.5 and then take a look at our animation. And there we go. That already looks a lot better, so that gets us where we're going as far as the circles. Let's just reload that one more time and make sure that we have a smooth transition there. We do, that looks good. So in the next lesson will move forward and again really sell this effect by animating the box shadows behind the circles. So let’s save our work and we'll move on with the next lesson. Thank you for watching.


