
 Lessons: 16Length: 2.6 hours
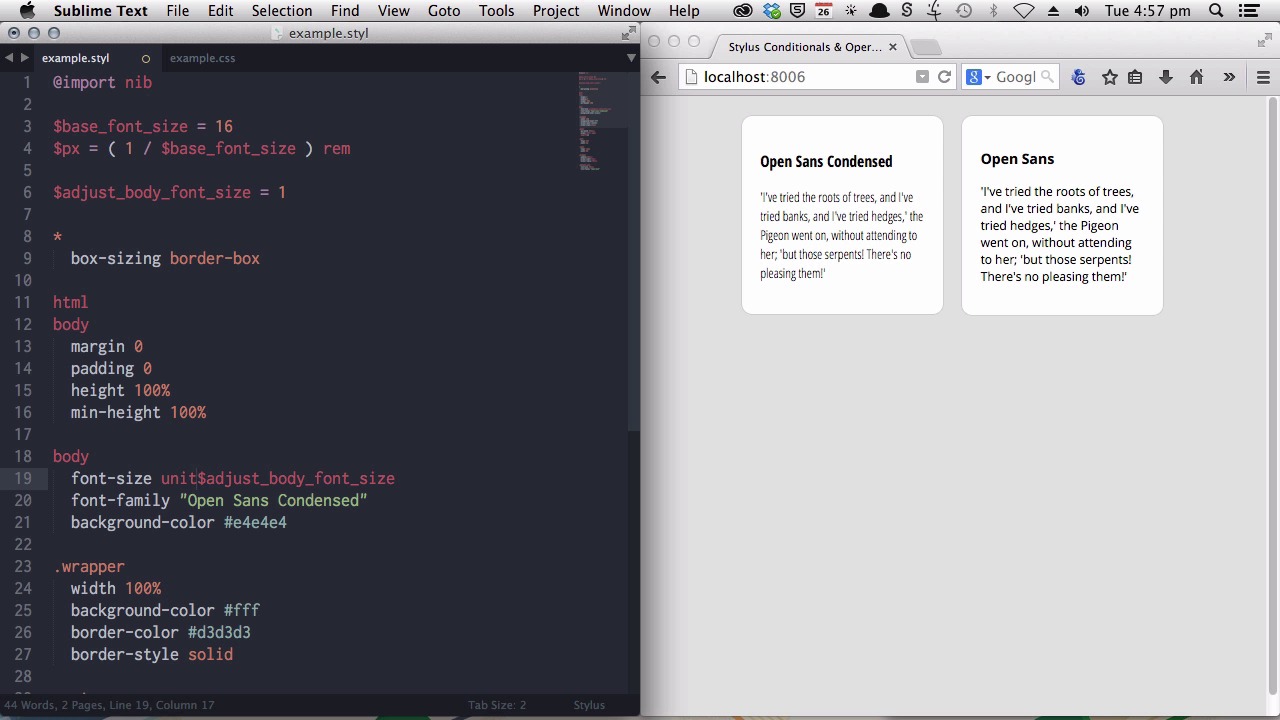
- Overview
- Transcript
5.1 Adjust Base Font Size, Perhaps: Using Conditionals and Operators
Sometimes you need to tweak your site’s base font size, if you find the font family you’re using is a little larger or smaller than average. In this lesson you’ll learn how to use conditionals and operators to output a base font size adjustment, but only when required.
1.Introduction
1.1CSS Needs a Hero01:17
2.Stylus Superhero Basic Training
2.1Quick and Easy Setup09:19
2.2Terse or Full Syntax, Your Choice05:50
2.3Faster Child and Pseudo Element Targeting via Nesting06:50
3.A Practical Intro to Stylus Variables
3.1Create an "Easy Update Color Scheme"08:02
3.2Create a "px to rem" Converter Variable14:35
4.Practical Intro to Mixins
4.1Create a "Zebra Stripe" Mixin12:45
4.2Use CSS3 Easily with Prebuilt "Nib" Mixins09:07
5.Practical Intro to Logic and Functions
5.1Adjust Base Font Size, Perhaps: Using Conditionals and Operators09:38
5.2What Functions Can Do That Mixins Can't06:16
5.3Create a "px to rem or em" Converter Function13:55
5.4Level Up Your Color Schemes With Stylus's Built-In Functions15:13
6.Stylus Superpowers
6.1Variables on the Fly: Property Lookup09:32
6.2Create a "Golden" Layout14:54
6.3Generate H-Tag Styles With a Single Line: Hashes, Iteration and Interpolation16:49
7.Conclusion
7.1Wrapping Up02:34
5.1 Adjust Base Font Size, Perhaps: Using Conditionals and Operators
Hello. Welcome to the Practical Intro to Logic and Functions section of the Become a CSS Superhero with Stylus course. Now we're gonna really start getting into some of the more complex but more powerful stuff that Stylus can do. Now, in this lesson, we'll be looking at things called conditionals and operators, and we're going to use these to apply an adjustment to your base font size conditionally. That is, only when that adjustment needs to happen. Now you recall, I mentioned earlier that as a best practice, you should leave the font size applied to the HTML element at its default. So don't go changing it to 62.5% or anything like that because you don't wanna override the user's ability to set their own preferred font size. And I also go into some of the other reasons why that's important. I mentioned earlier my course Bomb Proof Web Design. So if you're interested in more information on that you can check out that course. Now that said, there are some circumstances where you're going to need to make a little bit of a tweak to how the default text on your site actually appears. That is, if you're using a font that, for whatever reason, comes up noticeably larger or smaller than your typical font does at the default size. And we have an example of that here. On the right, we have a box using the Open Sans font. And that's at 16 pixels. And next to it, we have a box using the Open Sans Condensed font. And that's also at 16 pixels. And yet, you can see the size that they come up at is noticeably different. Now even if you were to leave your HTML font size at its default of 16 pixels, you're probably going to find that people have a little bit of difficulty reading a font this large. And you're also gonna have some flow and effects to your layout. Now you can see that the heights of the two elements are quite different. And you're actually going to be in your, your visitors' best interest if you do adjust that. Just to normalize it, not to try and take away control from the user. But just to give them a consistent experience. And the way we're going to do that is by applying an adjustment to the body element. Now we're going to use an m value against the body element so that will still give you a multiple of the font size that's applied to the HTML element. Which means all of the rem values will still operate in the same way as they would otherwise but your text display is gonna be at a normalized size. Now let's have a look at that, how this would work. So we will put a new font size in, let's say 1.2m for example. That's a little bit big, so we'll scale that down a little bit more. Okay, there we go 1.1 m's, that looks about right. So we've normalized that font size. But you don't wanna be having to rewrite your code every time you create a new site. So we're going to put in a little bit of a check. We're gonna put in a variable to control whether or not you're going to be adjusting that body font size. And then we're going to run a test to see if this alternative font size code needs to be included or not. And the first step to do that is to add our new variable. And we're gonna call it adjust_body_font_size. And, we'll set that to be equal to one. Because, generally speaking, you're not going to want to change anything. So, one e n will typically be the font size that you would apply to the body element. Now, instead of explicitly writing out this, m value, I'm going to draw from this variable. [BLANK_AUDIO] So we know that we want the font size, by default, to be 1m. So we're pulling in this value of 1. However we also need to add the m unit, so we're going to use a little function that's included in Stylus called unit. So I'll just type out unit. Add some brackets. And then I will place a comma and add the unit that I want to use. So that will just turn this into 1m, in the CSS that's output. Now, we'll save that and I will show you the result in code. [BLANK_AUDIO] Okay, so then that's just taken that and turned it into font size 1m. Now, if we were to adjust this variable, we would get the same effect that you just saw earlier of correcting that Open Sans Condensed font size. All right, there you go. However, if you do have a font that looks perfectly fine at its normal size, then you don't want to have this extra code output. It's not necessary. Now we're going to do a, what's called a conditional check to see whether this code is necessary. And we know that if this value is left at one, we don't need this code because the body font size is automatically going to be one em. So this is just extra. It is not required. You know, the way that I'll do that is with what's called a conditional check. So conditional check just checks on a certain condition. So I'm gonna say if, that's the conditional element of what we're writing. And I want to know if adjust font size is equal to one or not. And this is where I'm going to use something called an operator. And there all different types of logic that you can use through operators. In this case we want one that says, that means is not equal to. So we're going to use an operator that looks like this. Exclamation mark, equal. So, this first little part of the operator says not, and the second part says equal. And then I'm going to put one. So, in plain English, this whole line just means if the value of adjust_body_font_size is not equal to one, and then you can go on and provide instructions if that condition evaluates to be true. Now, if we wanted to do the opposite is equal, we would use two equal signs. But in this case we want to know that it's not equal, because we only need this line of code if adjust_body_font_size is not equal to one. Now, because we only want this line to be output. If we get our result of true from this conditional check here, we need to just tab indent it. Now I'll save that. And if we have a look at our CSS, now you can see there's no font size line that's being output. Because Stylus has seen this conditional check. And it's looked up to see whether or not one is equal to adjust_body_font_size. And because it found that it is equal it hasn't proceeded. Now let's change this variable again. Now we're changing it to 1.1. When Stylus reaches its conditional check it's gonna say if adjust_body_font_size is not equal to one, it's gonna look up here and it's gonna find this. And it's gonna see that adjust_body_font_size is not equal to one. Then it will go ahead and it will write out this code. I'll save that again. [BLANK_AUDIO] And now, you can see that that has been included. And that's a very simple introductory way to look at conditionals and operators. So again, this is the conditional. And this is the operator. And there's a lot that you can do with these things but that just gives you something you can run with and use right away. And we'll get into some more complex stuff in the following videos. And, that will begin with learning about Stylus functions. Now, Stylus functions look a lot like Stylus mix-ins. But, they're not quite the same. In the next lesson, we will learn about what a Stylus function can do that a Stylus mix-in can't. I'll see you in the next lesson.


