
 Lessons: 16Length: 2.6 hours
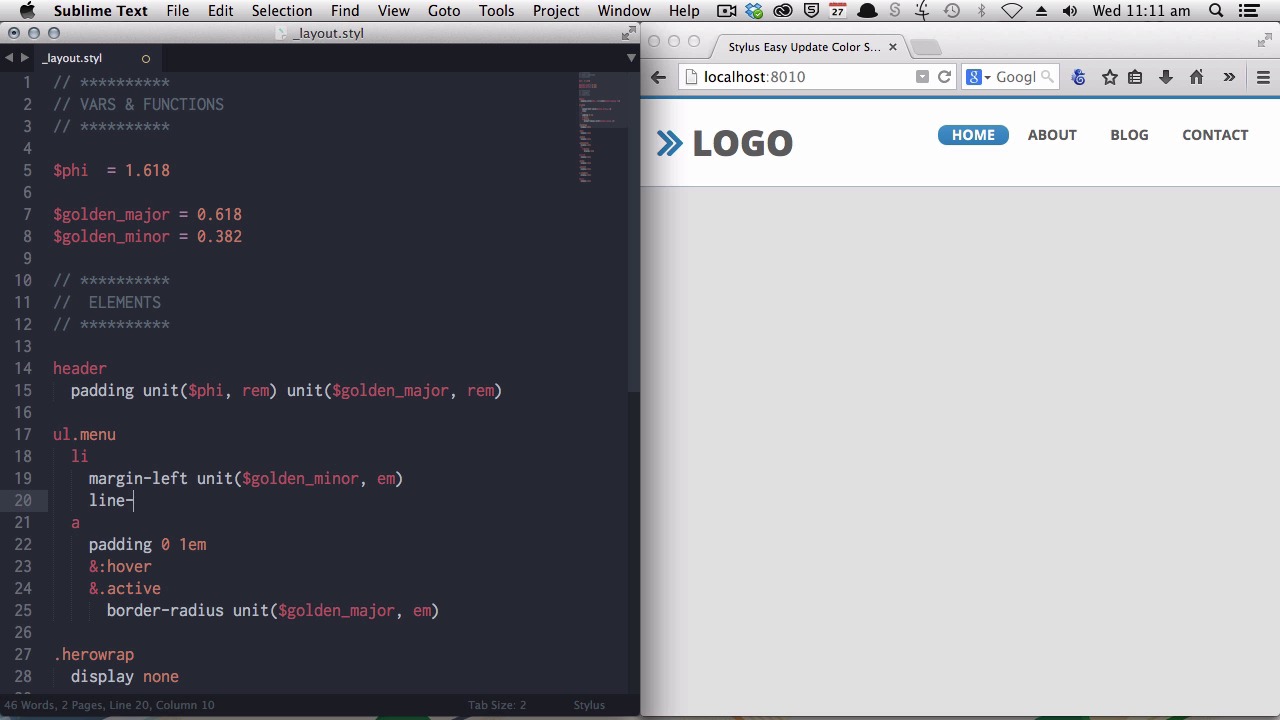
- Overview
- Transcript
6.2 Create a "Golden" Layout
The ancient Greeks discovered that a single value named the Golden Ratio had a way of repeatedly popping in things we considered visually beautiful. In this lesson you’ll learn how to easily incorporate this “divine proportion” into your layouts using Stylus variables.
1.Introduction
1.1CSS Needs a Hero01:17
2.Stylus Superhero Basic Training
2.1Quick and Easy Setup09:19
2.2Terse or Full Syntax, Your Choice05:50
2.3Faster Child and Pseudo Element Targeting via Nesting06:50
3.A Practical Intro to Stylus Variables
3.1Create an "Easy Update Color Scheme"08:02
3.2Create a "px to rem" Converter Variable14:35
4.Practical Intro to Mixins
4.1Create a "Zebra Stripe" Mixin12:45
4.2Use CSS3 Easily with Prebuilt "Nib" Mixins09:07
5.Practical Intro to Logic and Functions
5.1Adjust Base Font Size, Perhaps: Using Conditionals and Operators09:38
5.2What Functions Can Do That Mixins Can't06:16
5.3Create a "px to rem or em" Converter Function13:55
5.4Level Up Your Color Schemes With Stylus's Built-In Functions15:13
6.Stylus Superpowers
6.1Variables on the Fly: Property Lookup09:32
6.2Create a "Golden" Layout14:54
6.3Generate H-Tag Styles With a Single Line: Hashes, Iteration and Interpolation16:49
7.Conclusion
7.1Wrapping Up02:34
6.2 Create a "Golden" Layout
Hi, welcome back to Become a CSS Superhero with Stylus'. In this lesson, you will be learning to use Stylus variables and functions to incorporate something known as the golden ratio. And the number phi into your layouts. Now the number phi is a Greek number that represents a value of 1.618. And the golden ratio is a relationship between two different values. If a equals 1, this rectangle would be 1.618 wide. The golden ratio can repeat infinitely. If this square here were one by one. Then, the whole width of this rectangle would 1.618. Again, if this square were one by one. Then this length would be 1.618. If this square were one by one. Then this length would be 1.618. And so on, and so on. Another way to express that ratio is that, if the value of a was 61.8%, then the value of b would be 38.2%. Now why does this matter? It just sounds like a bunch of numbers at first. Now the reason is that ancient Greek philosophers discovered that these values would keep popping up. In nature, and in anything that we intuitively perceived as being beautiful. As an example, the Mona Lisa has been shown to use the golden ratio, to use the number phi. And we see it in the famous nautilus shell, in plants, and it has also been shown to appear in the human face. Now if you use the same principles of beauty that have shown up in art, in architecture and in nature itself in your designs. You'll find that it becomes a lot easier to create a layer that looks just right. And you will remember this layout from our earlier tutorials. This layout actually already has these golden ratios in place. Now, what we're gonna do is strip this whole layout back and rebuild it. So you can see how phi and the golden ratio are incorporated along the way. Okay, so the first part of the process is to establish our variables to work with. And one of the primary ones that you'll be using is phi. So that's just a matter of creating a variable named phi and setting it to 1.618. And we're also going to use the percentage values that I spoke about, the 61.8% and the 38.2%. Now, we're not always going to want to use those values with an actual percentage unit applied to them. So, instead of saving the variable out with the percentage unit attached. We'll turn it into just a plain number, which means we'll then be able to use it in several different ways. So, to describe the larger size of the golden ratio, we'll use a variable called golden_major. So that's for the major part of the golden ratio. And we will set that to a value of 0.618, which is basically the same thing 61.8%. For the smaller size, we will describe that as golden_minor. And we'll set that to 0.382. And again, that is basically your equivalent to 38.2%. And now, we're ready to start using these numbers in our design. [BLANK_AUDIO] Here is our original design, but I have just hidden all the elements until we come along to setting up the layout for each one. And we'll begin by adding some, we'll turn off this display, none setting and we'll add some padding into our header. And we're gonna use Stylus' unit function. And we're going to set the header to just have a padding value of phi rems. And there you go, straight away, that's in place. You, you can see that it's got quite nice padding. All around it by default. However, the logo is probably pushed in a little bit too far from the edges. We probably don't need it to come quite so far in. The top and bottom heading is just nice, but we're gonna reduce the left and right padding a little bit. So to do that, we're going to use our golden_major number. So again, using the unit function. We use golden_major, rems. And there you go, that's still a golden ratio number. That it looks just a little bit more how you would expect the layout to appear in the header. All right, now let's have a look at the menu. Actually we'll just comment this out first so you can see how the menu looks without any styling. Now first we will add in some margin and line height. [BLANK_AUDIO] And some margin to the left of each of these menu items. In this case, we only want a small gap in between the items, so we're going to use the smallest of our numbers. Which is golden_minor. And as we talked about earlier, because we want all of the design of this menu to be relative to the font size of the actual menu itself. We're gonna use ems rather than rems. Okay. That's pretty good. Now we're just going to add some padding inside the actual menu item. So that padding will be applied to the link which inside these list items. In this case, we're going to use just straight up 1em. Now, 1 is actually a golden ratio number. Because you remember that we had our rectangle where, if a was equal to 1, the whole width of the element would be equal to 1.618. So you don't always have to use these variables, just the number 1 is also a golden ratio value. So we save that. And there we go, that's starting to shape up. And now we wanna get our curved corners back on our buttons. And we'll do that down here with a border radius CSS3 mix-in from [UNKNOWN]. And once more, we will use the unit function and our golden_major variable. The only thing left is to stop those being so squishy by giving them some line height. Now we'll start by putting in a line height value of phi. [BLANK_AUDIO] But you can see, that's a little bit too small. The default line height is one ems. And we've multiplied that out by phi once, by using 1.618 ems. But it's still not quite big enough, so we wanna be able to take extra steps. We wanna be able to multiple that number by phi more than once. And to do that, we're gonna use a function, a custom function, called step. And we're just gonna paste that function in, all at once, and then show you how it's used. Okay, so here is our step function, and I'm gonna put it to use down here so you can see how it's done. And now the first parameter is start, and that is the default value that we've begun with. As I mentioned, the default line height is one. Now we're going to decide how many steps we want to apply this function to. And that means how many times do you want to have your original value multiplied. And we're gonna say two. We already tried one step, which is just using phi as 1.618, that's 1 times 1.618. We wanna go one step higher, so we'll change that to two. The number that we are going to be multiplying by, so this is our multiplier argument is phi. And then the fourth argument is the unit. In this case, we want a unit of em. Now, we'll save that and render it. And there you go. That looks much better. It looks very natural. Now we're ready to start moving through the rest of our code, and using our new variables and function. All right, so next stop is our hero section. And we're going to just add some padding to the wrapper. And we're just gonna make that one rem, top and bottom, and zero left and right. Again, one is the golden ratio value. And to the actual hero unit itself, we will sit padding of golden_major, rem. Now what you can do is you can start it just by using a single unit of golden_major, golden_minor or phi. If it's too small or too big, then you can try one of the other variables. And if that's still not right, then you can use your step function. All right, next stop, we've got our middle section with its middle items inside. And we will also use the same amount of padding from hero wrap in the middle section. Much better. Each of these middle items need some padding on the left. And we're going to use a step function here. So starting with one em, using two steps, multiplying by phi and using a rem unit. Starting to look better. Also need some padding on the right. And we'll use one rem. Now our little icons are still looking little bit weird, so we'll have to adjust those. We'll set their left position using the step function. A start value of one, two steps multiplying by phi and using an em value. So then what we're gonna do is multiply, our resulting value by, negative 0.5. So that gives us half of the amount of padding that's on the left there. All right next up is our main article section. [BLANK_AUDIO] Now it's always a good idea to use percentage-based widths for any columns, so that they remain flexible for responsiveness. This is why when we created our golden_major and golden_minor variables, we didn't attach any units to them. So that we could later use them as percentages if we want to. As well as having used them for rem and em values. Now, to convert our golden_ major and golden_minor variables to percentages, we're going to include this little percent function. It's just a simple process that will convert any number that you feed the function to a percentage value. And now, if we go ahead and set the width of the smaller column to percent golden_minor. And we then set the width of the content column, to percent golden_major. You immediately get the correct ratios and the width of each of these columns. And that still looks a little bit funny because we haven't added any padding. And we'll go ahead and do that now. Padding, step, starting point of one, two steps, multiplying by phi, using rem values. There we go, starting to look much better. And we also need some padding on the content. Padding left. And we're just gonna use the same amount that the overall area is padded by. [BLANK_AUDIO] Looking much better. So now we want to make our Read More buttons look right. I'll just put the whole lot of code in all at once for you. Save a little time. And there you go. Just like that it just looks right. And finally, just need to add a little padding to our footer, which we will set to have phi as its padding value. [BLANK_AUDIO] And there we go. So, you can see how easy that will make it to create layouts that look right. You won't have to sit there, deciding you have 25 pixels or 30 pixels as the right amount. You just work with these three variables and you'll find typically one of the three variables by themselves will be the right amount. And if not, then you just use your step function to adjust it a little bit. In the next and final lesson of the course, you'll learn how to generate h tag styles with one line of code. Using things called hashes, iteration, and interpolation. I'll see you in the final lesson.


