
 Lessons: 16Length: 2.6 hours
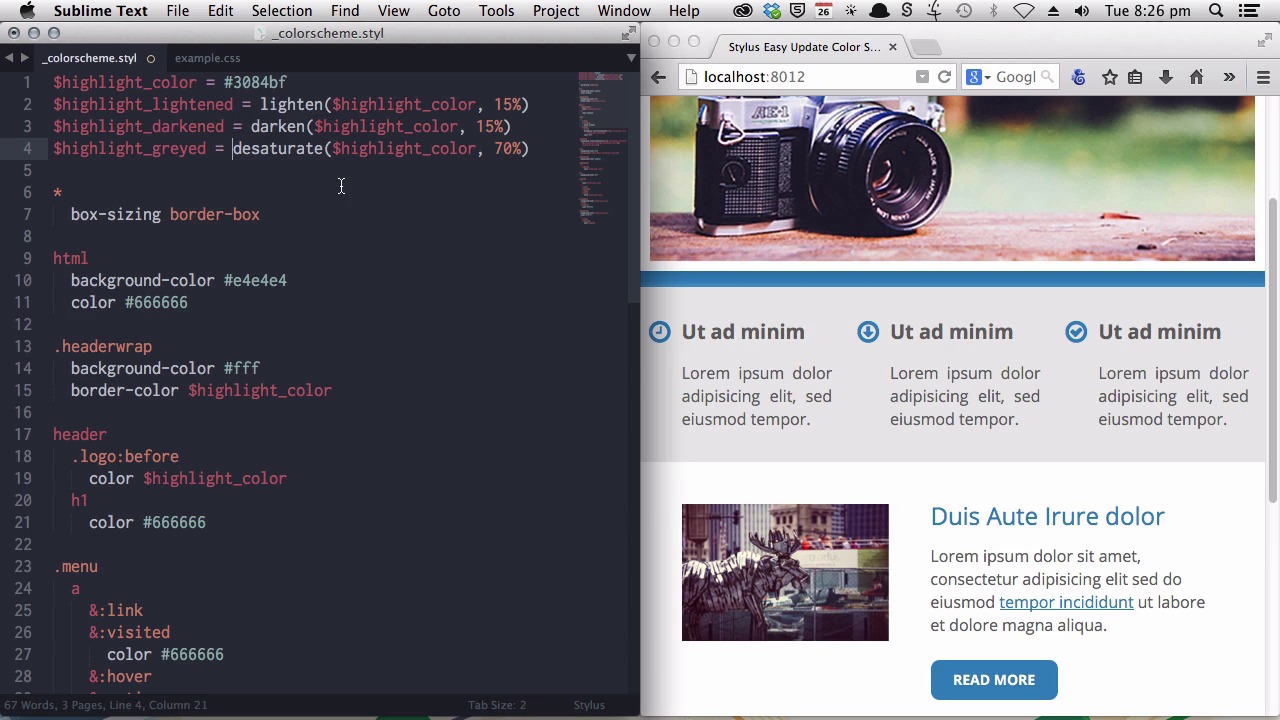
- Overview
- Transcript
5.4 Level Up Your Color Schemes With Stylus's Built-In Functions
You’ve seen how much easier life gets when you build “easy update color schemes” using Stylus variables. In this lesson you’ll learn how to make color scheme creation even easier using Stylus’s built-in color modification functions.
Related Links1.Introduction
1.1CSS Needs a Hero01:17
2.Stylus Superhero Basic Training
2.1Quick and Easy Setup09:19
2.2Terse or Full Syntax, Your Choice05:50
2.3Faster Child and Pseudo Element Targeting via Nesting06:50
3.A Practical Intro to Stylus Variables
3.1Create an "Easy Update Color Scheme"08:02
3.2Create a "px to rem" Converter Variable14:35
4.Practical Intro to Mixins
4.1Create a "Zebra Stripe" Mixin12:45
4.2Use CSS3 Easily with Prebuilt "Nib" Mixins09:07
5.Practical Intro to Logic and Functions
5.1Adjust Base Font Size, Perhaps: Using Conditionals and Operators09:38
5.2What Functions Can Do That Mixins Can't06:16
5.3Create a "px to rem or em" Converter Function13:55
5.4Level Up Your Color Schemes With Stylus's Built-In Functions15:13
6.Stylus Superpowers
6.1Variables on the Fly: Property Lookup09:32
6.2Create a "Golden" Layout14:54
6.3Generate H-Tag Styles With a Single Line: Hashes, Iteration and Interpolation16:49
7.Conclusion
7.1Wrapping Up02:34
5.4 Level Up Your Color Schemes With Stylus's Built-In Functions
Hey, welcome back to Become a CSS Superhero with Stylus. This is the last of our lessons on logic and functions, and we're gonna wrap up this section with a look at Stylus's own in-built functions. Now, you've already created an easy update color scheme utilizing Stylus variables. And you saw how much easier that makes it to update your color scheme. Now we're gonna use Stylus's in-built color manipulation functions to make it even easier again. And we already have our highlight_color variable in place from the earlier tutorial. And we are going to take these color manipulation functions to create different versions of that base color. And that will allow us to generate an entire monochromatic color scheme based off this one variable. And we're gonna place the different versions of the original highlight color throughout the design to do things like linear gradients and shadows and highlights. All right, let's begin. The first thing I wanna do is add a gradient to this little menu button here. And as I only have one version of the highlight color so far, I'm going to need a second one. I want a color that's a little bit lighter than the existing highlight color. So I'm gonna create a variable called highlight_lightened. And then, I'm going to take the original highlight color, and I'm gonna apply a function called lighten to it. So I just type out lighten, open my brackets, place in the original color. And then I'm gonna say I wanna lighten this color by 15%. Now, Stylus will actually take that original highlight color, and it will figure out what color is exactly 15% lighter than the original. And so I now have this second variable that I can use to create my linear gradient. Now I'm going to apply that down here, replacing just the flat highlight color that's already, already in there. All right, now we will change that from background-color to just straight background so we can apply a gradient. And we're gonna use the linear gradient mixin from Nib, just like we did in an earlier tutorial. So linear-gradient, and in this case, we want it to start at the bottom. The first color will be our existing highlight_color. And the second color will be our new highlight_lightened color. Let's close the brackets and recompile. And there you go. You can see now that we have a nice subtle gradient effect applied. [BLANK_AUDIO] Okay, next let's apply another gradient, only this time, we're gonna add one to this hero wrapper with the blue background here. And we're going to do it in such a way that it'll create a kind of a bevel effect. So we want a slightly darker color on one end, then the same flat blue and a slightly lighter color all the way at the bottom. And we already have our lightened version of the original blue and our regular original blue. So now we will need a third one that this time has been darkened instead of lightened. So it's the same deal again. In fact, I'm just going to copy and paste this whole line and just change this to highlight_darkened and change lighten to darken. And same thing again here with our hero wrap. We're going to use the linear gradient mixin. Now, this time, it's gonna be a little bit different in terms of the order of colors. Now, this time, we are gonna start with out highlight_lightened color. And that will be at 0%. And then we'll move on to our regular highlight_color. And we're gonna place that at 2%, so it just creates a little bit of a, a light effect as in a lighting effect at the bottom of the hero element. Then we will [BLANK_AUDIO] pick up the main highlight color all the way up at 98% again. And we will wrap up with our new highlight_darkened color. And you can see the effect that's being created. It's just subtle, but that's, generally speaking, what you want with a lighting effect, just nice and subtle. So you've got a little shadow at the top here, and a little bit of a light effect at the bottom. And to keep this consistent, we don't want this actual slide area to look flat anymore. This blue background has been given the effect of being sunk back so we want this photo to be given the the look of having been set forward in the page. And we'll do that by adding a box shadow to it. And we already have our highlight_darkened variable, so we can just go ahead and use that existing darker version of the blue for the drop shadow here. Now I'm just gonna copy and paste some code over to show you the effect. [BLANK_AUDIO] So we just have a box shadow mixin with the, the size and the blur amount of the, the shadow. And we're just using our same highlight_darkened variable. [BLANK_AUDIO] And there, you can see, again, subtle still, but you can see the shadow effect. Just let me blow this up to full screen, so you can also see around the edges we have this shadow. Next, we're gonna just add in some really subtle borders, just some very fine lines. We're going to go with a soft subtle line along the bottom of this strip here, as well as down the sides of this content area. And to do that, we're going to need one more color. And we're gonna call it highlight_greyed. [BLANK_AUDIO] To create this color, we're going to combine two different functions. We're going to apply two different functions to the same original highlight blue. Okay, so add in our equal sign. And first, we're gonna desaturate the original blue, desaturate highlight_color. And we're gonna desaturate it by 70%. Now, to desaturate basically means you're making something grayscale. And the more you desaturate it, the more to just, the more, the closer it gets just to straight black and white. The higher the saturation is, the further away from straight black and white it is. And then we're also going to lighten it a little bit, as well. So again, just use that lighten function. And then put a comma after what you've already written and add 50%. Now we're gonna use this highlight_greyed variable down on our middlewrap class. I'm just gonna add a border to the bottom. border-bottom 1 flexible pixel, solid highlight_greyed. I'm gonna save that out, and there you go. You can see it's appeared at the bottom of this middle area. And then we're gonna do the same thing down the sides of the content area. And we'll just add in both a left border and a right border using that same highlight_greyed variable. And you can now see that same color running down the sides of this space. Next, we wanna add in some hover effects. Right now, when you hover over the Read More link or just regular links, the color doesn't change. So we wanna add in something to let people know that they can interact. And we're gonna do that by creating another color variable. And this time, we'll call it highlight_hover. Now, just a quick tip. When you're creating your variable names, don't use names like red or blue or green because it kind of defeats the purpose of having a variable that you can change. If you decide that you don't want a blue color scheme anymore, you're gonna be stuck trying to make sense of a style sheet that's full of a variable called blue this or green that. Instead, try to make your variable names represent the function of the color. So in this case, we are using this variable wherever there's a hover. Now, it doesn't matter if it's pink, purple, green, red. That variable is still gonna make sense. All right, now we're going to take one of the colors that we've already created and adjust it a little bit further. In this case, we're gonna saturate it. And remember what I said earlier. This means that you're taking it further away from being just grayscale, you're filling it up with color. I'm gonna take our highlight_lightened color and we are going to saturate it by 40%. [BLANK_AUDIO] And now, we'll take that down and apply it to our readmore color. [BLANK_AUDIO] And you'll remember from an earlier video that you can target psuedo-classes in this way. And the focus, and then we'll set our background-color to our new highlight_hover. And we're also going to apply this to our regular links. So we'll have it that our default color for our normal links inside the content is just our preexisting highlight_color. But when it's hovered, you get the hover color. Okay, so now, there we go. A nice bright blue for the hover effect. And finally, just one more little tweak. Right now, we've got some fairly bright white color down in the footer here, and we wanna make that just a little bit more subdued. So we'll go ahead and create our last variable. And we're gonna call it highlight_textover, because this is the color that we will use on any text that is over our highlight_color. And again, we're gonna take one of the existing modified colors that we already created and we will lighten it. So we're lightening our highlight_hover color by 40% to give us our highlight_textover color. And now we'll replace that white with our new variable. And now, you can see that you've got a much more subtle text color for the footer. Let's have a look at this full-screen. And these are the little, little details that will help to give your designs life. Now,when this gets really cool. Yes, it's cool that you can, you can just take your existing colors and you can create different versions of them without having to, to go into a graphics application. That, by itself, is, is really cool. But what's even better is now all of these colors, all of these variations, this whole monochromatic color scheme, can be changed purely by altering this base variable. So watch this. Let's say we wanna go with red instead. Save and compile. Now, check that out. How cool is that? Let's make this full-screen. Now, everything has been adjusted. You've got gradients, you've got shadows, you've got your borders. You've got your highlight colors and your footer text color. Everything is being changed just by changing that one single variable. Now, if you can get into the habit of doing all your color schemes like this, then imagine how much time you'll save if you need to make a color scheme-wide adjustment. It's just fantastic. You can see why Stylus functions and all of these different things that we've been going through are so powerful. And they can give you access to all of these different ways of making your workflow more efficient and allowing you to create more different versions and more variations on your work. There are also some other functions that are built into Stylus, and I'll include a link to the reference where you can have a look at all the different functions that are available for you. And that wraps up our practical intro to logic and functions. In the next section, the last of the course, we're going to go into Stylus superpowers. So these are a little bit more difficult, but really not very difficult. These are the areas where you can start to get into some of the super, super special features of Stylus. Everything else has already been pretty super-powered so far. But in this last section, we're gonna tackle some really, really good stuff. So I'll see you in Stylus Superpowers.


