
 Lessons: 16Length: 2.6 hours
- Overview
- Transcript
2.3 Faster Child and Pseudo Element Targeting via Nesting
Stylus gives you a way to target child elements and pseudo elements in a flash, making for smooth and fast coding. Learn how to use Stylus ”nesting” in this lesson.
1.Introduction
1.1CSS Needs a Hero01:17
2.Stylus Superhero Basic Training
2.1Quick and Easy Setup09:19
2.2Terse or Full Syntax, Your Choice05:50
2.3Faster Child and Pseudo Element Targeting via Nesting06:50
3.A Practical Intro to Stylus Variables
3.1Create an "Easy Update Color Scheme"08:02
3.2Create a "px to rem" Converter Variable14:35
4.Practical Intro to Mixins
4.1Create a "Zebra Stripe" Mixin12:45
4.2Use CSS3 Easily with Prebuilt "Nib" Mixins09:07
5.Practical Intro to Logic and Functions
5.1Adjust Base Font Size, Perhaps: Using Conditionals and Operators09:38
5.2What Functions Can Do That Mixins Can't06:16
5.3Create a "px to rem or em" Converter Function13:55
5.4Level Up Your Color Schemes With Stylus's Built-In Functions15:13
6.Stylus Superpowers
6.1Variables on the Fly: Property Lookup09:32
6.2Create a "Golden" Layout14:54
6.3Generate H-Tag Styles With a Single Line: Hashes, Iteration and Interpolation16:49
7.Conclusion
7.1Wrapping Up02:34
2.3 Faster Child and Pseudo Element Targeting via Nesting
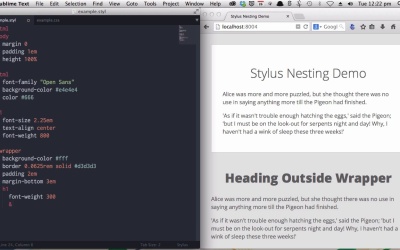
Hey, welcome back to Become a CSS Superhero with Stylus. This lesson is gonna gear you up with what we call nesting in Stylus. So in a nutshell, nesting is about tab indenting lines of code inside selectors. So you can target child or pseudo elements under those selectors. Let's run through some live examples of how this works. In this example here, you can see this white box, which is controlled by this wrapper class. And below the wrapper, we also have the same h1 line, as well as a paragraph of text. So other than the fact that the top level is wrapped by this wrapper class, these two lines are the same. It's just a heading one, paragraph, heading one, paragraph. And we're going to use nesting to target just this first heading one line here. Here is our wrapper class. Now, all I have to do is just on the, the same line, we just tab indented by one level, just write the h1 tag, yeah? Tab indent again. And then we're going to change the font weight only of the h1 element that's inside the wrapper. So just type out font-weight 300. And because we have this h1 code nested underneath the wrapper class, it will only affect the h1 element that is a child of that wrapper class. So you'll see this when we save. So there you go. Right away, the font weight of this h1 element has changed. But this one has stayed the same. To show you the CSS [BLANK_AUDIO] This is the CSS that has been created by nesting the h1 code inside the wrapper class. And whenever you want to target any child of any selector that you already have in your code, that's all you need to do. Just make sure that the code is nested underneath the selector that you want to target the child elements of. And you can also use this same technique to target pseudo elements like before or after. The way that you do this is by combining nesting with the ampersand symbol. In Stylus, the ampersand symbol will duplicate the parent selectors into the line that you use the ampersand symbol on. Let me give you an example. So, our CSS so far looks like this. We have wrapper h1 with a font-weight of 300. Now, what if we want to create a before element against wrapper h1? Here's how. Again, inside the element that you're wanting to target, which in this case is the h1 under the wrapper class, type the ampersand. Now, that will duplicate .wrapper h1 onto the resulting CSS, which you'll see in a moment. Then we type out the pseudo selector. [BLANK_AUDIO] And just to show you, let's just put color black. Now that has compiled. [BLANK_AUDIO] Okay, so there you can see that has generated the before selector on this wrapper h1. Now let's have a look at a practical example of how you might use that. All right. In this case, we are going to add some little ASCII symbols both before and after the h1 element. All right. So we are going to add also the after element. This way, this styling will apply both before and after the wrapper h1 element, and then just add in a little CSS underneath it. And this will put this little ASCII symbol code both before and after the h1 element with this margin and this color applied to both. So, we'll save and compile. [BLANK_AUDIO] And there you go. You've got these nice little red ASCII flowers. And you'll notice again that this doesn't affect the h1 element that's outside of the wrapper. And that's because we're using Stylus nesting. Here's the CSS that we've generated as a result. And you can also use this technique to create things like drop caps inside your wrapper element. Heading back to our Stylus code. Now, so you don't have to watch me typing this stuff out, just got some code I created earlier, and I will paste that straight in. [BLANK_AUDIO] Now we're targeting the paragraph tag that is a child of the wrapper element. So the paragraph tag is nested inside the wrapper element. And then again we are using some pseudo elements. So we have the ampersand symbol, and that will duplicate .wrapper p into this line. And then we have the first-of-type and first-letter pseudo selectors. And this will locate the first paragraph that is a child of the wrapper element, and then within that, it will find the first letter. It will then increase its font size and its line height. Now let's save and recompile that. [BLANK_AUDIO] And there you go. Immediately you got your nice drop cap. [BLANK_AUDIO] So that is how nesting works in Stylus. And you can nest as many times as you need to. Obviously, you don't want to go too crazy with being too specific with your nested selectors because that can slow down your CSS rendering. But when you do need to nest your CSS, this is a really, really quick and easy way to do it. All right, that's it for your Stylus superhero basic training. You've got the essential foundation that you need, and you are now ready to head on to the next level. We aree gonna start now with your practical intro to variables, and we'll get started there with creating an easy update color scheme. See you there.


