
 Lessons: 16Length: 2.6 hours
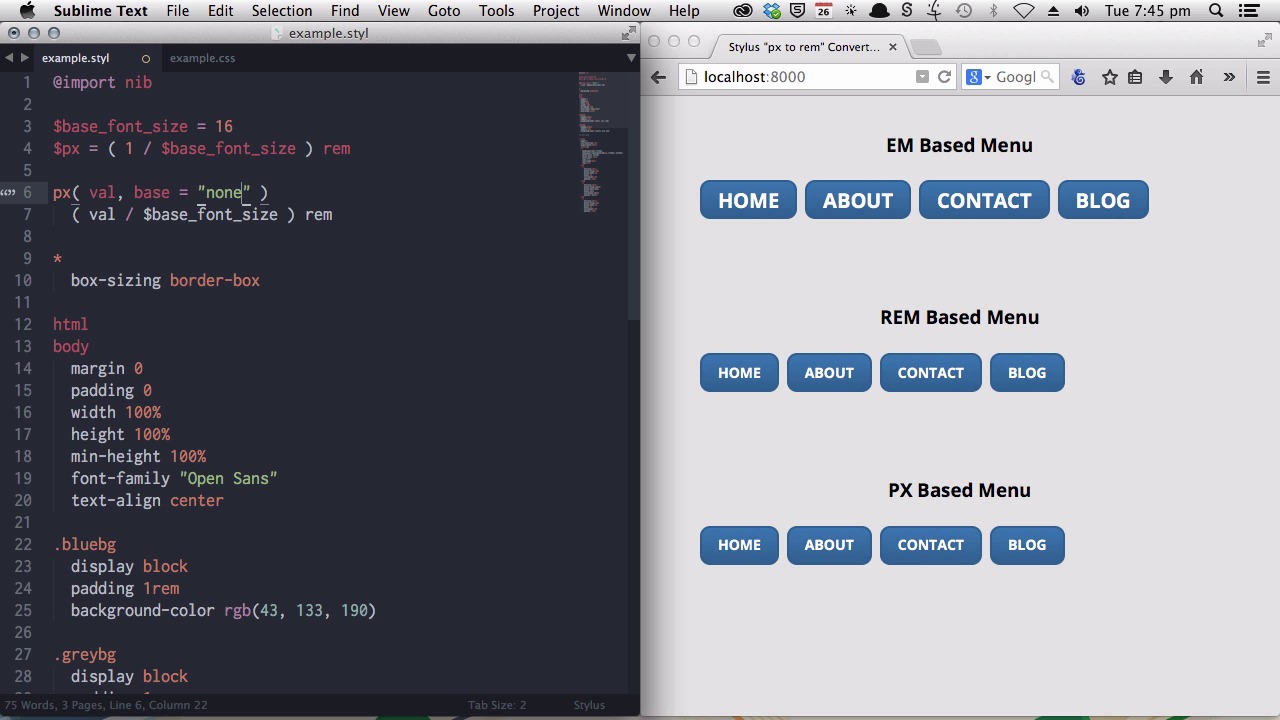
- Overview
- Transcript
5.3 Create a "px to rem or em" Converter Function
Having already created a px to rem variable, but now you’re ready to turn it up a notch. In this lesson you’ll create a px to rem or em function that is even more powerful and flexible.
1.Introduction
1.1CSS Needs a Hero01:17
2.Stylus Superhero Basic Training
2.1Quick and Easy Setup09:19
2.2Terse or Full Syntax, Your Choice05:50
2.3Faster Child and Pseudo Element Targeting via Nesting06:50
3.A Practical Intro to Stylus Variables
3.1Create an "Easy Update Color Scheme"08:02
3.2Create a "px to rem" Converter Variable14:35
4.Practical Intro to Mixins
4.1Create a "Zebra Stripe" Mixin12:45
4.2Use CSS3 Easily with Prebuilt "Nib" Mixins09:07
5.Practical Intro to Logic and Functions
5.1Adjust Base Font Size, Perhaps: Using Conditionals and Operators09:38
5.2What Functions Can Do That Mixins Can't06:16
5.3Create a "px to rem or em" Converter Function13:55
5.4Level Up Your Color Schemes With Stylus's Built-In Functions15:13
6.Stylus Superpowers
6.1Variables on the Fly: Property Lookup09:32
6.2Create a "Golden" Layout14:54
6.3Generate H-Tag Styles With a Single Line: Hashes, Iteration and Interpolation16:49
7.Conclusion
7.1Wrapping Up02:34
5.3 Create a "px to rem or em" Converter Function
Hello. Welcome back to Become a CSS SuperHero With Stylus. In this lesson, you are going to learn how to write your own functions. Now, earlier on, we created a variable that allows you to find the equivalent of any pixel value as a rem value. In this value, we're going to create a function that will do much the same thing, but it will let you output an em value, instead of a rem value if you want to. Now why would you use, need to use an em value instead of a rem value? Now, as we talked about earlier, the difference between an em value and a rem value is this, the actual size that's something measured in em's will come out as depends on the font size of the element it's applied to. Now let's have a look at the example. On the right side of the screen here, we have got three instances of a menu. Now, everything about these menu items has been designed around the styling font size of 14 pixels. So, it has a border-radius, border-width, margin, line-height, and padding. That all look good as long as the text is at that 14-pixel font size. What happens though, if the font size gets changed? Let's have a quick look. Now this will just effect this top example here. Let's watch what happens if we change the font-size and all the rest of the settings just remain the same. And now you can see that this looks a little bit wrong where only the text has changed. Nothing else has changed. So this looks a little cramped up, and it does, doesn't look right. Now, if all of our settings, our border-radius, border-width, margin, line-height, and padding, if they had been set with em values, everything would have scaled up proportionally as we increase the font-size of that specific element. So when you're doing styling that is related to an actual body of text, rather than a layout component, that's when you're gonna wanna look at using ems. And, for that reason, in that circumstance, your pixel variable is not gonna do the job. For that reason, we're gonna create a function that will still let us output our rem values when we want it, but it will also let us output em values when that's what we need instead. Now, we'll start by writing out our function, so that it will still allow us to convert pixels to rem values in the same way that we already were before, using this basic calculation. You remember from before that functions are written in the same way as mix-ins where you just, you put the name of the function and you follow it up with some brackets? In this case, it's just gonna be px because I find that it's the most intuitive when I can replace what I was writing, which might be, you know, 200 px, still using that, that px memory device so I can still put 200 px. I'm just writing it in a slightly different way. All right, now, we're going to begin by just duplicating the functionality that we already have going with our px variable. Now, you'll remember from before that this is our simple formula that you use to figure out the equivalent rem value to the starting em value. So I'll just put that under this pixel function. And now we're actually going to know, in this case, what the starting pixel value is. And we can pass that starting pixel value through to the function when we call it. So we will do that by creating this value argument. And now we can replace this value of 1 with our argument. If you remember from before to get the rem value equivalent to any pixel value, you just need to divide that initial pixel value by the base_font_size, and this function will do that for us. Now if we go down to one of our values below, we'll be able to call this pixel function to convert any of the existing fixed pixel values into rem values. All right so, let's do that with the rem-based menu here. I'm just gonna go through and knock off these little units at the end. And then,. [BLANK_AUDIO] We just add in our pixel function. Each one of these instances will call that pixel function that we just created and convert the value that we're passing as an argument into its equiv, equivalent rem value. So, let's see that work. All right, that's compiled. And we'll now see that we have rem values here, where previously we had pixel values. And now if we are to increase the base font-size, you'll see the rem menu scales up proportionally while the other menus are a little bit funky looking. Okay, now what happens though if we want em units instead of rem units for the reasons that we discussed earlier? That's still gonna be the same calculation, with the main difference being that we have ems placed on the end of the, the new figure as attuned at rather than rems. However, we need a way to let the function know that we, we want ems, and we also need a way to let the function know what the base pixel size is that we want to have our value, values calculated relative to. All right, now what we are gonna do is pass a second value through, second argument, sorry, through the function. And it's gonna be called base. I'm gonna set it to have a default value of none. And the reason that I'm doing this is when you first design your em based layout, your decisions on the right amount of curvature and the right amount of spacing are going to be dependent on that original font size that you've selected, and when you scale it up, you still actually are going to want your em values to be related to that original font size that you chose. That's how you're gonna maintain the right proportions and the right sizing. That might not make sense quite yet, but you'll see how this works as we put the new function into action. Now first, we're going to just make sure that unless we tell the function that we want ems, it outputs rem values by default. And to do that, we're going to use the conditionals that we talked about in an earlier video. Now we do that by saying if base is equal to none, which is the default setting, then return this value. As long as a second argument is not passed, this is what we'll get output. So, these callings of the functions down here, of the function will still output in the same way. So that's been recompiled and you can see everything is still the same down here. [BLANK_AUDIO] But if a second argument is passed setting that base value, we express that by writing else. So that's if this is true then do this. Or else, do whatever is on the following line. That will be the same calculation. [BLANK_AUDIO] But, we want an em value on the end. And we're no longer gonna be dividing by our base_font_size variable. Now we actually want to be dividing by whatever has been passed as a second argument. And again, that'll all make sense when you see this work. [BLANK_AUDIO] Okay, now to apply that to our Em Based Menu first I'll just reset that down to its original 14 pixels. Okay, so we'll start, I'm just gonna copy and paste all of this in because it's much the same application but the difference is we want that second value to say, 14. [BLANK_AUDIO] Now if we head over to our compiled CSS, now you can see we have em values instead. Now you didn't see any visual change. And that's good, cuz that's exactly what we want, we want the em values to look just like the rem and pixel values. But the difference with what we've done here is now if we change this font-size, let's say to 20, now we get a beautiful proportional scale across the board. And just to show you that contrast against the, the other types. And you can see with the REM Based and the PX Based Menu, you've still got that squished up look. Only the EM Based Menu is still looking just how you want it to. And finally, I just wanna show you why we do pass that original 14-pixel value as the base that we're working off with these ems, cuz that might seem a little counter-intuitive at first. If we had passed the same font-size that we were changing the actual menu to this is what we would get. You'd actually end up with the same squished up layout as you did with the other ones. So that's why you wanna start with the value that you've originally designed your, your look around. So you get that right, you set your base value, and then you just pass it through from that point on. And then if you need to change your font-size you can go ahead and do it, and everything will just scale proportionately along with it. You can actually shortcut that specifying the original value by putting a variable in line inside the style. You don't actually need to have your variables off of the top of the stylesheet. You can also do it this way. So I just say base equals 14. [BLANK_AUDIO] And then I can replace all of these second arguments with this variable. And see that will work in exactly the same way. And then that just makes it a bit more straightforward of a process. You'll come along and when you're creating your design, you'll, you'll put in the font-size that you're gonna start designing around. And then when you do that you'll create this base variable. As you go on and you add the other properties of the element, you'll just type in your pixel function, add in the pixel size for the particular property that you're defining, and then just use the space variable. And then from that point on, you'll be able to make any adjustments that you need to. And everything will stay proportional and everything will stay just how you designed it on your first pass. All right, so now you know how to write your own functions, very much like mixins but you handle your calculation or whatever other processing you need to do inside the function and then you have it spit out a value that you can place within your code. And the other thing that functions have in common with mixins is there are a whole lot of pre-written functions already available to you that you can take advantage of. And you don't even need an external library like nib to use these functions. Stylus itself has a lot of really cool functions that are built right in to it. So in the next level, we're gonna look at how you can utilize some of these functions in your stylesheets. We're gonna be taking our easy update color scheme that we started to make variable driven. And we're gonna make it even easier again to update using some of the Stylus functions that allow you to manipulate colors. I'll see you in the next video. [BLANK_AUDIO]


