
 Lessons: 16Length: 2.6 hours
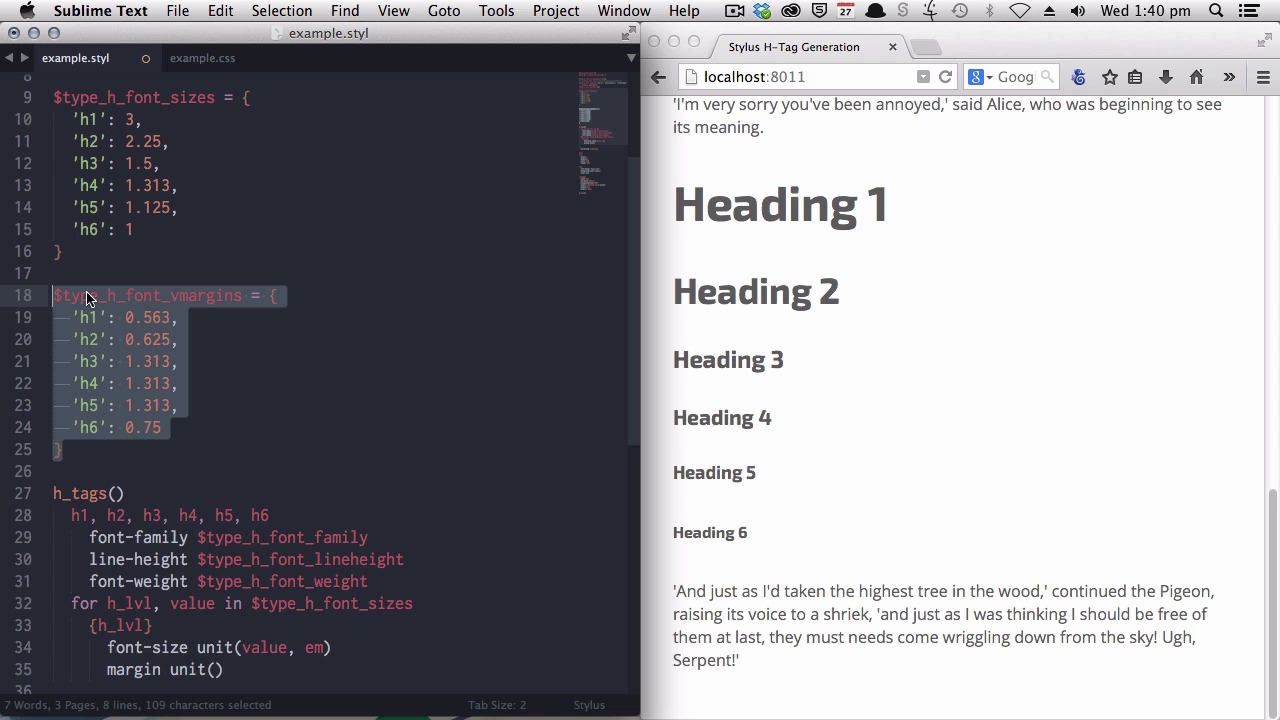
- Overview
- Transcript
6.3 Generate H-Tag Styles With a Single Line: Hashes, Iteration and Interpolation
In this lesson you’ll create a sophisticated and reusable mixin that will generate all your H-Tag styles. You’ll be able to deploy it anywhere in your stylesheet with just a single line of code, as many times as you like.
1.Introduction
1.1CSS Needs a Hero01:17
2.Stylus Superhero Basic Training
2.1Quick and Easy Setup09:19
2.2Terse or Full Syntax, Your Choice05:50
2.3Faster Child and Pseudo Element Targeting via Nesting06:50
3.A Practical Intro to Stylus Variables
3.1Create an "Easy Update Color Scheme"08:02
3.2Create a "px to rem" Converter Variable14:35
4.Practical Intro to Mixins
4.1Create a "Zebra Stripe" Mixin12:45
4.2Use CSS3 Easily with Prebuilt "Nib" Mixins09:07
5.Practical Intro to Logic and Functions
5.1Adjust Base Font Size, Perhaps: Using Conditionals and Operators09:38
5.2What Functions Can Do That Mixins Can't06:16
5.3Create a "px to rem or em" Converter Function13:55
5.4Level Up Your Color Schemes With Stylus's Built-In Functions15:13
6.Stylus Superpowers
6.1Variables on the Fly: Property Lookup09:32
6.2Create a "Golden" Layout14:54
6.3Generate H-Tag Styles With a Single Line: Hashes, Iteration and Interpolation16:49
7.Conclusion
7.1Wrapping Up02:34
6.3 Generate H-Tag Styles With a Single Line: Hashes, Iteration and Interpolation
Welcome to the final lesson of Become a CSS superhero with Stylus. In this final lesson, we're going to create a really, really powerful mixin that's going to save you a lot of time. This mixin will let you generate all of your htag code for every project that you ever create, just by using one single line of code. And normally, it takes about 25 to 35 lines of code to generate your heading tags, and that's a real pain to have to write out every time. And then if you decide you wanna change your font family, or your line height, you have to update all those styles, h1 through h6. With this technique, it becomes much easier to make adjustments. All right, we are gonna begin with a few variables. These variables will control the line height, the font family, and the font weight of your heading tags. So, we'll grab some variables that I prepared earlier. Again, just to make this a little bit faster for you to watch. All right, so we've got topography, h font, line height. Sometimes, I find it helps to put a little prefix on the beginning of your variables. That way, when you start to have a lot of variables in your pro, in your project, the ones that are prefaced with, type, you know they're topography related. Or, you can preface your colors with color, and so on. We have also have a nice font stack here, that we're gonna be using for our heading font family. Now, I've grabbed that from cssfontstack.com, by the way, which is a really good resource to, to generate font stacks. Now, we're gonna be setting our default font weight to 700. Now, to create the mixin. Now, you already know how to create a mix in, you just set up your name, and place your brackets in. Now, we want to start by setting these variables, all three, against all six of our heading levels. And, that's done very simply, by just entering the CSS that needs to be used. So, we have a comma-separated list of all of our head heading tag levels. And, then we're just growing the variables from here, and placing them in the CSS. Now, we can grab our mixin name, and just paste it into our main style area, to output our existing mixin content. Now, you can see that that immediately effect the headings on this page. They all have the consistent, front family line height and font weight. And, this is the CSS that's been ouput. Now, we want to control the actual size, and the margin, the top and bottom margin of each heading. Now, I find that the default sizing and margin of heading tags is a little bit out of whack, and we're gonna adjust that to make it have a little bit more flow. And, we're gonna stop that process with something called a hash. Now, a hash is basically just a set of information. I'll show you what they look like. This is our hash of heading font sizes. So, on the left, you have, what are called, your keys. So, these heading tags, these are your keys. And, on the right, you have the values that are set against those keys. Now, we're going to do something called iteration to go through each one of the items that are saved inside this hash, and output them against the correct heading tag. Iteration basically just means to loop through something, so we'll loop through this hash to get the right numbers out. Now, the way that we do that, inside our htag mixiin, is to use a for loop. So, we're gonna say for h level. H level will be a tag that we are gonna use to represent each one of these keys. As we loop through this hash, the, Stylus will pull out these key names, and it will save those key names against this h level, tag that we've allocated as part of our code. Then we're gonna say, get the value In our hash. So, that means, for each of these keys get the value. So, that's this, this value on the right, out of the type_h_font_sizes hash. Now, that will make a little bit more sense when you see it working. And, the next thing that we need to do is make sure that we're actually having the right heading tag output as part of our code. And, to do that, we're gonna do something called interpolation. In this case, all that's gonna do, all that, all that means is to just take the key value that is being fed through this h level tag, and pass it into our selector. And, in simple terms just means wrap it in curly brackets. So, we'll put h_lvl, now what that will do is just put h1, or h2, h3, h4, h5, h6 in our CSS. And, then we will have it output the font size that it's just grabbed out of the type h font sizes hash. And, we do that simply by using our unit variable again, and we know that it is pulling this value. So again, that's this right column out of our hash. So, we'll take that value, and we'll add an m unit to it. Okay, let's see that working. And, there you have it. You can see that, we now have a much more appropriate set of sizing for our headings. And, in our CSS, you can see that has now output all of the correct code. This has come from our interpolation. So, that's this part of the mixin. And, then we have the font size CSS, which has come from here. And, then the actual number 3, 2.25 has come out of our hash, having been passed through this value. Okay, now we can repeat that same process to get very nice vertical margins added to our headings. Again, we're gonna create a hash to represent the vertical margins that we wanna use. And, we have the same set of keys down the left column, with a new set of values. And, now all we have to do is enter our margin. We're going to use the unit function again. But, this time, it's a little bit different. Right now, the hash that we are looping through, the hash that we are iterating, is this type h font size hash. So, there's no information in this hash about our vertical margins. All our vertical margins are held in this hash. So, we need a way to look up the information out of this hash. And, that's why we have created the same keys, in both hashes. Now, what we can do is use the key, which we already have, via looping through our first hash. We can use that key to look up the values from the second hash. So, if we say, go to the type h font vmargins hash, and do some square brackets, and tell it that you want to look up the current key that you're looking at from inside the type h font sizes. And, because these match, when, when you're at the h1 stage of the font sizes hash, if you tell it to look up the matching h1 vertical margins entry in the vertical margins hash, you'll get the right number. We're gonna add a m unit to it, and we'll say, 0 margins left and right. Okay, now that is a better level of vertical margin. You can see how things work much better in the flow of text. And, to look at the generated CSS, now you can see that it has grabbed all those values out of our vertical margin hash. And, from here on, if you wanna change the font sizable of your heading tags, or if you want to adjust your vertical margins, you can just come to this hash, and make your changes there, and everything else will be updated. Now, there's one more thing that we want to add in, one of the most common things you'll find yourself doing when you're creating your responsive media queries is downsizing your heading tags. They're one of the first things that becomes too cramped as you start to be working within a smaller width. And, to make this a really easy problem to deal with, we're gonna add an argument to our mixin that will allow you to pass a multiplier. That way, if you say you want your headings to now be 80% of the original size, you would pass 0.8. Then, your font sizes and your margins would be multiplied by 0.8, making them come out at 80% of the values that you have entered under your hashes. Now, here's how we'll do it. First, we'll create the argument. And, we're gonna call it factor. Because, this is the factor we'll be multiplying by. And, we'll set it to a default of one. Now, we're going to apply that factor against our font size. Now, to do that, we're gonna create a new variable, and we're gonna call it size. And, we're gonna say that size will be equal to value, which is what we were putting straight in against our font size. But, we want it now to be multiplied by our factor. So now, instead of putting the value straight in here, we'll put our new size variable. And, by default, the factor is set to one. And that means, you're not going to see any change the first time that we save this. [BLANK_AUDIO] No change, just as we expected. But, let's see what happens if we use that same mixin under a media query passing a factor to multiply by. We'll head down the bottom of our style sheet, and we'll add in a media query. Now, this is set to kick in at 500 flexible pixels wide, as in the rem equivalent to 500 pixels. And, we're passing a value of 0.8. Now, that means that all our headings should be scaled down to 80% of their original size. As you see these get thinner, you'll see it jump down in size. There you go. Now, all of the headings have become proportionally smaller, just as we wanted. And, let's add another media query to make them smaller again, we'll say, 400, that's 65%. And, let's do one more, max width 300, at 50%. And, we'll go smaller again, and there you go. There's another level of scaling down, all the way down to our smallest size. However, there's one problem. Right now, the heading level 6 is smaller than our main text. And, that's something you're never going to want. You're always going to want your headings to be larger than your main text. Now, what we need to do there to prevent that, is make sure that even when you're scaling your headings down, they never go any lower than one m in size. And, to fix that, we're going to run a check. So, before we slot the size variable in, against our font size, we're going to make sure it's at least 1 m. If it's something lower than 1 m, we'll reset that variable to equal 1 m. If it's higher than 1 m, then it'll just go in unchanged. And, we're gonna do that with something called a ternary operator. Now, a ternary operator is a way of just short cutting your code, where you might need to write a long if, else, conditional check, a ternary operator can make things much more concise. Now, this is our ternary operator that's going to take care of the job. Now, what's happening here is between these opening brackets, you have the condition that's being tested for. So, we're multiplying value by factor. And then, we're asking is value by factor less than one? And, you see the little question mark here, so this is the question that's being asked at the start of this ternary operator. Is value times factor less than one? If the answer is yes, then we do this. So, if the answer to the question is value times factor less than one, yes, then we should say our size needs to equal one, and we set that here. If the answer to that question is no, then we say, okay, go ahead and set size to equal value times factor. Now let's see that work. [BLANK_AUDIO] And, right away, our heading level 6 has been corrected so that it's not smaller than the surrounding text anymore. You can safely deploy that heading mixin any time you need to scale down your overall text, knowing that you're not going to end up with any funny, tiny, little headings that are smaller than your, all the rest of your fonts. And, you can also take away from this lesson, that some of these elements of Stylus that might have names that seem off-putting like hashes and iteration and interpolation, they're not actually that complex when you really get down to it. A hash is just a set of information. Interpolation is just sticking something in curly brackets, so you can use it in a selector. And iteration is just going through something in a loop until you've gotten all the stuff out of it that you need. And, that brings us to the end of our final lesson in Become a CSS Superhero with Stylus. In the next video, we're gonna recap everything that you've learned, cuz it's been a lot. And, I'm gonna give you some extra tips on where you can go next with your CSS Superhero training.


