
 Lessons: 16Length: 2.6 hours
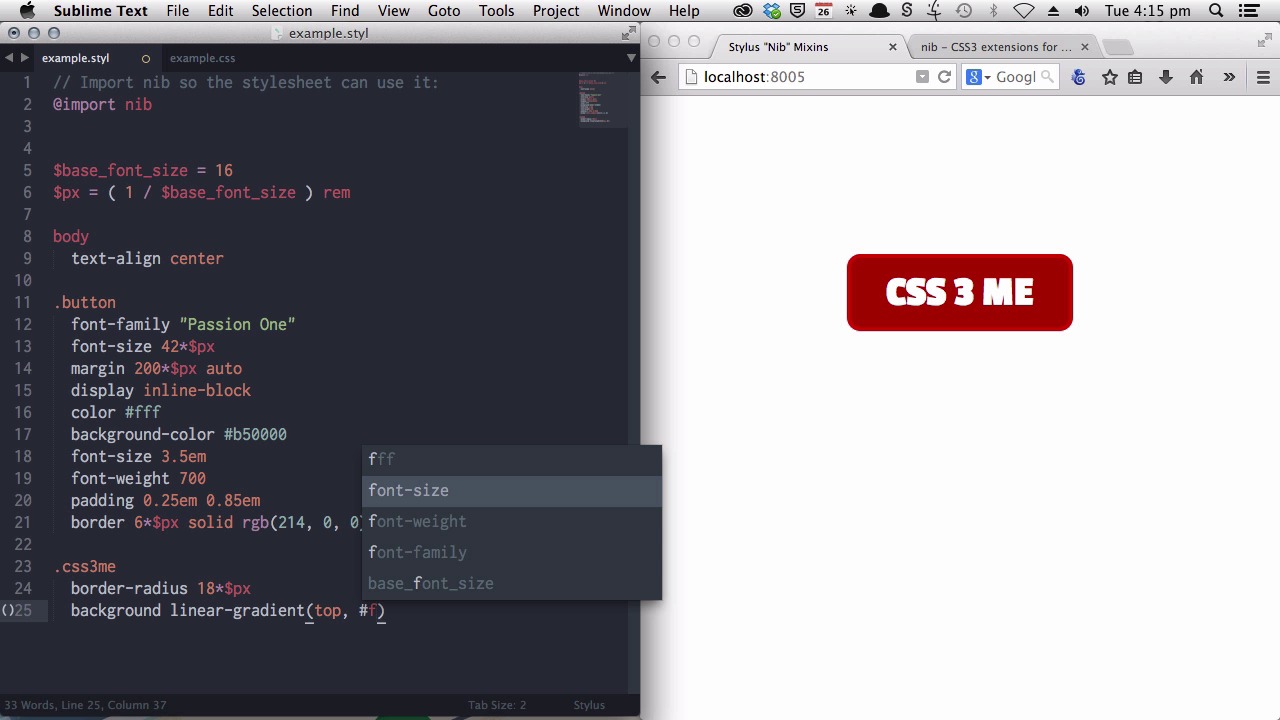
- Overview
- Transcript
4.2 Use CSS3 Easily with Prebuilt "Nib" Mixins
Employing CSS3 manually can take lines upon lines of unwieldy code, and updating it can be just as arduous. In this lesson you’ll learn how to shortcut the process using prebuilt mixins from the Nib library, so CSS3 becomes super easy.
Related Links1.Introduction
1.1CSS Needs a Hero01:17
2.Stylus Superhero Basic Training
2.1Quick and Easy Setup09:19
2.2Terse or Full Syntax, Your Choice05:50
2.3Faster Child and Pseudo Element Targeting via Nesting06:50
3.A Practical Intro to Stylus Variables
3.1Create an "Easy Update Color Scheme"08:02
3.2Create a "px to rem" Converter Variable14:35
4.Practical Intro to Mixins
4.1Create a "Zebra Stripe" Mixin12:45
4.2Use CSS3 Easily with Prebuilt "Nib" Mixins09:07
5.Practical Intro to Logic and Functions
5.1Adjust Base Font Size, Perhaps: Using Conditionals and Operators09:38
5.2What Functions Can Do That Mixins Can't06:16
5.3Create a "px to rem or em" Converter Function13:55
5.4Level Up Your Color Schemes With Stylus's Built-In Functions15:13
6.Stylus Superpowers
6.1Variables on the Fly: Property Lookup09:32
6.2Create a "Golden" Layout14:54
6.3Generate H-Tag Styles With a Single Line: Hashes, Iteration and Interpolation16:49
7.Conclusion
7.1Wrapping Up02:34
4.2 Use CSS3 Easily with Prebuilt "Nib" Mixins
Hello, welcome back to Become a CSS Superhero with Stylus. In this lesson, you're going to learn about the nib mixin library. In the previous lesson, we went through how you can create your own mix-ins to save yourself from repeating big lines of code, big blocks of code. And, how you can use a mixin's ability to. Do a little bit of intelligent processing to create all kinds of really cool effects. And I also mentioned how you are able to then share mixins that you create with other people. And one of the best mixin libraries out there is called Nib. Now this is a library of mixins created by the same people that created Stylus itself. And in this video you're gonna learn how to use them. To really, really easily incorporate CSS three into your style sheets. Now, here's a little example, this is the nib documentation page, there'll be a link to this below the video, and this is an example of what you might do with lib, with nib. Now, for example, this is a linear gradient. Instead of having to write lines and lines of vendor prefix code, you can just write this one little line of code instead. And when it's compiled, it will give you the full linear-gradient code that you need to be cross browser compatible. And we are going to. Take this basic little button. This has just got nothing but a, a red background and a border applied to it. And we are going to add some CSS 3 effects to it using nib mix ins. And because you're using Prepros to compile your styles, it's really easy for you to get going with Nib. Nib is actually shipped with Prepros, do you don't have to go and download it or do anything particularly complicated to bring it into your project. All you have to do is through the Prepros interface. Click on the style sheet that you want to use Nib in. And just check the Use Nib box. And then in your actual style sheet, you just write @import nib. And that's it. You can be in using nib mix-ins immediately. That's all you have to do. Right now, let's start with adding a border radius, you know, curved corners to this, to this button to show you how a nib works. Now to use the border radius mix-in. You just type border-radius. [BLANK_AUDIO] And then you just tell it. [BLANK_AUDIO] The radius that you want your border to be. And you'll notice that we're using our pixel to rem variable from earlier. And you'll also notice something different to the last mix in that we used. We're not actually incorporating any brackets. I could still use brackets if I wanted to and. I would get the same code at the end of the process but Stylus also supports something called transparent mix-ins which means that if I don't want to write brackets I can just use mix-in as though a regular CSS property. All right. Let's save and compile that and have a look at the result. There you go, lovely curved corners. As for the actual CSS that's output, you can see that you've got the vender prefix that's required to make this CSS 3 property cross compatible between various browsers. The properties that they used there the vender prefixes that are used there rather, will depend on how widely supported the differences of properties that you're using are from one browser to the next. Okay next up let's add a bit of a gradient to this button. All right, so I want to apply the gradient to my background. And all I need to do is type, again, linear-gradient. And in this case I am gonna use brackets so, I want the gradient to begin at the top. I want it to be a fairly bright red at the top. [BLANK_AUDIO] And I want it to go through to a darker red. All the way at the bottom. All right let's save and compile that. And there you go. Straightaway we've got a really nice, beautiful smooth, smooth gradient applied. Let's just add a couple of extra stops to that so that we've got a little bit more detail in the, in the gradient. I'll actually just copy over the completed style rather than you having to sit here and watch me type. [BLANK_AUDIO] All right, so now we've got a full multi-stop gradient. And that gives us this nice glossy effect. All right, next up, let's add some shadow. And we will start with, let's just start with a basic shadow. [BLANK_AUDIO] You see that's just given a general haze around the whole thing. And again, to look over at the CSS that we've had produced, you see it's actually outputting quite a lot. So the gradient that's being produced is has the vendor prefixes. And the formatting, correct formatting for all of these different browser platforms. And we'll keep fleshing out this shadow, that you can basically just use full shadow code formatting. Multiple shadows then, made that add an extra layer of haze around the outside. Now we will also add an insert shadow. See we've now go a little bit of of darkness around the inside there to give it some more dimension. And then just to soften that off a little, we'll add one final inset shadow. There you go, so that's got a little glow around the inside. Now that's a pretty nice looking, pretty nice looking lot of CSS 3. And that's all being useable with the neat mix-ins. And we've got quite a lot of code here and if you were gonna do all of that manually or by hand, that would take you a long time. And then, updating it would also take you a long time. And you could also. Move this along even further by creating more variables for your, to hold your colors and things like that. Like we went over in the, in the last, in one of the earlier videos. There are a lot of different mix ins that are available for you to use in Nib. These are just a few of them. Another one, for example, is a box sizing mixin that I use in pretty much every single site that I create, which is simply just using a star to select everything, and entering box sizing, border box. And then that automatically gives me the correct. Box size and code. Now you can get a full reference for all the different mixins that are available in nib at the docs page. Again, that will be in the link below this video. There's lots of lots of stuff that you can do with it. Just to quickly show you. This is a full list of the different types of CSS properties that you can use, so that's really, really handy. And that's your practical intro to mixes. You should have a pretty clear idea of how awesome they are and some of the really great things that you can do with them, but it creating your own mixins for anything that you need, or using existing mixins. And the next section is called Practical Intro to Logic and Functions. Now, this is where we really start to dig in to some of the most powerful elements of Stylus' ability to create more high level functionality. So its ability to allow you to create sophisticated functionality that you write once to make all of your CSS development from that point on quicker and easier. And we're gonna start by looking at things called conditionals and operators. And we're going to be using these to allow you to adjust the base font size, that is, the one that's applied to the HTML element, sometimes. Only if you need to. I'll see you in the video.


