
 Lessons: 16Length: 2.6 hours
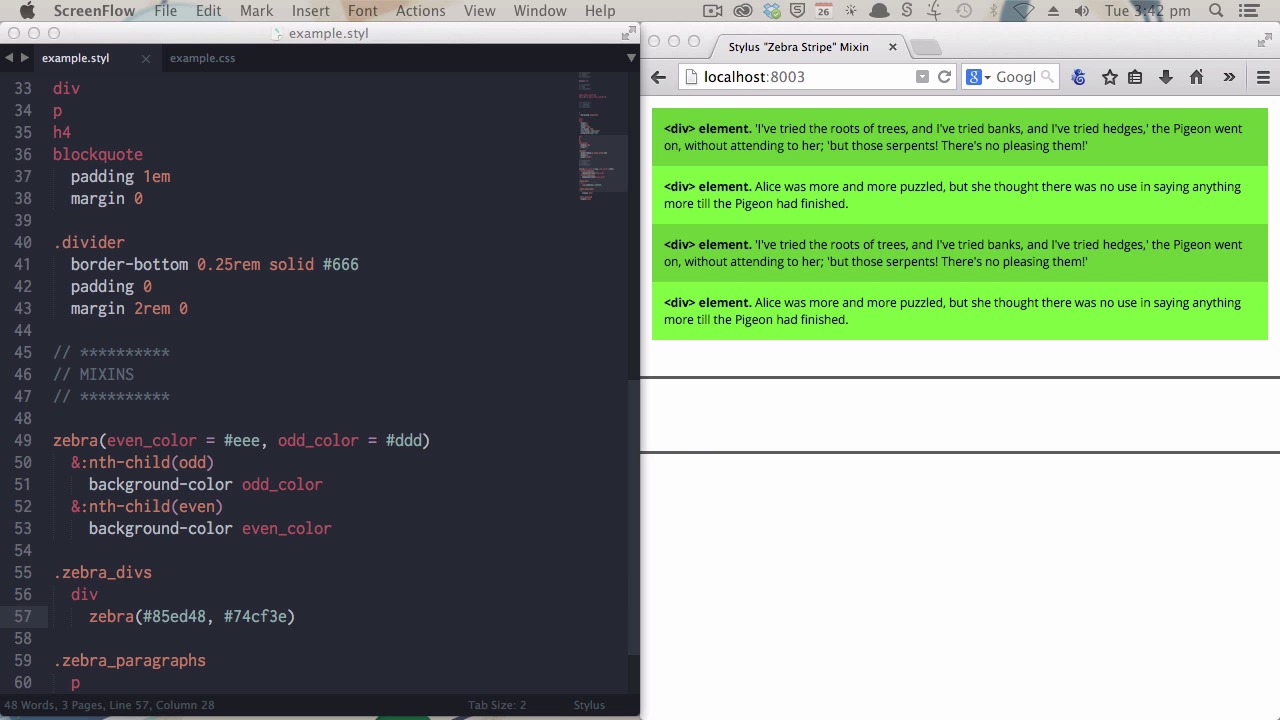
- Overview
- Transcript
4.1 Create a "Zebra Stripe" Mixin
Wouldn’t it be nice to have the ability to easily apply commonly-used styles like “Zebra Striping” when you need them, in a fast and simple way? Learn how to do just that by creating a Stylus mixin in this lesson.
1.Introduction
1.1CSS Needs a Hero01:17
2.Stylus Superhero Basic Training
2.1Quick and Easy Setup09:19
2.2Terse or Full Syntax, Your Choice05:50
2.3Faster Child and Pseudo Element Targeting via Nesting06:50
3.A Practical Intro to Stylus Variables
3.1Create an "Easy Update Color Scheme"08:02
3.2Create a "px to rem" Converter Variable14:35
4.Practical Intro to Mixins
4.1Create a "Zebra Stripe" Mixin12:45
4.2Use CSS3 Easily with Prebuilt "Nib" Mixins09:07
5.Practical Intro to Logic and Functions
5.1Adjust Base Font Size, Perhaps: Using Conditionals and Operators09:38
5.2What Functions Can Do That Mixins Can't06:16
5.3Create a "px to rem or em" Converter Function13:55
5.4Level Up Your Color Schemes With Stylus's Built-In Functions15:13
6.Stylus Superpowers
6.1Variables on the Fly: Property Lookup09:32
6.2Create a "Golden" Layout14:54
6.3Generate H-Tag Styles With a Single Line: Hashes, Iteration and Interpolation16:49
7.Conclusion
7.1Wrapping Up02:34
4.1 Create a "Zebra Stripe" Mixin
Hi, welcome back to Become a CSS Superhero with Stylus and the practical intro to mix-in section. All right, so what is a mix-in? Earlier you saw how we were able to save our color value against a variable. So that we could then just place that variable multiple times throughout our code without having to rewrite that same piece of information out again and again. Well mix-ins work in much the same way. I mean, instead of just being able to store a small snippet of information like a color code, you can store multiple lines of information, like a whole CSS clause, for example. And the other thing is, you can have information sent to the mix-in that will change the type of code that it outputs. Now, as usual, this is something that's best if you just see rather than me trying to explain it to you. Now what we're gonna do here is create a zebra striping mix-in. What you'll end up with is the ability to use one little line of code that will then make the children of any element that you use that code on zebra striped. On the right side of the screen here you are seeing four div elements and these div elements are wrapped in a parent div that uses the class, zebra_divs. And this is where we're going to start applying our new mix-in. We're just going to begin with a very simple version of the mix-in we're going to end up with. Just to show you the syntax. And you can give a mix-in any name that you want. In this case we're zebra striping so I'm calling it zebra. You just type out the word that you will be titling your mix-in with, and then follow it up with brackets. And Stylus will automatically recognize that that's a mix-in that you're writing. The syntax is the same as with writing regular classes. You just need to make sure that you tab indent. Now we're gonna begin purely by outputting a background color. And just make it obnoxiously bright so you can see the effect real easily. And this is a very basic mix-in. Anywhere that we copy this line into a code. Into a class, rather, it will output this code. We will apply it to these div elements that you see on the right. Save and compile. And there you go. Aah! Lots of red. But you get the general idea. Whatever you put here will be applied wherever you reuse this zebra mix-in. All right now, let's make this a little bit more sophisticated. We're going to add in the actual zebra part of the zebra mix-in that we're creating. That is the alternating application of the color every second child gets the same color. All right, now, we're going to do this using the ampersand symbol that we discussed in a previous video as well as some shooter selectors. All right, now. Use the ampersand to target the parent selector. And we're going to use nth-child odd, and that will tag it every odd child. So the first, third, fifth, and so on. And now that we've got this extra level of nesting in, this will need to be tabbed. One level further in, to make sure that its effected by what's going on above it and its appearance. [BLANK_AUDIO] And, then we also need, nth-child, even. And we'll stick with the garish theme, by using another nice bright color. Now if we save and compile. And you can see on the right there, you have every odd child is affected by the red color. And every even child is affected by the purple color. Those colors are pretty horrifying, so let's give it some better default colors. Now we can actually set some default values for the mix-in to use in between these brackets. So let's give it an even color. [BLANK_AUDIO] Of eee. And let's give it an odd color of ddd. Now we can use these names in place of these fixed hex codes. Even color and odd color. And again, we'll save and compile. Aah, much better. And what you can actually do, when you call this mix-in, this is your mix-in, and this is where you're calling the mix-in, you can feed it different colors. Again by putting your values in between the brackets. And that's just a matter of putting your new values in, in the same order that they appear in the original mix-in. So we've got the even color first. Let's make that, say. Actually I'll use the color picker, so I'm just gonna put in a placeholder color so that I can activate the color picker. Let's go with a green. [BLANK_AUDIO] And then comma separate, just like we have up here in the original mix-in. With a second color. [BLANK_AUDIO] And because we've passed these colors through the mix-in, these are called arguments. Because we've passed arguments through the mix-in, they will overwrite these defaults that we've set up here. So, we"ll save and compile. And now you can see, we've got our lime green zebra striping working here. [BLANK_AUDIO] Now you have this mix-in written, you can apply it to any element that you want and you can apply any colors that you want. Again, so, this is all just done with single line. So, I've also got a, a set of paragraph tags. Just reveal them. All right, so we've got paragraph tags here. Paragraph elements, also as the child of a, a div in this case named separate paragraphs. Now we will use this same mix-in, this time, it's as a child of a p tag. Now we'll apply some different colors. We'll have a red. [BLANK_AUDIO] And now, when we save and compile, you see the zebra striping apply itself to these paragraph elements. [BLANK_AUDIO] See how easy that is? Once you've written the mix-in once, you can apply it over and over again. And anytime you have a block of code that is gonna be used. You don't have to keep typing it out time and time again. Now, the only thing left to look at is, with both of these use cases, you have the same type of HTML element that you're targeting. You've got the, the div element in the first example and the paragraph element in the second example. But what happens if you have a mix of different HTML elements? Like in this example. Now here we've got a heading for tag, a p tag, a div tag and a block quote tag. So, this becomes a problem. You couldn't use the current mix-in in the same way that you've used it in these first two examples. Because it relies on being able to look at its parent. Using this ampersand symbol, so it knows what types of elements to look at. So, we're going to, just like we replaced the color codes with these arguments, we're also gonna replace this ampersand code with an argument. And we do that again in between the brackets. Then we will say, child, to represent what type of child we're gonna be targeting. And we will say equals, and we still want this ampersand to be the default choice, because then these applications will still work. So we'll just, whoops, just add the ampersand in as the default. And then all we have to do is replace these two ampersands in our mix-in. With the child argument, but because we, we, now, this would not work. This would just purely print out, child-nth-child. That wouldn't work. We need to let Stylus know that this is an argument. And the way that we do that is by wrapping the argument with curly brackets. Now it knows, because of these curly brackets, that this is an argument, and it will look up the default value from this little bit of code that we included here. Now if we save and compile, this should work in exactly the same way. [BLANK_AUDIO] There we go. Saved and compiled, nothing has changed. That means we can still use it in the way that we have here. But now in the same way that we overrode the defaults, the default colors in these uses of the mix-in, we can also override the default child. And that's what we will do here. [BLANK_AUDIO] I will still use the zebra mix-in in much the same way. [BLANK_AUDIO] I'll give it a couple of new colors. [BLANK_AUDIO] Now right now, this would not work properly. Because it doesn't know what child elements it's supposed to be targeting. So just to show you. It just made everything the same color purple because it has no way to distinguish what it's supposed to be doing. What we're, we'll add in to remedy that is a new child target. And we will enter. [BLANK_AUDIO] The descendant operator, this little greater than, now what that is going to tell the browser to do is to look up any immediate child of the zebra anything class. Now that doesn't matter. It doesn't matter if it's a h4 tag, p tag, div tag or block quote. It'll work on all of them. There you go. So now you have a fully functional zebra mix-in that you can apply to specific children only. Now you would, you would want to use this if, for example, you had something else inside your zebra divs class that you didn't want to affect. Say you wanted to have a heading above the zebra striping. And you would use it in this way, if you just wanted to have a blanket effect on all the child elements, no matter what type of element they were. The mix-ins are super, super powerful. And the other really cool thing about them is, they can be shared between the person that creates the mix-in and anybody else. And there's actually a library of pre-built mix-ins called Nib that was created by the same people that made Stylus itself. And it has a whole bunch of really cool stuff in it. One of the biggest strengths that it has, the Nib library, is its ability to make working with CSS3 really easy. And that's what you're gonna learn about in the next video.


