


- Overview
- Transcript
4.3 Targeting Individual Shapes
With your SVG embedded in the page, in this lesson you will learn how to find and target individual shapes within that SVG.
1.Introduction
1.1Introduction00:52
1.2Downloading Snap.svg07:42
2.Creating Graphics in a Snap
2.1Creating Basic Shapes09:38
2.2Complex Shapes08:16
2.3Shape Attributes05:57
2.4Grouping Shapes07:23
2.5Shape Transformations08:37
3.Animating in a Snap
3.1Animation Basics06:58
3.2Animation Callbacks04:53
3.3Easing06:26
4.Basic Interactivity
4.1Installing MAMP03:33
4.2Using an External SVG08:46
4.3Targeting Individual Shapes08:58
4.4Basic Interaction06:32
4.5Hover Events03:32
5.SVG Clock Animation
5.1Importing the Clock SVG06:08
5.2Targeting Individual Clock Shapes08:30
5.3Pulling the Current Time08:30
5.4Organizing the Code05:32
5.5Time Is Circular07:26
5.6Staying Current03:08
5.7Animating the Second Hand03:11
5.8Fixing the Second Hand Animation08:51
5.9Minutes and Hours09:43
5.10Adjusting the Hour Hand03:44
5.11Finishing Touches05:31
6.Conclusion
6.1Conclusion00:54
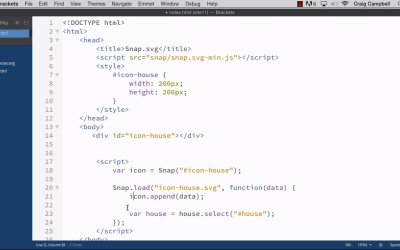
4.3 Targeting Individual Shapes
Hello, and welcome back to animating with Snap.svg. Now that we've got our external svg embedded into our page, I want to take a closer look at how this svg in particular is constructed. Now when you initially look at it, it looks like just a circle and an icon. But there's actually three separate pieces here. There's the house icon. And then the background is actually made up of two different shapes. So we have this internal background. And this ring that goes around the outside. And if we make that ring larger, which is what we're gonna do later on in our code. You'll see it separates into two separate objects. And we're gonna do that whenever we click on the object, or when we hover over it. Now if you're making your own icons in Illustrator, it's very important to pay attention to the names you give to your layers. Because those names are going to translate into that SVG file. So you'll notice that the outer ring here is on a separate layer called ring. And that ring, that name, there, is actually placed in the SVG file, which makes it a lot easier for you to target that particular shape in order to manipulate it. So the house graphic here is on a separate layer called house. And the BG, your that's inner circle here, is on a layer called BG. So if we open up our SVG file, so if we go back into Brackets, click on iconhouse.svg, you'll notice that we have a couple of groups here. That's what this G stands for, it stands for group, and a group can have any number of shapes in it. Each one of these only has one shape but our first group here's called BG and if we resize. Here, you can see Illustrator in the background and our layer for that circle is called bg. So we know that this group here contains the blue circle that makes up the background for our shape. Our second group here has an ID of house. Again that name house there, I did not put that name in this SVG file. Illustrator did that for me, because it saw that layer was named house. And so when it exported that particular shape, this shape right here. It gave it the name of the layer that it was on. And same thing for the ring that goes around the outside edge. So those three IDs there are gonna make it very easy to target these individual shapes in our code. So let's expand that back out. And then let's jump in to Finder, and let's make a copy of our site 10 folder and let's rename it to the site eleven. And then we'll grab site 11 and drag it down to Brackets. So now we've got our index file open in our site 11 folder, and we can go into Chrome. And we can navigate to site eleven. Just to remind ourselves what it looks like right now, so all we see on the stage is that icon. And let's go back into our code and let's talk about how to point to one specific item in that SVG. So in our load function, we have our callback function where we're passing in data. And that data is basically the information for the SVG itself. And so we're embedding that data or appending that data to the Snap item that we created. So we can now reference the entire icon by pointing to this house variable. So another thing we can do in order to point to a specific shape inside that house. Is we can point to house .select, and then inside parentheses and inside quotation marks, we would enter in the CSS selector that we need to point to that item or to point to a specific item. So if we wanted to point to the house icon itself, we could point to the item with an ID of house. So we're going to say #house and that should point to the house shape. Well, how do we know it's pointing to the house shape? Well we're going to have to experiment a little bit. But first of all let's store this in a variable. So we'll say var, let's call this house icon. You can call it whatever you want to. And that looks good, in fact it might make more sense to call this house and to call this up here icon. So icon equals snap icon house. And then snap.load and instead of house append will say icon.append. And that's just going to make a little more sense. Because the house icon itself, I want to give that the name of house or the shape of the house. So we're gonna say var house = icon.select. And hopefully that naming convention will make it a little easier to understand what's what. So now we're selecting the house layer inside our icon. And in order to tell whether or not we've selected it properly, we can just try to give it a new color. So let's say house.attr, and then we'll put our parentheses and our curly brackets, and we'll say fill, colon, space and then red inside quotation marks. Let's see if that works. Let's save our file, jump back into our browser and refresh, and we see that it didn't work. Now let's right click on that. Inspect element. And this is gonna be a big key to understanding why that didn't work. So you'll see that our group element with an ID of house, looks like it does have a fill attribute with the hexadecimal value for red applied to it. So for all intents and purposes it should be working. The problem is, anytime we have CSS in our SVG, Are pointing to objects within our SVG. We won't be able to override that style, so you'll notice that we have a style here called ST one, and the fill is set to white or FF six times whatever. So our CSS is setting the fill color to white. So when we come down here and try to override it. It's not gonna work, but you'll notice. If I were to jump in here using the web developer tools in Chrome, and get rid of that and hit Enter, you'll notice that our house is now red. So we can change the color of the house using our Java Script code, we just can't do it if it's already been set using CSS. So one way we can fix that, is we can go back into our code, and before we do that I want to take a look at this. Let's reload this page so that we can see those CSS colors again. So this 2f62ad, that's the shade of blue we have here. So if we want to keep that shade of blue, we can highlight that code and copy it. And then we can give our background that same shade. So we're pointing to house here. Let's go ahead and create a variable for our background. And we'll set equal to icon.select. And then inside quotation marks we'll say #bg. So then we can say bg.attr. And we can set our fill color to that same value. So I'll just paste that value there. And that should do it for us. And the reason I did that first, is because we're about to get rid of this color inside the SVG itself. So let's save our HTML file. Jump into our SVG file. And here near the top, we see our styles. I'm just gonna get rid of all of those styles, which is basically gonna turn everything black. So we're gonna delete that for now. Save it. Jump back into our browser and refresh. And now we can see that our background is by default, black. But we've applied different colors to the house icon and to the background. Now the ring around the edge hasn't been altered in our JavaScript code so it's staying black. But if we were to come in here to our index.html file And comment out these two attribute lines here. Save that, refresh our page, you'll see that everything is black. We can't tell one item from another. But again if we come back in here, we can set up those attributes, and we can set our fill color for the house to white, and then we can create another line here, and I'm just going to copy this and paste it. And this will be for the ring around the outside so call this one ring will change BG to ring. And they were going to select the pound ring ID. That's in that file. And then we'll give it that same blue fill colors will save that. Go back to our page and refresh it. And that didn't work. Let's try that again. We need to point to ring.attr. Let's try that again, save and refresh. And there we go. We're back to where we started but now that we've applied those colors using JavaScript, we can change those colors later if we want to. But if we have those colors in CSS, we're not gonna be able to alter them. Anyways that's how you can target individual items within your external SVG file, using Snap.svg. Thank you for watching and I'll see you in the next lesson.


