


- Overview
- Transcript
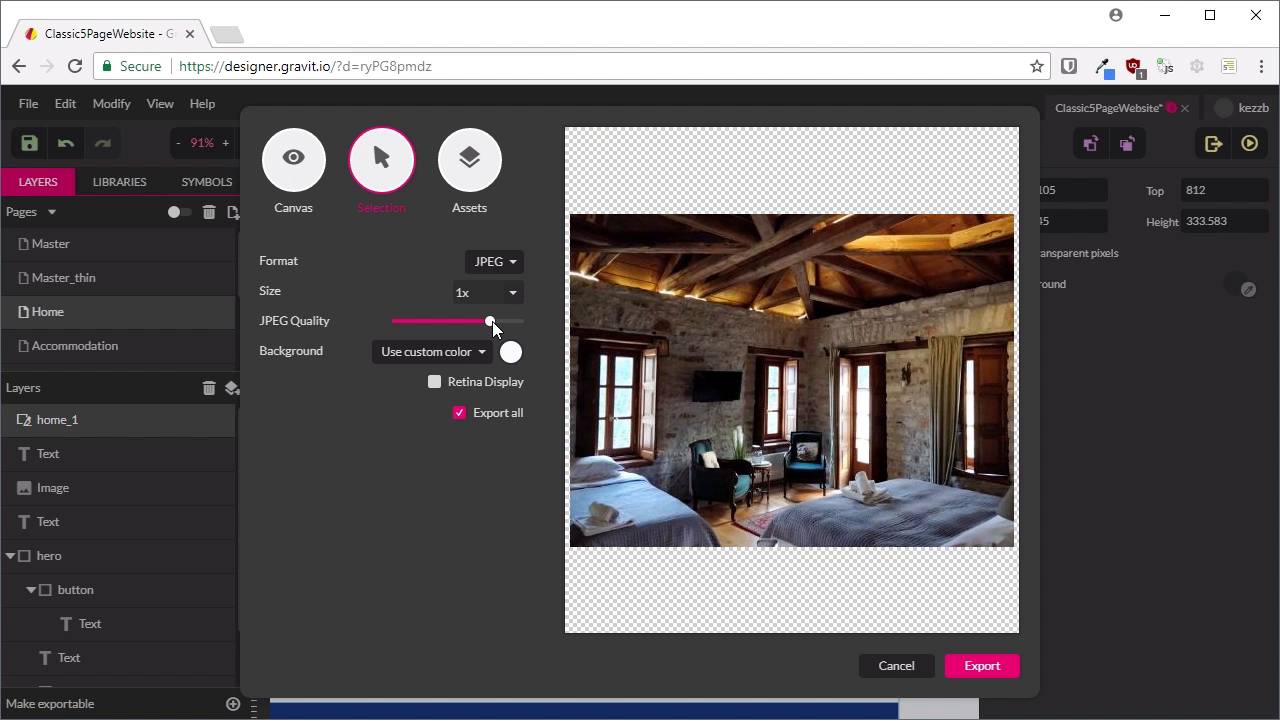
2.9 Export Images
We’ve placed a few images in our design, so before we can move on to coding, we’ll need to export them ready for use.
1.Introduction
1.1Welcome to the Course00:43
2.The Design Phase
2.1Design the Master Layout19:04
2.2Master Layout: Thin Width08:59
2.3Design the Home Page12:54
2.4Home Page: Thin Width05:03
2.5Design the “Accommodation” Page05:31
2.6Design the “Rates” Page03:41
2.7Design the “Guest Comments” Page03:33
2.8Design the Contact Page04:59
2.9Export Images03:43
3.The Coding Phase
3.1Code Up the Master Layout24:37
3.2Code the Home Page16:05
3.3Code the “Accommodation” Page04:50
3.4Code the “Rates” Page02:33
3.5Code the “Guest Comments” Page04:28
3.6Code the Contact Page06:39
4.Conclusion
4.1Wrapping Up04:35
2.9 Export Images
Hey, and welcome back to Build a Classic Five Page Website. We've totally finished our whole design slash mock up stage, and we're almost ready to code. The only thing we need to do is get all of our images exported from our design. So specifically talking about our photos. Before you go ahead and export from Gravit, you're gonna need to set up a folder to export into. So I've created a folder called OurBnB. And then inside that I'm also going to need a folder named images. And that images folder is where you want to export each one of your images into. So the way to export an image in Gravit, just gonna scroll in. There's a couple of ways you can do it, but for our purposes, we're gonna use the Slice tool. So if you hit this little drop down here, you can choose the Slice tool and then we can draw out a slice that is the exact same height and width as the image that you wanna export. That has come out as a decimal, but don't worry about that. That decimal's just gonna get rounded off when the export happens. And now you can provide a name for this slice, and then that will determine the name of the image that gets exported. So I'm gonna double-click that to rename it. And we're just gonna give this the name home_1. Now making sure that the slice is selected, so you'll see that on the right hand side this display will change if it's not selected. Yeah, it is selected so that's good to go. Then you can hit this little button here, Export. Then you wanna choose Selection, and that's gonna give you the export for the slice that you have selected. Then you wanna change this to JPEG, and then you wanna drag the slider down. You're gonna see the quality degrade in this preview here. Basically what you wanna do is get this slider down as low as you can without making the photo look terrible. But as a rule of thumb, the smaller you can get your images, the better performance is gonna be, and that's always a good thing. So once you're happy with the JPEG quality, hit Export. You're wanna browse into that images folder that you just created. And the only thing that you wanna change here is, the file extension by default is .jpeg, but that's not normally the extension that JPEGs will use. Oddly enough normally it's just jpg, so I'd prefer to change that to .jpg. And then you can go ahead, save that out, and then you just need to do the same process for all the other images. Now, with the hero image, you gonna need to make sure that you hide the text here and the button before you export your slice. I won't go through and show you exporting this here image because it's the exact same process that we just went through with the image below. So to give you a checklist of images that you will need to export, you've got these two on the homepage, you have these two on the Accommodation page, and these two on the Rates page. In the end, you should have a total of six JPEG images in the images folder of the folder that you just set up for your site. And then, that's it. We're ready to start coding, and that's what we're going to be doing in the next section of the course. And we're gonna be going through basically the same process with our coding that we did with our mockup. The first thing that we're gonna do is, code up this master section, so we're gonna create this header and this footer. We're going to set up our navigation menu both in its wide and narrow form. And once we've got that master file, we'll use that every time we want to create one of our five HTML pages that will actually go live on the site. So we're gonna get started and code up that master layout in the next lesson. I'll see you there.


