

- Overview
- Transcript
2.4 What is CSS?
In this lesson, I'll give you a quick intro to CSS (Cascading Style Sheets).
1.Introduction
1.1So, You Wanna Be a Web Designer?01:15
2.Web Design Fundamentals
2.1What is Web Design?04:03
2.2A Brief History of the World Wide Web03:32
2.3What is HTML?14:10
2.4What is CSS?14:17
2.5Tools of the Trade06:30
3.The Design Stage
3.1Always Plan Ahead04:23
3.2Create Some Sketches10:42
3.3Introduction to Photoshop09:30
3.4Photoshop Design: Homepage Header12:01
3.5Photoshop Design: Portfolio Area (Part 1)11:04
3.6Photoshop Design: Portfolio Area (Part 2)07:21
3.7Photoshop Design: The Portfolio and About Pages07:45
3.8Slicing the Images05:09
4.The HTML Stage
4.1HTML: Homepage (Part 1)08:11
4.2HTML: Homepage (Part 2), Portfolio and About Page09:46
5.The CSS Stage
5.1CSS: Reset CSS and Typography Rules12:41
5.2CSS: General Positioning09:01
5.3CSS: Page Headers10:20
5.4CSS: Final Touches10:34
6.Conclusion
6.1What You've Learned01:30
2.4 What is CSS?
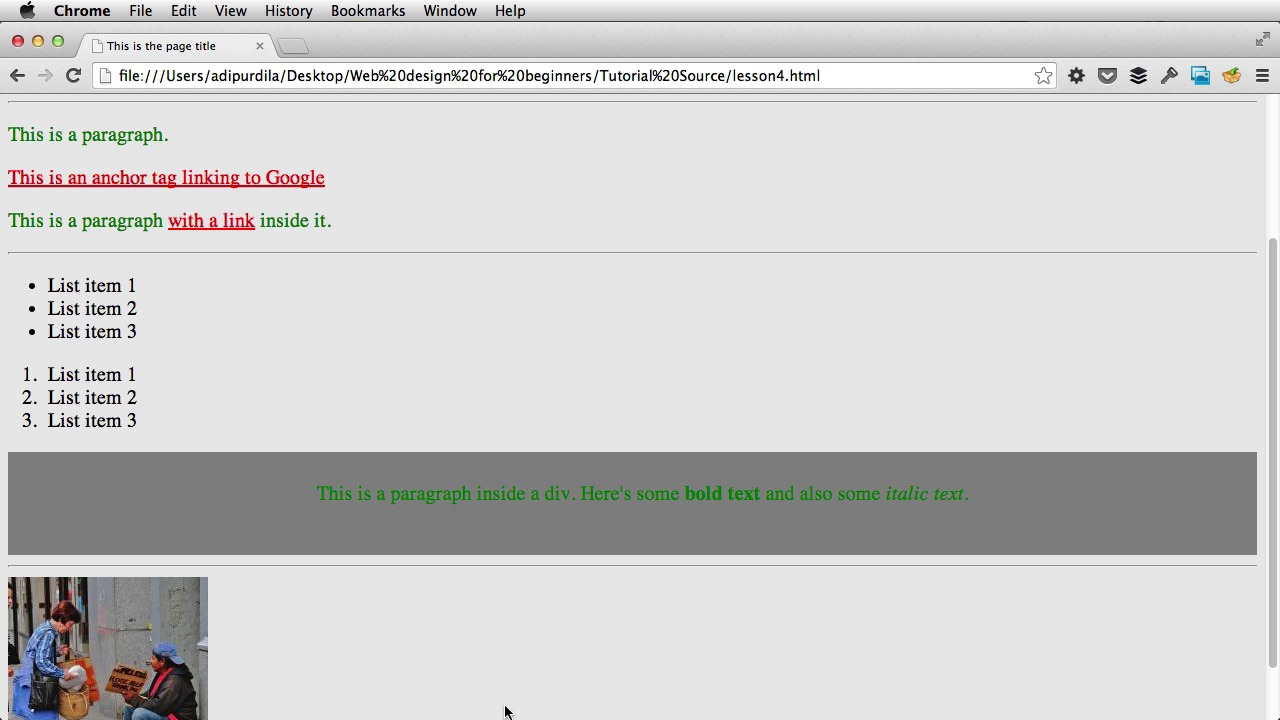
In the previous lesson I showed you the very basics of HTML. But HTML only gives structure to your webpage. Think of it like the chassis of a car. That's the frame. It's the skeleton which supports everything else. Well, the CSS would be the rest of the stuff that's being added on that chassis, stuff that gives the car its final look. So, the windshield, the hood, the doors the headlights, the paint and so on. So, in a webpage, the CSS is responsible for how that page looks like. For example, what fonts it's using, text size, text color, width and heights for different elements, positioning for those elements, all of these are controlled via CSS. And that brings me to what CSS means. It stands for Cascading Style Sheets. So, let me show you how to use them. In the HTML document you need to go in the head section, of your document, so right here, and do the style tag. So style, style. All right, now everything you write within this tag is considered CSS, and will be applied to elements on this page. So you use CSS by first having a selector, that selector is the means by which you target different elements on the page. So you would have selector, and then in curly brackets, you'll have the declaration. More specifically you're gonna have a property for that selector, followed by a value. So this is a standard Syntax for CSS. I'm gonna keep this here for now just so we can compare. I'm gonna start with the selector. In my case it will be the body element. So, all of my page. And then I'm gonna start with a property. In my case, I'm just gonna target the background color, and then the value. So, I'm gonna change it to a light gray, by giving it the hex code, eaeaea. You can also give it one of the recognized colors. By CSS for example red, or green, or blue, or black, or yellow. All of these are recognized. So, you don't have to write the hex code each time. But, I'm just gonna keep with this light gray. So now, I'm just gonna delete this since it's not exactly valid. I'm gonna refresh the page. And now the background color of my page has changed. If you write blue in here. It's gonna become blue. All right. Next, why don't we change the font size. Maybe I want the text, to be a bit bigger. So I'm gonna do font size, and just a quick a quick note here, if you're using a modern. Code editor, you're gonna have this code completion. So if I write font-, it's gonna give me a few options to choose from, and this is a great way to learn the language, so font-size 20 pixels. Pixels is the measurement unit, 20 is the value. Save. Refresh, and now I have a bigger font size. Great. So let's target something else. Let's target the paragraphs. Again, selector, followed by property and value. Let's change the color, the text color of all paragraphs to green. So, I'm gonna say color. Green. Save and refresh. And now everything that is a paragraph, has its text color changed to green. The exception is this, the link, which has a different color by default. But, that can be changed as well. For example. Okay, target the anchor tags and say color, red. Refresh and now all of my links are red. Great, what else? Let's target the div. We have a single div in our HTML, right here. So we're gonna target this, and we're gonna do some changes. So first of all, let's change this background color to something darker, like dark grey. Okay, there it is. Why don't we align the text in the center? For that, text-align center. Refresh, and now the text is aligned in the center. We can also align it to left or right. All right, now I wanna talk to you about a property called padding. And I'm gonna show you exactly how how to use it. So, we have this gray box over here. But notice, there isn't enough breathing room around the text especially. At the top and at the bottom. So the way to fix that is to add padding to the parent div, and the parent div meaning the div that holds that, this paragraph. So in this case, this right here is called a child, and this is called a parent. I can do something like this padding followed by a value for example 20 pixels, and that will add 20 pixels of padding on the top, on the bottom, on the left and on the right. You can also add different values for each of the four directions. For example, you can have a specific padding on the top. A different one on the right. Another one on the bottom. And another one on the left. And the way to do that. Is by using the following structure. So padding, first you would do top, right, bottom, and left. So you're going clockwise. Yeah, top, right, bottom, left. And then top again. So using the structure, you can do something like this, 10 pixels on the top, 20 on the right, maybe 30 on the bottom, and 40 on the left, refresh. And you get some different results. And now if I right-click this element and I choose inspect element. Let me just click here so you can almost see it. [BLANK_AUDIO] It's gonna up a window. [BLANK_AUDIO] And if you go to computed on the right here, it's gonna give you the exact padding. Yeah? So this, this box that is highlighted with blue. Is the actual paragraph, and this is the outer box. And notice the padding that I just set 10, 20,30, and 40. Okay, so that's how you use padding. Now coupled with padding, there's another property that's called margin. And the margin property defines the distance between, an element and its neighbors. Right? Its siblings to be more specific. And let's, let me give you an example. UL and OL are siblings, because they have the same parent. Which is the body element. Same goes for the hr and the paragraph. In fact, all of the, these elements that I just selected, are siblings because they share the same parent, the body element. Just like these three elements are siblings with one another, because they have the UL as their column parent. So, to show you how margin works, I'm gonna target this. Image right here and let's say I wanna move that image to the right by about, I don't know, 200 pixels. So, I'm gonna target the image, and I'm gonna say margin. Left 200 pixels. Save. Refresh and now the image is moved. And this also works for all the other directions. So, if I leave margin to 200 pixels, it's the same as saying. Set the margin to 200 pixels on all four directions. Top, bottom, left, right. So now if I refresh, you'll notice the image is pushed down by 200 pixels. It's pushed to the left to the right, sorry, by 200 pixels. Any element that will be below the image would be pushed down, by 200 pixels. And any element that would have been on the right side of the image, would have been pushed to the right by 200 pixels. And again if I right-click and select inspect element, you'll notice. On the right side here, there is the margin that's on, that's displayed with the orange color. All of that space cannot be occupied by another element. Now, I wanna talk to you about selecting children. So for example I have this div here. That has a paragraph as its child. Well, what if you wanna select this paragraph and style it? You can do that very simply by saying div, followed by an additional selector. And that means, and you read this from right to left. It means select the paragraph from the div. So I'm just gonna say color set to white, refresh, and now only that paragraph will be set to white. The rest remain set to green, and you can go even further. For if you wanna select the strong text, the bold text within this paragraph, you would do this. Strong, and that will only make the bold text white. So again you read from right to left. Select the strong element from the paragraph from the div. All right, so I'm just delete this. So finally, I wanna talk to you about classes and IDs. You can call them attributes, that you can apply to an HTML tag. For example, I have this div here, and I can do class, let's call it demo. And I'm gonna create another div, and I'm gonna give it an ID of test. This is a test. All right. Now, these two are mainly used for styling purposes. In CSS, you can target this demo value, and this test value. And using the same Syntax you can apply different properties and values to them. But the main difference between these two, is that you will apply a class to elements that are repeating themselves. And you would apply an ID, to elements which only occur once in your page. For example, if you have a couple of paragraphs that you wanna look the same. You would give each one of those paragraphs the same class. If you only have one paragraph, which you want to make different, then you would give it an ID, and style that accordingly. All right, so quickly, in CSS, let's first target this div, with a class of demo. And the way to do that is CSS is with the .character followed by the class name. So .demo will target the element with the class of demo. So let's change the background color to red for example. [BLANK_AUDIO] And there it is, and if you wanna select an element with an ID. You would do hashtag, followed by the name of the ID. In my case, I'm gonna add some padding, about 5 pixels. Or, let's also do a background color of blue. So we can distinguish the two. And that's it. Really, really simple. So again dot followed by the class name. Hash followed by the ID name. And that's basically how you use CSS. You target the elements you want to style using a selector. Then write the property you wanna change, followed by the new value. And I'll talk more about CSS in the exercise part. Now, every successful web designer has certain tools he uses, and these tools will make his job much easier. In the next lesson, I'll show you some of these tools. So stay tuned.


